Iptables Tutorial 1.1.19
Oskar Andreasson
blueflux@koffein.net
Copyright © 2001-2003 by Oskar Andreasson
Permission is granted to copy, distribute and/or modify this document under the terms of the GNU Free Documentation License, Version 1.1; with the Invariant Sections being "Introduction" and all sub-sections, with the Front-Cover Texts being "Original Author: Oskar Andreasson", and with no Back-Cover Texts. A copy of the license is included in the section entitled "GNU Free Documentation License".
All scripts in this tutorial are covered by the GNU General Public License. The scripts are free source; you can redistribute them and/or modify them under the terms of the GNU General Public License as published by the Free Software Foundation, version 2 of the License.
These scripts are distributed in the hope that they will be useful, but WITHOUT ANY WARRANTY; without even the implied warranty of MERCHANTABILITY or FITNESS FOR A PARTICULAR PURPOSE. See the GNU General Public License for more details.
You should have received a copy of the GNU General Public License within this tutorial, under the section entitled "GNU General Public License"; if not, write to the Free Software Foundation, Inc., 59 Temple Place, Suite 330, Boston, MA 02111-1307 USA
Dedications
First of all I would like to dedicate this document to my wonderful girlfriend Ninel. She has supported me more than I ever can support her to any degree. I wish I could make you just as happy as you make me.
Second of all, I would like to dedicate this work to all of the incredibly hard working Linux developers and maintainers. It is people like those who make this wonderful operating system possible.
- Table of Contents
- About the author
- How to read
- Prerequisites
- Conventions used in this document
- 1. Introduction
- 2. Preparations
- 2.1. Where to get iptables
- 2.2. Kernel setup
- 2.3. User-land setup
- 3. Traversing of tables and chains
- 3.1. General
- 3.2. mangle table
- 3.3. nat table
- 3.4. Filter table
- 4. The state machine
- 4.1. Introduction
- 4.2. The conntrack entries
- 4.3. User-land states
- 4.4. TCP connections
- 4.5. UDP connections
- 4.6. ICMP connections
- 4.7. Default connections
- 4.8. Complex protocols and connection tracking
- 5. Saving and restoring large rule-sets
- 5.1. Speed considerations
- 5.2. Drawbacks with restore
- 5.3. iptables-save
- 5.4. iptables-restore
- 6. How a rule is built
- 6.1. Basics
- 6.2. Tables
- 6.3. Commands
- 6.4. Matches
- 6.4.1. Generic matches
- 6.4.2. Implicit matches
- 6.4.3. Explicit matches
- 6.4.4. Unclean match
- 6.5. Targets/Jumps
- 6.5.1. ACCEPT target
- 6.5.2. DNAT target
- 6.5.3. DROP target
- 6.5.4. LOG target
- 6.5.5. MARK target
- 6.5.6. MASQUERADE target
- 6.5.7. MIRROR target
- 6.5.8. QUEUE target
- 6.5.9. REDIRECT target
- 6.5.10. REJECT target
- 6.5.11. RETURN target
- 6.5.12. SNAT target
- 6.5.13. TOS target
- 6.5.14. TTL target
- 6.5.15. ULOG target
- 7. rc.firewall file
- 7.1. example rc.firewall
- 7.2. explanation of rc.firewall
- 7.2.1. Configuration options
- 7.2.2. Initial loading of extra modules
- 7.2.3. proc set up
- 7.2.4. Displacement of rules to different chains
- 7.2.5. Setting up default policies
- 7.2.6. Setting up user specified chains in the filter table
- 7.2.7. INPUT chain
- 7.2.8. FORWARD chain
- 7.2.9. OUTPUT chain
- 7.2.10. PREROUTING chain of the nat table
- 7.2.11. Starting SNAT and the POSTROUTING chain
- 8. Example scripts
- 8.1. rc.firewall.txt script structure
- 8.1.1. The structure
- 8.2. rc.firewall.txt
- 8.3. rc.DMZ.firewall.txt
- 8.4. rc.DHCP.firewall.txt
- 8.5. rc.UTIN.firewall.txt
- 8.6. rc.test-iptables.txt
- 8.7. rc.flush-iptables.txt
- 8.8. Limit-match.txt
- 8.9. Pid-owner.txt
- 8.10. Sid-owner.txt
- 8.11. Ttl-inc.txt
- 8.12. Iptables-save ruleset
- A. Detailed explanations of special commands
- B. Common problems and questions
- B.1. Problems loading modules
- B.2. State NEW packets but no SYN bit set
- B.3. SYN/ACK and NEW packets
- B.4. Internet Service Providers who use assigned IP addresses
- B.5. Letting DHCP requests through iptables
- B.6. mIRC DCC problems
- C. ICMP types
- D. Other resources and links
- E. Acknowledgments
- F. History
- G. GNU Free Documentation License
- 0. PREAMBLE
- 1. APPLICABILITY AND DEFINITIONS
- 2. VERBATIM COPYING
- 3. COPYING IN QUANTITY
- 4. MODIFICATIONS
- 5. COMBINING DOCUMENTS
- 6. COLLECTIONS OF DOCUMENTS
- 7. AGGREGATION WITH INDEPENDENT WORKS
- 8. TRANSLATION
- 9. TERMINATION
- 10. FUTURE REVISIONS OF THIS LICENSE
- How to use this License for your documents
- H. GNU General Public License
- I. Example scripts code-base
- List of Tables
- 3-1. Destination local host (our own machine)
- 3-2. Source local host (our own machine)
- 3-3. Forwarded packets
- 4-1. User-land states
- 4-2. Internal states
- 6-1. Tables
- 6-2. Commands
- 6-3. Options
- 6-4. Generic matches
- 6-5. TCP matches
- 6-6. UDP matches
- 6-7. ICMP matches
- 6-8. Limit match options
- 6-9. MAC match options
- 6-10. Mark match options
- 6-11. Multiport match options
- 6-12. Owner match options
- 6-13. State matches
- 6-14. TOS matches
- 6-15. TTL matches
- 6-16. DNAT target
- 6-17. LOG target options
- 6-18. MARK target options
- 6-19. MASQUERADE target
- 6-20. REDIRECT target
- 6-21. REJECT target
- 6-22. SNAT target
- 6-23. TOS target
- 6-24. TTL target
- 6-25. ULOG target
- C-1. ICMP types
About the author
I am someone with too many old computers on his hands. I have my own LAN and want all my machines to be connected to the Internet, whilst at the same time making my LAN fairly secure. The new iptables is a good upgrade from the old ipchains in this regard. With ipchains, you could make a fairly secure network by dropping all incoming packages not destined for given ports. However, things like passive FTP or outgoing DCC in IRC would cause problems. They assign ports on the server, tell the client about it, and then let the client connect. There were some teething problems in the iptables code that I ran into in the beginning, and in some respects I found the code not quite ready for release in full production. Today, I'd recommend everyone who uses ipchains or even older ipfwadm etc .,to upgrade - unless they are happy with what their current code is capable of and if it does what they need.
How to read
This document was written purely so people can start to grasp the wonderful world of iptables. It was never meant to contain information on specific security bugs in iptables or Netfilter. If you find peculiar bugs or behaviors in iptables or any of the subcomponents, you should contact the Netfilter mailing lists and tell them about the problem and they can tell you if this is a real bug or if it has already been fixed. There are very rarely actual security related bugs found in iptables or Netfilter, however, one or two do slip by once in a while. These are properly shown on the front page of the Netfilter main page, and that is where you should go to get information on such topics.
The above also implies that the rule-sets available with this tutorial are not written to deal with actual bugs inside Netfilter. The main goal of them is to simply show how to set up rules in a nice simple fashion that deals with all problems we may run into. For example, this tutorial will not cover how we would close down the HTTP port for the simple reason that Apache happens to be vulnerable in version 1.2.12 (This is covered really, though not for that reason).
This document was simply written to give everyone a good and simple primer at how to get started with iptables, but at the same time it was created to be as complete as possible. It does not contain any targets or matches that are in patch-o-matic for the simple reason that it would require too much effort to keep such a list updated. If you need information about the patch-o-matic updates, you should read the info that comes with it in patch-o-matic as well as the other documentations available on the Netfilter main page.
Prerequisites
This document requires some previous knowledge about Linux/Unix, shell scripting, as well as how to compile your own kernel, and some simple knowledge about the kernel internals.
I have tried as much as possible to eradicate all prerequisites needed before fully grasping this document, but to some extent it is simply impossible to not need some previous knowledge.
Conventions used in this document
The following conventions are used in this document when it comes to commands, files and other specific information.
Code excerpts and command-outputs are printed like this, with all output in fixed width font and user-written commands in bold typeface:
[blueflux@work1 neigh]$ ls
default  eth0  lo
[blueflux@work1 neigh]$
All commands and program names in the tutorial are shown in bold typeface.
All system items such as hardware, and also kernel internals or abstract system items such as the loopback interface are all shown in an italic typeface.
computer output is formatted in this way in the text.
filenames and paths in the file-system are shown like /usr/local/bin/iptables.
Chapter 1. Introduction
1.1. Why this document was written
Well, I found a big empty space in the HOWTO's out there lacking in information about the iptables and Netfilter functions in the new Linux 2.4.x kernels. Among other things, I'm going to try to answer questions that some might have about the new possibilities like state matching. Most of this will be illustrated with an example rc.firewall.txt file that you can use in your /etc/rc.d/ scripts. Yes, this file was originally based upon the masquerading HOWTO for those of you who recognize it.
Also, there's a small script that I wrote just in case you screw up as much as I did during the configuration available as rc.flush-iptables.txt.
1.2. How it was written
I've consulted Marc Boucher and others from the core Netfilter team. Many heartfelt thanks to them for their work and for their help on this tutorial, that I originally wrote for boingworld.com, and now maintain for my own site frozentux.net. This document will guide you through the setup process step by step and hopefully help you to understand some more about the iptables package. I will base most of the stuff here on the example rc.firewall file, since I find that example a good way to learn how to use iptables. I have decided to just follow the basic chains and from there go down into each and one of the chains traversed in each due order. That way the tutorial is a little bit harder to follow, though this way is more logical. Whenever you find something that's hard to understand, just come back to this tutorial.
1.3. Terms used in this document
This document contains a few terms that may need more detailed explanations before you read them. This section will try to cover the most obvious ones and how I have chosen to use them within this document.
DNAT - Destination Network Address Translation. DNAT refers to the technique of translating the Destination IP address of a packet, or to change it simply put. This is used together with SNAT to allow several hosts to share a single Internet routable IP address, and to still provide Server Services. This is normally done by assigning different ports with a Internet routable IP address, and then tell the Linux router where to send the traffic.
Stream - This term refers to a connection that sends and receives packets that are related to each other in some fashion. Basically, I have used this term for any kind of connection that sends two or more packets in both directions. In TCP this may mean a connection that sends a SYN and then replies with an SYN/ACK, but it may also mean a connection that sends a SYN and then replies with an ICMP Host unreachable. In other words, I use this term very loosely.
SNAT - Source Network Address Translation. This refers to the techniques used to translate one source address to another in a packet. This is used to make it possible for several hosts to share a single Internet routable IP address, since there is currently a shortage of available IP addresses in IPv4 (IPv6 will solve this).
State - This term refers to which state the packet is in, either according to RFC 793 - Transmission Control Protocol or according to userside states used in Netfilter/iptables. Note that the used states internally, and externally, do not fully follow the RFC 793 specification fully. The main reason is that Netfilter has to make several assumptions about the connections and packets.
User space - With this term I mean everything and anything that takes place outside the kernel. For example, invoking iptables -h takes place outside the kernel, while iptables -A FORWARD -p tcp -j ACCEPT takes place (partially) within the kernel, since a new rule is added to the ruleset.
Kernel space - This is more or less the opposite of User space. This implies the actions that take place within the kernel, and not outside of the kernel.
Userland - See User space.
Chapter 2. Preparations
This chapter is aimed at getting you started and to help you understand the role Netfilter and iptables play in Linux today. This chapter should hopefully get you set up and finished to go with your experimentation, and installation of your firewall. Given time and perseverance, you'll then get it to perform exactly as you want it to.
2.1. Where to get iptables
The iptables user-space package can be downloaded from the http://www.netfilter.org/documentation/index.html#FAQ - The official Netfilter Frequently Asked Questions. Also a good place to start at when wondering what iptables and Netfilter is about.. The iptables package also makes use of kernel space facilities which can be configured into the kernel during make configure. The necessary steps will be discussed a bit further down in this document.
2.2. Kernel setup
To run the pure basics of iptables you need to configure the following options into the kernel while doing make config or one of its related commands:
CONFIG_PACKET - This option allows applications and utilities that needs to work directly to various network devices. Examples of such utilities are tcpdump or snort.
CONFIG_PACKET is strictly speaking not needed for iptables to work, but since it contains so many uses, I have chosen to include it here. If you do not want it, don't include it. |
CONFIG_NETFILTER - This option is required if you're going to use your computer as a firewall or gateway to the Internet. In other words, this is most definitely required for anything in this tutorial to work at all. I assume you will want this, since you are reading this.
And of course you need to add the proper drivers for your interfaces to work properly, i.e. Ethernet adapter, PPP and SLIP interfaces. The above will only add some of the pure basics in iptables. You won't be able to do anything productive to be honest, it just adds the framework to the kernel. If you want to use the more advanced options in Iptables, you need to set up the proper configuration options in your kernel. Here we will show you the options available in a basic 2.4.9 kernel and a brief explanation :
CONFIG_IP_NF_CONNTRACK - This module is needed to make connection tracking. Connection tracking is used by, among other things, NAT and Masquerading. If you need to firewall machines on a LAN you most definitely should mark this option. For example, this module is required by the rc.firewall.txt script to work.
CONFIG_IP_NF_FTP - This module is required if you want to do connection tracking on FTP connections. Since FTP connections are quite hard to do connection tracking on in normal cases, conntrack needs a so called helper, this option compiles the helper. If you do not add this module you won't be able to FTP through a firewall or gateway properly.
CONFIG_IP_NF_IPTABLES - This option is required if you want do any kind of filtering, masquerading or NAT. It adds the whole iptables identification framework to the kernel. Without this you won't be able to do anything at all with iptables.
CONFIG_IP_NF_MATCH_LIMIT - This module isn't exactly required but it's used in the example rc.firewall.txt. This option provides the LIMIT match, that adds the possibility to control how many packets per minute that are to be matched, governed by an appropriate rule. For example, -m limit --limit 3/minute would match a maximum of 3 packets per minute. This module can also be used to avoid certain Denial of Service attacks.
CONFIG_IP_NF_MATCH_MAC - This allows us to match packets based on MAC addresses. Every Ethernet adapter has its own MAC address. We could for instance block packets based on what MAC address is used and block a certain computer pretty well since the MAC address very seldom change. We don't use this option in the rc.firewall.txt example or anywhere else.
CONFIG_IP_NF_MATCH_MARK - This allows us to use a MARK match. For example, if we use the target MARK we could mark a packet and then depending on if this packet is marked further on in the table, we can match based on this mark. This option is the actual match MARK, and further down we will describe the actual target MARK.
CONFIG_IP_NF_MATCH_MULTIPORT - This module allows us to match packets with a whole range of destination ports or source ports. Normally this wouldn't be possible, but with this match it is.
CONFIG_IP_NF_MATCH_TOS - With this match we can match packets based on their TOS field. TOS stands for Type Of Service. TOS can also be set by certain rules in the mangle table and via the ip/tc commands.
CONFIG_IP_NF_MATCH_TCPMSS - This option adds the possibility for us to match TCP packets based on their MSS field.
CONFIG_IP_NF_MATCH_STATE - This is one of the biggest news in comparison to ipchains. With this module we can do stateful matching on packets. For example, if we have already seen traffic in two directions in a TCP connection, this packet will be counted as ESTABLISHED. This module is used extensively in the rc.firewall.txt example.
CONFIG_IP_NF_MATCH_UNCLEAN - This module will add the possibility for us to match IP, TCP, UDP and ICMP packets that don't conform to type or are invalid. We could for example drop these packets, but we never know if they are legitimate or not. Note that this match is still experimental and might not work perfectly in all cases.
CONFIG_IP_NF_MATCH_OWNER - This option will add the possibility for us to do matching based on the owner of a socket. For example, we can allow only the user root to have Internet access. This module was originally just written as an example on what could be done with the new iptables. Note that this match is still experimental and might not work for everyone.
CONFIG_IP_NF_FILTER - This module will add the basic filter table which will enable you to do IP filtering at all. In the filter table you'll find the INPUT, FORWARD and OUTPUT chains. This module is required if you plan to do any kind of filtering on packets that you receive and send.
CONFIG_IP_NF_TARGET_REJECT - This target allows us to specify that an ICMP error message should be sent in reply to incoming packets, instead of plainly dropping them dead to the floor. Keep in mind that TCP connections, as opposed to ICMP and UDP, are always reset or refused with a TCP RST packet.
CONFIG_IP_NF_TARGET_MIRROR - This allows packets to be bounced back to the sender of the packet. For example, if we set up a MIRROR target on destination port HTTP on our INPUT chain and someone tries to access this port, we would bounce his packets back to him and finally he would probably see his own homepage.
CONFIG_IP_NF_NAT - This module allows network address translation, or NAT, in its different forms. This option gives us access to the nat table in iptables. This option is required if we want to do port forwarding, masquerading, etc. Note that this option is not required for firewalling and masquerading of a LAN, but you should have it present unless you are able to provide unique IP addresses for all hosts. Hence, this option is required for the example rc.firewall.txt script to work properly, and most definitely on your network if you do not have the ability to add unique IP addresses as specified above.
CONFIG_IP_NF_TARGET_MASQUERADE - This module adds the MASQUERADE target. For instance if we don't know what IP we have to the Internet this would be the preferred way of getting the IP instead of using DNAT or SNAT. In other words, if we use DHCP, PPP, SLIP or some other connection that assigns us an IP, we need to use this target instead of SNAT. Masquerading gives a slightly higher load on the computer than NAT, but will work without us knowing the IP address in advance.
CONFIG_IP_NF_TARGET_REDIRECT - This target is useful together with application proxies, for example. Instead of letting a packet pass right through, we remap them to go to our local box instead. In other words, we have the possibility to make a transparent proxy this way.
CONFIG_IP_NF_TARGET_LOG - This adds the LOG target and its functionality to iptables. We can use this module to log certain packets to syslogd and hence see what is happening to the packet. This is invaluable for security audits, forensics or debugging a script you are writing.
CONFIG_IP_NF_TARGET_TCPMSS - This option can be used to counter Internet Service Providers and servers who block ICMP Fragmentation Needed packets. This can result in web-pages not getting through, small mails getting through while larger mails don't, ssh works but scp dies after handshake, etc. We can then use the TCPMSS target to overcome this by clamping our MSS (Maximum Segment Size) to the PMTU (Path Maximum Transmit Unit). This way, we'll be able to handle what the authors of Netfilter them selves call "criminally brain-dead ISPs or servers" in the kernel configuration help.
CONFIG_IP_NF_COMPAT_IPCHAINS - Adds a compatibility mode with the obsolescent ipchains. Do not look to this as any real long term solution for solving migration from Linux 2.2 kernels to 2.4 kernels, since it may well be gone with kernel 2.6.
CONFIG_IP_NF_COMPAT_IPFWADM - Compatibility mode with obsolescent ipfwadm. Definitely don't look to this as a real long term solution.
As you can see, there is a heap of options. I have briefly explained here what kind of extra behaviors you can expect from each module. These are only the options available in a vanilla Linux 2.4.9 kernel. If you would like to take a look at more options, I suggest you look at the patch-o-matic functions in Netfilter user-land which will add heaps of other options in the kernel. POM fixes are additions that are supposed to be added in the kernel in the future but has not quite reached the kernel yet. These functions should be added in the future, but has not quite made it in yet. This may be for various reasons - such as the patch not being stable yet, to Linus Torvalds being unable to keep up, or not wanting to let the patch in to the mainstream kernel yet since it is still experimental.
You will need the following options compiled into your kernel, or as modules, for the rc.firewall.txt script to work. If you need help with the options that the other scripts need, look at the example firewall scripts section.
CONFIG_PACKET
CONFIG_NETFILTER
CONFIG_IP_NF_CONNTRACK
CONFIG_IP_NF_FTP
CONFIG_IP_NF_IRC
CONFIG_IP_NF_IPTABLES
CONFIG_IP_NF_FILTER
CONFIG_IP_NF_NAT
CONFIG_IP_NF_MATCH_STATE
CONFIG_IP_NF_TARGET_LOG
CONFIG_IP_NF_MATCH_LIMIT
CONFIG_IP_NF_TARGET_MASQUERADE
At the very least the above will be required for the rc.firewall.txt script. In the other example scripts I will explain what requirements they have in their respective sections. For now, let's try to stay focused on the main script which you should be studying now.
2.3. User-land setup
First of all, let's look at how we compile the iptables package. It's important to realize that for most part configuration and compilation of iptables goes hand in hand with the kernel configuration and compilation. Certain distributions comes with the iptables package preinstalled, one of these are Red Hat. However, in Red Hat it is disabled per default. We will check closer on how to enable it and take a look at other distributions further on in this chapter.
2.3.1. Compiling the user-land applications
First of all unpack the iptables package. Here, we have used the iptables 1.2.6a package and a vanilla 2.4 kernel. Unpack as usual, using bzip2 -cd iptables-1.2.6a.tar.bz2 | tar -xvf - (this can also be accomplished with the tar -xjvf iptables-1.2.6a.tar.bz2, which should do pretty much the same as the first command. However, this may not work with older versions of tar). The package should now be unpacked properly into a directory named iptables-1.2.6a. For more information read the iptables-1.2.6a/INSTALL file which contains pretty good information on compiling and getting the program to run.
After this, there you have the option of configuring and installing extra modules and options etcetera for the kernel.The step described here will only check and install standard patches that are pending for inclusion to the kernel, there are some even more experimental patches further along, which may only be available when you carry out other steps.
Some of these patches are highly experimental and may not be such a good idea to install them. However, there are heaps of extremely interesting matches and targets in this installation step so don't be afraid of at least looking at them. To carry out this step we do something like this from the root of the iptables package: |
make pending-patches KERNEL_DIR=/usr/src/linux/
The variable KERNEL_DIR should point to the actual place that your kernel source is located at. Normally this should be /usr/src/linux/ but this may vary, and most probably you will know yourself where the kernel source is available.
This only asks about certain patches that are just about to enter the kernel anyway. There might be more patches and additions that the developers of Netfilter are about to add to the kernel, but is a bit further away from actually getting there. One way to install these are by doing the following: |
make most-of-pom KERNEL_DIR=/usr/src/linux/
The above command would ask about installing parts of what in Netfilter world is called patch-o-matic, but still skip the most extreme patches that might cause havoc in your kernel. Note that we say ask, because that's what these commands actually do. They ask you before anything is changed in the kernel source. To be able to install all of the patch-o-matic stuff you will need to run the following command:
make patch-o-matic KERNEL_DIR=/usr/src/linux/
Don't forget to read the help for each patch thoroughly before doing anything. Some patches will destroy other patches while others may destroy your kernel if used together with some patches from patch-o-matic etc.
You may totally ignore the above steps if you don't want to patch your kernel, it is in other words not necessary to do the above. However, there are some really interesting things in the patch-o-matic that you may want to look at so there's nothing bad in just running the commands and see what they contain. |
After this you are finished doing the patch-o-matic parts of installation, you may now compile a new kernel making use of the new patches that you have added to the source. Don't forget to configure the kernel again since the new patches probably are not added to the configured options. You may wait with the kernel compilation until after the compilation of the user-land program iptables if you feel like it, though.
Continue by compiling the iptables user-land application. To compile iptables you issue a simple command that looks like this:
make KERNEL_DIR=/usr/src/linux/
The user-land application should now compile properly. If not, you are on your own, or you could subscribe to the Netfilter mailing list, where you have the chance of asking for help you with your problems. There are a few things that might go wrong with the installation of iptables, so don't panic if it won't work. Try to think logically about it and find out what's wrong, or get someone to help you.
If everything has worked smoothly, you're ready to install the binaries by now. To do this, you would issue the following command to install them:
make install KERNEL_DIR=/usr/src/linux/
Hopefully everything should work in the program now. To use any of the changes in the iptables user-land applications you should now recompile and reinstall your kernel and modules, if you hadn't done so before. For more information about installing the user-land applications from source, check the INSTALL file in the source which contains excellent information on the subject of installation.
2.3.2. Installation on Red Hat 7.1
Red Hat 7.1 comes preinstalled with a 2.4.x kernel that has Netfilter and iptables compiled in. It also contains all the basic user-land programs and configuration files that is needed to run it. However, the Red Hat people have disabled the whole thing by using the backward compatible ipchains module. Annoying to say the least, and a lot of people keep asking different mailing lists why iptables don't work. So, let's take a brief look at how to turn the ipchains module off and how to install iptables instead.
The default Red Hat 7.1 installation today comes with an hopelessly old version of the user-space applications, so you might want to compile a new version of the applications as well as install a new and custom compiled kernel before fully exploiting iptables. |
First of all you will need to turn off the ipchains modules so it won't start in the future. To do this, you will need to change some filenames in the /etc/rc.d/ directory-structure. The following command should do it:
chkconfig --level 0123456 ipchains off
By doing this we move all the soft links that points to the /etc/rc.d/init.d/ipchains script to K92ipchains. The first letter which per default would be S, tells the initscripts to start the script. By changing this to K we tell it to Kill the service instead, or to not run it if it was not previously started. Now the service won't be started in the future.
However, to stop the service from actually running right now we need to run another command. This is the service command which can be used to work on currently running services. We would then issue the following command to stop the ipchains service:
service ipchains stop
Finally, to start the iptables service. First of all, we need to know which run-levels we want it to run in. Normally this would be in run-level 2, 3 and 5. These run-levels are used for the following things:
2. Multiuser without NFS or the same as 3 if there is no networking.
3. Full multiuser mode, i.e. the normal run-level to run in.
5. X11. This is used if you automatically boot into Xwindows.
To make iptables run in these run-levels we would do the following commands:
chkconfig --level 235 iptables on
The above commands would in other words make the iptables service run in run-level 2, 3 and 5. If you'd like the iptables service to run in some other run-level you would have to issue the same command in those. However, none of the other run-levels should be used, so you should not really need to activate it for those run-levels. Level 1 is for single user mode, i.e, when you need to fix a screwed up box. Level 4 should be unused, and level 6 is for shutting the computer down.
To activate the iptables service, we just run the following command:
service iptables start
There are no rules in the iptables script. To add rules to an Red Hat 7.1 box, there is two common ways. Firstly, you could edit the /etc/rc.d/init.d/iptables script. This would have the undesired effect of deleting all the rules if you updated the iptables package by RPM. The other way would be to load the rule-set and then save it with the iptables-save command and then have it loaded automatically by the rc.d scripts.
First we will describe the how to set up iptables by cutting and pasting to the iptables init.d script. To add rules that are to be run when the computer starts the service, you add them under the start) section, or in the start() function. Note, if you add the rules under the start) section don't forget to stop the start() function in the start) section from running. Also, don't forget to edit a the stop) section either which tells the script what to do when the computer is going down for example, or when we are entering a run-level that doesn't require iptables. Also, don't forget to check out the restart section and condrestart. Note that all this work will probably be trashed if you have, for example, Red Hat Network automatically update your packages. It may also be trashed by updating from the iptables RPM package.
The second way of doing the set up would require the following: First of all, make and write a rule-set in a shell script file, or directly with iptables, that will meet your requirements, and don't forget to experiment a bit. When you find a set up that works without problems, or as you can see without bugs, use the iptables-save command. You could either use it normally, i.e. iptables-save > /etc/sysconfig/iptables, which would save the rule-set to the file /etc/sysconfig/iptables. This file is automatically used by the iptables rc.d script to restore the rule-set in the future. The other way is to save the script by doing service iptables save, which would save the script automatically to /etc/sysconfig/iptables. The next time you reboot the computer, the iptables rc.d script will use the command iptables-restore to restore the rule-set from the save-file /etc/sysconfig/iptables. Do not intermix these two methods, since they may heavily damage each other and render your firewall configuration useless.
When all of these steps are finished, you can deinstall the currently installed ipchains and iptables packages. This because we don't want the system to mix up the new iptables user-land application with the old preinstalled iptables applications. This step is only necessary if you are going to install iptables from the source package. It's not unusual that the new and the old package to get mixed up, since the rpm based installation installs the package in non-standard places and won't get overwritten by the installation for the new iptables package. To carry out the deinstallation, do as follows:
rpm -e iptables
And why keep ipchains lying around if you won't be using it any more? Removing it is done the same way as with the old iptables binaries, etc:
rpm -e ipchains
After all this has been completed, you will have finished with the update of the iptables package from source, having followed the source installation instructions. None of the old binaries, libraries or include files etc should be lying around any more.
Chapter 3. Traversing of tables and chains
In this chapter we'll discuss how packets traverse the different chains, and in which order. We will also discuss the order in which the tables are traversed. We'll see how valuable this is later on, when we write our own specific rules. We will also look at the points which certain other components, that also are kernel dependent, enter into the picture. Which is to say the different routing decisions and so on. This is especially necessary if we want to write iptables rules that could change routing patterns/rules for packets; i.e. why and how the packets get routed, good examples of this is DNAT and SNAT. Not to be forgotten are, of course, the TOS bits.
3.1. General
When a packet first enters the firewall, it hits the hardware and then gets passed on to the proper device driver in the kernel. Then the packet starts to go through a series of steps in the kernel, before it is either sent to the correct application (locally), or forwarded to another host - or whatever happens to it.
First, let us have a look at a packet that is destined for our own local host. It would pass through the following steps before actually being delivered to our application that receives it:
Table 3-1. Destination local host (our own machine)
| Step | Table | Chain | Comment |
|---|---|---|---|
| 1 | On the wire (e.g., Internet) | ||
| 2 | Comes in on the interface (e.g., eth0) | ||
| 3 | mangle | PREROUTING | This chain is normally used for mangling packets, i.e., changing TOS and so on. |
| 4 | nat | PREROUTING | This chain is used for DNAT mainly. Avoid filtering in this chain since it will be bypassed in certain cases. |
| 5 | Routing decision, i.e., is the packet destined for our local host or to be forwarded and where. | ||
| 6 | mangle | INPUT | At this point, the mangle INPUT chain is hit. We use this chain to mangle packets, after they have been routed, but before they are actually sent to the process on the machine. |
| 7 | filter | INPUT | This is where we do filtering for all incoming traffic destined for our local host. Note that all incoming packets destined for this host pass through this chain, no matter what interface or in which direction they came from. |
| 8 | Local process/application (i.e., server/client program) |
Note that this time the packet was passed through the INPUT chain instead of the FORWARD chain. Quite logical. Most probably the only thing that's really logical about the traversing of tables and chains in your eyes in the beginning, but if you continue to think about it, you'll find it will get clearer in time.
Now we look at the outgoing packets from our own local host and what steps they go through.
Table 3-2. Source local host (our own machine)
| Step | Table | Chain | Comment |
|---|---|---|---|
| 1 | Local process/application (i.e., server/client program) | ||
| 2 | Routing decision. What source address to use, what outgoing interface to use, and other necessary information that needs to be gathered. | ||
| 3 | mangle | OUTPUT | This is where we mangle packets, it is suggested that you do not filter in this chain since it can have side effects. |
| 4 | nat | OUTPUT | This chain can be used to NAT outgoing packets from the firewall itself. |
| 5 | filter | OUTPUT | This is where we filter packets going out from the local host. |
| 6 | mangle | POSTROUTING | The POSTROUTING chain in the mangle table is mainly used when we want to do mangling on packets before they leave our host, but after the actual routing decisions. This chain will be hit by both packets just traversing the firewall, as well as packets created by the firewall itself. |
| 7 | nat | POSTROUTING | This is where we do SNAT as described earlier. It is suggested that you don't do filtering here since it can have side effects, and certain packets might slip through even though you set a default policy of DROP. |
| 8 | Goes out on some interface (e.g., eth0) | ||
| 9 | On the wire (e.g., Internet) |
In this example, we're assuming that the packet is destined for another host on another network. The packet goes through the different steps in the following fashion:
Table 3-3. Forwarded packets
| Step | Table | Chain | Comment |
|---|---|---|---|
| 1 | On the wire (i.e., Internet) | ||
| 2 | Comes in on the interface (i.e., eth0) | ||
| 3 | mangle | PREROUTING | This chain is normally used for mangling packets, i.e., changing TOS and so on. |
| 4 | nat | PREROUTING | This chain is used for DNAT mainly. SNAT is done further on. Avoid filtering in this chain since it will be bypassed in certain cases. |
| 5 | Routing decision, i.e., is the packet destined for our local host or to be forwarded and where. | ||
| 6 | mangle | FORWARD | The packet is then sent on to the FORWARD chain of the mangle table. This can be used for very specific needs, where we want to mangle the packets after the initial routing decision, but before the last routing decision made just before the packet is sent out. |
| 7 | filter | FORWARD | The packet gets routed onto the FORWARD chain. Only forwarded packets go through here, and here we do all the filtering. Note that all traffic that's forwarded goes through here (not only in one direction), so you need to think about it when writing your rule-set. |
| 8 | mangle | POSTROUTING | This chain is used for specific types of packet mangling that we wish to take place after all kinds of routing decisions has been done, but still on this machine. |
| 9 | nat | POSTROUTING | This chain should first and foremost be used for SNAT. Avoid doing filtering here, since certain packets might pass this chain without ever hitting it. This is also where Masquerading is done. |
| 10 | Goes out on the outgoing interface (i.e., eth1). | ||
| 11 | Out on the wire again (i.e., LAN). |
As you can see, there are quite a lot of steps to pass through. The packet can be stopped at any of the iptables chains, or anywhere else if it is malformed; however, we are mainly interested in the iptables aspect of this lot. Do note that there are no specific chains or tables for different interfaces or anything like that. FORWARD is always passed by all packets that are forwarded over this firewall/router.
Do not use the INPUT chain to filter on in the previous scenario! INPUT is meant solelyfor packets to our local host that do not get routed to any otherdestination. |
We have now seen how the different chains are traversed in three separate scenarios. If we were to figure out a good map of all this, it would look something like this:
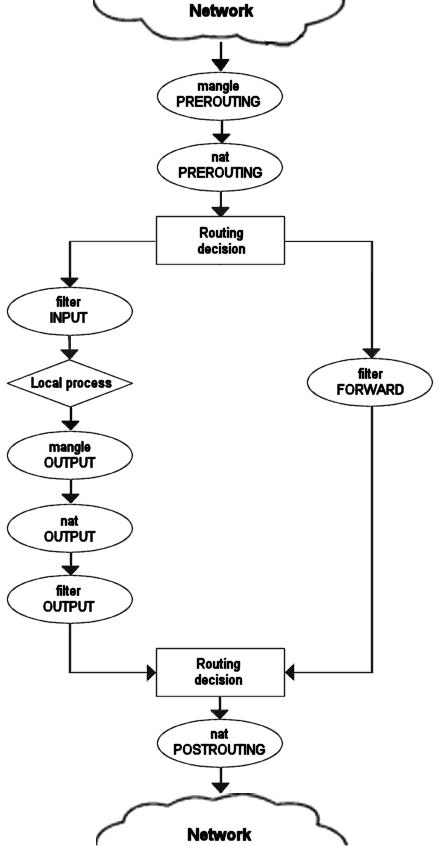
To clarify this image, consider this. If we get a packet into the first routing decision that is not destined for the local machine itself, it will be routed through the FORWARD chain. If the packet is, on the other hand, destined for an IP address that the local machine is listening to, we would send the packet through the INPUT chain and to the local machine.
Also worth a note, is the fact that packets may be destined for the local machine, but the destination address may be changed within the PREROUTING chain by doing NAT. Since this takes place before the first routing decision, the packet will be looked upon after this change. Because of this, the routing may be changed before the routing decision is done. Do note, that all packets will be going through one or the other path in this image. If you DNAT a packet back to the same network that it came from, it will still travel through the rest of the chains until it is back out on the network.
If you feel that you want more information, you could use the rc.test-iptables.txt script. This test script should give you the necessary rules to test how the tables and chains are traversed. |
3.2. mangle table
This table should as we've already noted mainly be used for mangling packets. In other words, you may freely use the mangle matches etc that could be used to change TOS (Type Of Service) fields and so on.
You are strongly advised not to use this table for any filtering; nor will any DNAT, SNAT or Masquerading work in this table. |
Targets that are only valid in the mangle table:
TOS
TTL
MARK
The TOS target is used to set and/or change the Type of Service field in the packet. This could be used for setting up policies on the network regarding how a packet should be routed and so on. Note that this has not been perfected and is not really implemented on the Internet and most of the routers don't care about the value in this field, and sometimes, they act faulty on what they get. Don't set this in other words for packets going to the Internet unless you want to make routing decisions on it, with iproute2.
The TTL target is used to change the TTL (Time To Live) field of the packet. We could tell packets to only have a specific TTL and so on. One good reason for this could be that we don't want to give ourself away to nosy Internet Service Providers. Some Internet Service Providers do not like users running multiple computers on one single connection, and there are some Internet Service Providers known to look for a single host generating different TTL values, and take this as one of many signs of multiple computers connected to a single connection.
The MARK target is used to set special mark values to the packet. These marks could then be recognized by the iproute2 programs to do different routing on the packet depending on what mark they have, or if they don't have any. We could also do bandwidth limiting and Class Based Queuing based on these marks.
3.3. nat table
This table should only be used for NAT (Network Address Translation) on different packets. In other words, it should only be used to translate the packet's source field or destination field. Note that, as we have said before, only the first packet in a stream will hit this chain. After this, the rest of the packets will automatically have the same action taken on them as the first packet. The actual targets that do these kind of things are:
DNAT
SNAT
MASQUERADE
The DNAT target is mainly used in cases where you have a public IP and want to redirect accesses to the firewall to some other host (on a DMZ for example). In other words, we change the destination address of the packet and reroute it to the host.
SNAT is mainly used for changing the source address of packets. For the most part you'll hide your local networks or DMZ, etc. A very good example would be that of a firewall of which we know outside IP address, but need to substitute our local network's IP numbers with that of our firewall. With this target the firewall will automatically SNAT and De-SNAT the packets, hence making it possible to make connections from the LAN to the Internet. If your network uses 192.168.0.0/netmask for example, the packets would never get back from the Internet, because IANA has regulated these networks (among others) as private and only for use in isolated LANs.
The MASQUERADE target is used in exactly the same way as SNAT, but the MASQUERADE target takes a little bit more overhead to compute. The reason for this, is that each time that the MASQUERADE target gets hit by a packet, it automatically checks for the IP address to use, instead of doing as the SNAT target does - just using the single configured IP address. The MASQUERADE target makes it possible to work properly with Dynamic DHCP IP addresses that your ISP might provide for your PPP, PPPoE or SLIP connections to the Internet.
3.4. Filter table
The filter table is mainly used for filtering packets. We can match packets and filter them in whatever way we want. This is the place that we actually take action against packets and look at what they contain and DROP or /ACCEPT them, depending on their content. Of course we may also do prior filtering; however, this particular table, is the place for which filtering was designed. Almost all targets are usable in this chain. We will be more prolific about the filter table here; however you now know that this table is the right place to do your main filtering.
Chapter 4. The state machine
This chapter will deal with the state machine and explain it in detail. After reading trough it, you should have a complete understanding of how the State machine works. We will also go through a large set of examples on how states are dealt within the state machine itself. These should clarify everything in practice.
4.1. Introduction
The state machine is a special part within iptables that should really not be called the state machine at all, since it is really a connection tracking machine. However, most people recognize it under the first name. Throughout this chapter i will use this names more or less as if they where synonymous. This should not be overly confusing. Connection tracking is done to let the Netfilter framework know the state of a specific connection. Firewalls that implement this are generally called stateful firewalls. A stateful firewall is generally much more secure than non-stateful firewalls since it allows us to write much tighter rule-sets.
Within iptables, packets can be related to tracked connections in four different so called states. These are known as NEW, ESTABLISHED, RELATED and INVALID. We will discuss each of these in more depth later. With the --state match we can easily control who or what is allowed to initiate new sessions.
All of the connection tracking is done by special framework within the kernel called conntrack. conntrack may be loaded either as a module, or as an internal part of the kernel itself. Most of the time, we need and want more specific connection tracking than the default conntrack engine can maintain. Because of this, there are also more specific parts of conntrack that handles the TCP, UDP or ICMP protocols among others. These modules grabs specific, unique, information from the packets, so that they may keep track of each stream of data. The information that conntrack gathers is then used to tell conntrack in which state the stream is currently in. For example, UDP streams are, generally, uniquely identified by their destination IP address, source IP address, destination port and source port.
In previous kernels, we had the possibility to turn on and off defragmentation. However, since iptables and Netfilter were introduced and connection tracking in particular, this option was gotten rid of. The reason for this is that connection tracking can not work properly without defragmenting packets, and hence defragmenting has been incorporated into conntrack and is carried out automatically. It can not be turned off, except by turning off connection tracking. Defragmentation is always carried out if connection tracking is turned on.
All connection tracking is handled in the PREROUTING chain, except locally generated packets which are handled in the OUTPUT chain. What this means is that iptables will do all recalculation of states and so on within the PREROUTING chain. If we send the initial packet in a stream, the state gets set to NEW within the OUTPUT chain, and when we receive a return packet, the state gets changed in the PREROUTING chain to ESTABLISHED, and so on. If the first packet is not originated by ourself, the NEW state is set within the PREROUTING chain of course. So, all state changes and calculations are done within the PREROUTING and OUTPUT chains of the nat table.
4.2. The conntrack entries
Let's take a brief look at a conntrack entry and how to read them in /proc/net/ip_conntrack. This gives a list of all the current entries in your conntrack database. If you have the ip_conntrack module loaded, a cat of /proc/net/ip_conntrack might look like:
tcp      6 117 SYN_SENT src=192.168.1.6 dst=192.168.1.9 sport=32775 \
     dport=22 [UNREPLIED] src=192.168.1.9 dst=192.168.1.6 sport=22 \
     dport=32775 use=2
This example contains all the information that the conntrack module maintains to know which state a specific connection is in. First of all, we have a protocol, which in this case is tcp. Next, the same value in normal decimal coding. After this, we see how long this conntrack entry has to live. This value is set to 117 seconds right now and is decremented regularly until we see more traffic. This value is then reset to the default value for the specific state that it is in at that relevant point of time. Next comes the actual state that this entry is in at the present point of time. In the above mentioned case we are looking at a packet that is in the SYN_SENT state. The internal value of a connection is slightly different from the ones used externally with iptables. The value SYN_SENT tells us that we are looking at a connection that has only seen a TCP SYN packet in one direction. Next, we see the source IP address, destination IP address, source port and destination port. At this point we see a specific keyword that tells us that we have seen no return traffic for this connection. Lastly, we see what we expect of return packets. The information details the source IP address and destination IP address (which are both inverted, since the packet is to be directed back to us). The same thing goes for the source port and destination port of the connection. These are the values that should be of any interest to us.
The connection tracking entries may take on a series of different values, all specified in the conntrack headers available in linux/include/netfilter-ipv4/ip_conntrack*.h files. These values are dependent on which sub-protocol of IP we use. TCP, UDP or ICMP protocols take specific default values as specified in linux/include/netfilter-ipv4/ip_conntrack.h. We will look closer at this when we look at each of the protocols; however, we will not use them extensively through this chapter, since they are not used outside of the conntrack internals. Also, depending on how this state changes, the default value of the time until the connection is destroyed will also change.
Recently there was a new patch made available in iptables patch-o-matic, called tcp-window-tracking. This patch adds, among other things, all of the above timeouts to special sysctl variables, which means that they can be changed on the fly, while the system is still running. Hence, this makes it unnecessary to recompile the kernel every time you want to change the timeouts. These can be altered via using specific system calls available in the /proc/sys/net/ipv4/netfilter directory. You should in particular look at the /proc/sys/net/ipv4/netfilter/ip_ct_* variables. |
When a connection has seen traffic in both directions, the conntrack entry will erase the [UNREPLIED] flag, and then reset it. The entry tells us that the connection has not seen any traffic in both directions, will be replaced by the [ASSURED] flag, to be found close to the end of the entry. The [ASSURED] flag tells us that this connection is assured and that it will not be erased if we reach the maximum possible tracked connections. Thus, connections marked as [ASSURED] will not be erased, contrary to the non assured connections (those not marked as [ASSURED]). How many connections that the connection tracking table can hold depends upon a variable that can be set through the ip-sysctl functions in recent kernels. The default value held by this entry varies heavily depending on how much memory you have. On 128 MB of RAM you will get 8192 possible entries, and at 256 MB of RAM, you will get 16376 entries. You can read and set your settings through the /proc/sys/net/ipv4/ip_conntrack_max setting.
4.3. User-land states
As you have seen, packets may take on several different states within the kernel itself, depending on what protocol we are talking about. However, outside the kernel, we only have the 4 states as described previously. These states can mainly be used in conjunction with the state match which will then be able to match packets based on their current connection tracking state. The valid states are NEW, ESTABLISHED, RELATED and INVALID states. The following table will briefly explain each possible state.
Table 4-1. User-land states
| State | Explanation |
|---|---|
| NEW | The NEW state tells us that the packet is the first packet that we see. This means that the first packet that the conntrack module sees, within a specific connection, will be matched. For example, if we see a SYN packet and it is the first packet in a connection that we see, it will match. However, the packet may as well not be a SYN packet and still be considered NEW. This may lead to certain problems in some instances, but it may also be extremely helpful when we need to pick up lost connections from other firewalls, or when a connection has already timed out, but in reality is not closed. |
| ESTABLISHED | The ESTABLISHED state has seen traffic in both directions and will then continuously match those packets. ESTABLISHED connections are fairly easy to understand. The only requirement to get into an ESTABLISHED state is that one host sends a packet, and that it later on gets a reply from the other host. The NEW state will upon receipt of the reply packet to or through the firewall change to the ESTABLISHED state. ICMP error messages and redirects etc can also be considered as ESTABLISHED, if we have generated a packet that in turn generated the ICMP message. |
| RELATED | The RELATED state is one of the more tricky states. A connection is considered RELATED when it is related to another already ESTABLISHED connection. What this means, is that for a connection to be considered as RELATED, we must first have a connection that is considered ESTABLISHED. The ESTABLISHED connection will then spawn a connection outside of the main connection. The newly spawned connection will then be considered RELATED, if the conntrack module is able to understand that it is RELATED. Some good examples of connections that can be considered as RELATED are the FTP-data connections that are considered RELATED to the FTP control port, and the DCC connections issued through IRC. This could be used to allow ICMP replies, FTP transfers and DCC's to work properly through the firewall. Do note that most TCP protocols and some UDP protocols that rely on this mechanism are quite complex and send connection information within the payload of the TCP or UDP data segments, and hence require special helper modules to be correctly understood. |
| INVALID | The INVALID state means that the packet can not be identified or that it does not have any state. This may be due to several reasons, such as the system running out of memory or ICMP error messages that do not respond to any known connections. Generally, it is a good idea to DROP everything in this state. |
These states can be used together with the --state match to match packets based on their connection tracking state. This is what makes the state machine so incredibly strong and efficient for our firewall. Previously, we often had to open up all ports above 1024 to let all traffic back into our local networks again. With the state machine in place this is not necessary any longer, since we can now just open up the firewall for return traffic and not for all kinds of other traffic.
4.4. TCP connections
In this section and the upcoming ones, we will take a closer look at the states and how they are handled for each of the three basic protocols TCP, UDP and ICMP. Also, we will take a closer look at how connections are handled per default, if they can not be classified as either of these three protocols. We have chosen to start out with the TCP protocol since it is a stateful protocol in itself, and has a lot of interesting details with regard to the state machine in iptables.
A TCP connection is always initiated with the 3-way handshake, which establishes and negotiates the actual connection over which data will be sent. The whole session is begun with a SYN packet, then a SYN/ACK packet and finally an ACK packet to acknowledge the whole session establishment. At this point the connection is established and able to start sending data. The big problem is, how does connection tracking hook up into this? Quite simply really.
As far as the user is concerned, connection tracking works basically the same for all connection types. Have a look at the picture below to see exactly what state the stream enters during the different stages of the connection. As you can see, the connection tracking code does not really follow the flow of the TCP connection, from the users viewpoint. Once it has seen one packet(the SYN), it considers the connection as NEW. Once it sees the return packet(SYN/ACK), it considers the connection as ESTABLISHED. If you think about this a second, you will understand why. With this particular implementation, you can allow NEW and ESTABLISHED packets to leave your local network, only allow ESTABLISHED connections back, and that will work perfectly. Conversely, if the connection tracking machine were to consider the whole connection establishment as NEW, we would never really be able to stop outside connections to our local network, since we would have to allow NEW packets back in again. To make things more complicated, there is a number of other internal states that are used for TCP connections inside the kernel, but which are not available for us in User-land. Roughly, they follow the state standards specified within RFC 793 - Transmission Control Protocol at page 21-23. We will consider these in more detail further along in this section.
As you can see, it is really quite simple, seen from the user's point of view. However, looking at the whole construction from the kernel's point of view, it's a little more difficult. Let's look at an example. Consider exactly how the connection states change in the /proc/net/ip_conntrack table. The first state is reported upon receipt of the first SYN packet in a connection.
tcp      6 117 SYN_SENT src=192.168.1.5 dst=192.168.1.35 sport=1031 \
     dport=23 [UNREPLIED] src=192.168.1.35 dst=192.168.1.5 sport=23 \
     dport=1031 use=1
As you can see from the above entry, we have a precise state in which a SYN packet has been sent, (the SYN_SENT flag is set), and to which as yet no reply has been sent (witness the [UNREPLIED] flag). The next internal state will be reached when we see another packet in the other direction.
tcp      6 57 SYN_RECV src=192.168.1.5 dst=192.168.1.35 sport=1031 \
     dport=23 src=192.168.1.35 dst=192.168.1.5 sport=23 dport=1031 \
     use=1
Now we have received a corresponding SYN/ACK in return. As soon as this packet has been received, the state changes once again, this time to SYN_RECV. SYN_RECV tells us that the original SYN was delivered correctly and that the SYN/ACK return packet also got through the firewall properly. Moreover, this connection tracking entry has now seen traffic in both directions and is hence considered as having been replied to. This is not explicit, but rather assumed, as was the [UNREPLIED] flag above. The final step will be reached once we have seen the final ACK in the 3-way handshake.
tcp      6 431999 ESTABLISHED src=192.168.1.5 dst=192.168.1.35 \
     sport=1031 dport=23 src=192.168.1.35 dst=192.168.1.5 \
     sport=23 dport=1031 use=1
In the last example, we have gotten the final ACK in the 3-way handshake and the connection has entered the ESTABLISHED state, as far as the internal mechanisms of iptables are aware. After a few more packets, the connection will also become [ASSURED], as shown in the introduction section of this chapter.
When a TCP connection is closed down, it is done in the following way and takes the following states.
As you can see, the connection is never really closed until the last ACK is sent. Do note that this picture only describes how it is closed down under normal circumstances. A connection may also, for example, be closed by sending a RST(reset), if the connection were to be refused. In this case, the connection would be closed down after a predetermined time.
When the TCP connection has been closed down, the connection enters the TIME_WAIT state, which is per default set to 2 minutes. This is used so that all packets that have gotten out of order can still get through our rule-set, even after the connection has already closed. This is used as a kind of buffer time so that packets that have gotten stuck in one or another congested router can still get to the firewall, or to the other end of the connection.
If the connection is reset by a RST packet, the state is changed to CLOSE. This means that the connection per default have 10 seconds before the whole connection is definitely closed down. RST packets are not acknowledged in any sense, and will break the connection directly. There are also other states than the ones we have told you about so far. Here is the complete list of possible states that a TCP stream may take, and their timeout values.
Table 4-2. Internal states
| State | Timeout value |
|---|---|
| NONE | 30 minutes |
| ESTABLISHED | 5 days |
| SYN_SENT | 2 minutes |
| SYN_RECV | 60 seconds |
| FIN_WAIT | 2 minutes |
| TIME_WAIT | 2 minutes |
| CLOSE | 10 seconds |
| CLOSE_WAIT | 12 hours |
| LAST_ACK | 30 seconds |
| LISTEN> | 2 minutes |
These values are most definitely not absolute. They may change with kernel revisions, and they may also be changed via the proc file-system in the /proc/sys/net/ipv4/netfilter/ip_ct_tcp_* variables. The default values should, however, be fairly well established in practice. These values are set in jiffies (or 1/100th parts of seconds), so 3000 means 30 seconds.
Also note that the User-land side of the state machine does not look at TCP flags set in the TCP packets. This is generally bad, since you may want to allow packets in the NEW state to get through the firewall, but when you specify the NEW flag, you will in most cases mean SYN packets. This is not what happens with the current state implementation; instead, even a packet with no bit set or an ACK flag, will count as NEW and if you match on NEW packets. This can be used for redundant firewalling and so on, but it is generally extremely bad on your home network, where you only have a single firewall. To get around this behavior, you could use the command explained in the State NEW packets but no SYN bit set section of the Common problems and questions appendix. Another way is to install the tcp-window-tracking extension from patch-o-matic, which will make the firewall able to track states depending on the TCP window settings. |
4.5. UDP connections
UDP connections are in them selves not stateful connections, but rather stateless. There are several reasons why, mainly because they don't contain any connection establishment or connection closing; most of all they lack sequencing. Receiving two UDP datagrams in a specific order does not say anything about which order in which they where sent. It is, however, still possible to set states on the connections within the kernel. Let's have a look at how a connection can be tracked and how it might look in conntrack.
As you can see, the connection is brought up almost exactly in the same way as a TCP connection. That is, from the user-land point of view. Internally, conntrack information looks quite a bit different, but intrinsically the details are the same. First of all, let's have a look at the entry after the initial UDP packet has been sent.
udp      17 20 src=192.168.1.2 dst=192.168.1.5 sport=137 dport=1025 \
     [UNREPLIED] src=192.168.1.5 dst=192.168.1.2 sport=1025 \
     dport=137 use=1
As you can see from the first and second values, this is an UDP packet. The first is the protocol name, and the second is protocol number. This is just the same as for TCP connections. The third value marks how many seconds this state entry has to live. After this, we get the values of the packet that we have seen and the future expectations of packets over this connection reaching us from the initiating packet sender. These are the source, destination, source port and destination port. At this point, the [UNREPLIED] flag tells us that there's so far been no response to the packet. Finally, we get a brief list of the expectations for returning packets. Do note that the latter entries are in reverse order to the first values. The timeout at this point is set to 30 seconds, as per default.
udp      17 170 src=192.168.1.2 dst=192.168.1.5 sport=137 \
     dport=1025 src=192.168.1.5 dst=192.168.1.2 sport=1025 \
     dport=137 use=1
At this point the server has seen a reply to the first packet sent out and the connection is now considered as ESTABLISHED. This is not shown in the connection tracking, as you can see. The main difference is that the [UNREPLIED] flag has now gone. Moreover, the default timeout has changed to 180 seconds - but in this example that's by now been decremented to 170 seconds - in 10 seconds' time, it will be 160 seconds. There's one thing that's missing, though, and can change a bit, and that is the [ASSURED] flag described above. For the [ASSURED] flag to be set on a tracked connection, there must have been a small amount of traffic over that connection.
udp      17 175 src=192.168.1.5 dst=195.22.79.2 sport=1025 \
     dport=53 src=195.22.79.2 dst=192.168.1.5 sport=53 \
     dport=1025 [ASSURED] use=1
At this point, the connection has become assured. The connection looks exactly the same as the previous example, except for the [ASSURED] flag. If this connection is not used for 180 seconds, it times out. 180 Seconds is a comparatively low value, but should be sufficient for most use. This value is reset to its full value for each packet that matches the same entry and passes through the firewall, just the same as for all of the internal states.
4.6. ICMP connections
ICMP packets are far from a stateful stream, since they are only used for controlling and should never establish any connections. There are four ICMP types that will generate return packets however, and these have 2 different states. These ICMP messages can take the NEW and ESTABLISHED states. The ICMP types we are talking about are Echo request and reply, Timestamp request and reply, Information request and reply and finally Address mask request and reply. Out of these, the timestamp request and information request are obsolete and could most probably just be dropped. However, the Echo messages are used in several setups such as pinging hosts. Address mask requests are not used often, but could be useful at times and worth allowing. To get an idea of how this could look, have a look at the following image.
As you can see in the above picture, the host sends an echo request to the target, which is considered as NEW by the firewall. The target then responds with a echo reply which the firewall considers as state ESTABLISHED. When the first echo request has been seen, the following state entry goes into the ip_conntrack.
icmp     1 25 src=192.168.1.6 dst=192.168.1.10 type=8 code=0 \
     id=33029 [UNREPLIED] src=192.168.1.10 dst=192.168.1.6 \
     type=0 code=0 id=33029 use=1
This entry looks a little bit different from the standard states for TCP and UDP as you can see. The protocol is there, and the timeout, as well as source and destination addresses. The problem comes after that however. We now have 3 new fields called type, code and id. They are not special in any way, the type field contains the ICMP type and the code field contains the ICMP code. These are all available in ICMP types appendix. The final id field, contains the ICMP ID. Each ICMP packet gets an ID set to it when it is sent, and when the receiver gets the ICMP message, it sets the same ID within the new ICMP message so that the sender will recognize the reply and will be able to connect it with the correct ICMP request.
The next field, we once again recognize as the [UNREPLIED] flag, which we have seen before. Just as before, this flag tells us that we are currently looking at a connection tracking entry that has seen only traffic in one direction. Finally, we see the reply expectation for the reply ICMP packet, which is the inversion of the original source and destination IP addresses. As for the type and code, these are changed to the correct values for the return packet, so an echo request is changed to echo reply and so on. The ICMP ID is preserved from the request packet.
The reply packet is considered as being ESTABLISHED, as we have already explained. However, we can know for sure that after the ICMP reply, there will be absolutely no more legal traffic in the same connection. For this reason, the connection tracking entry is destroyed once the reply has traveled all the way through the Netfilter structure.
In each of the above cases, the request is considered as NEW, while the reply is considered as ESTABLISHED. Let's consider this more closely. When the firewall sees a request packet, it considers it as NEW. When the host sends a reply packet to the request it is considered ESTABLISHED.
Note that this means that the reply packet must match the criterion given by the connection tracking entry to be considered as established, just as with all other traffic types. |
ICMP requests has a default timeout of 30 seconds, which you can change in the /proc/sys/net/ipv4/netfilter/ip_ct_icmp_timeout entry. This should in general be a good timeout value, since it will be able to catch most packets in transit.
Another hugely important part of ICMP is the fact that it is used to tell the hosts what happened to specific UDP and TCP connections or connection attempts. For this simple reason, ICMP replies will very often be recognized as RELATED to original connections or connection attempts. A simple example would be the ICMP Host unreachable or ICMP Network unreachable. These should always be spawned back to our host if it attempts an unsuccessful connection to some other host, but the network or host in question could be down, and hence the last router trying to reach the site in question will reply with an ICMP message telling us about it. In this case, the ICMP reply is considered as a RELATED packet. The following picture should explain how it would look.
In the above example, we send out a SYN packet to a specific address. This is considered as a NEW connection by the firewall. However, the network the packet is trying to reach is unreachable, so a router returns a network unreachable ICMP error to us. The connection tracking code can recognize this packet as RELATED. thanks to the already added tracking entry, so the ICMP reply is correctly sent to the client which will then hopefully abort. Meanwhile, the firewall has destroyed the connection tracking entry since it knows this was an error message.
The same behavior as above is experienced with UDP connections if they run into any problem like the above. All ICMP messages sent in reply to UDP connections are considered as RELATED. Consider the following image.
This time an UDP packet is sent to the host. This UDP connection is considered as NEW. However, the network is administratively prohibited by some firewall or router on the way over. Hence, our firewall receives a ICMP Network Prohibited in return. The firewall knows that this ICMP error message is related to the already opened UDP connection and sends it as an RELATED packet to the client. At this point, the firewall destroys the connection tracking entry, and the client receives the ICMP message and should hopefully abort.
4.7. Default connections
In certain cases, the conntrack machine does not know how to handle a specific protocol. This happens if it does not know about that protocol in particular, or doesn't know how it works. In these cases, it goes back to a default behavior. The default behavior is used on, for example, NETBLT, MUX and EGP. This behavior looks pretty much the same as the UDP connection tracking. The first packet is considered NEW, and reply traffic and so forth is considered ESTABLISHED.
When the default behavior is used, all of these packets will attain the same default timeout value. This can be set via the /proc/sys/net/ipv4/netfilter/ip_ct_generic_timeout variable. The default value here is 600 seconds, or 10 minutes. Depending on what traffic you are trying to send over a link that uses the default connection tracking behavior, this might need changing. Especially if you are bouncing traffic through satellites and such, which can take a long time.
4.8. Complex protocols and connection tracking
Certain protocols are more complex than others. What this means when it comes to connection tracking, is that such protocols may be harder to track correctly. Good examples of these are the ICQ, IRC and FTP protocols. Each and every one of these protocols carries information within the actual data payload of the packets, and hence requires special connection tracking helpers to enable it to function correctly.
Let's take the FTP protocol as the first example. The FTP protocol first opens up a single connection that is called the FTP control session. When we issue commands through this session, other ports are opened to carry the rest of the data related to that specific command. These connections can be done in two ways, either actively or passively. When a connection is done actively, the FTP client sends the server a port and IP address to connect to. After this, the FTP client opens up the port and the server connects to that specified port from its own port 20 (known as FTP-Data) and sends the data over it.
The problem here is that the firewall will not know about these extra connections, since they where negotiated within the actual payload of the protocol data. Because of this, the firewall will be unable to know that it should let the server connect to the client over these specific ports.
The solution to this problem is to add a special helper to the connection tracking module which will scan through the data in the control connection for specific syntaxes and information. When it runs into the correct information, it will add that specific information as RELATED and the server will be able to track the connection, thanks to that RELATED entry. Consider the following picture to understand the states when the FTP server has made the connection back to the client.
Passive FTP works the opposite way. The FTP client tells the server that it wants some specific data, upon which the server replies with an IP address to connect to and at what port. The client will, upon receipt of this data, connect to that specific port, from its own port 20(the FTP-data port), and get the data in question. If you have an FTP server behind your firewall, you will in other words require this module in addition to your standard iptables modules to let clients on the Internet connect to the FTP server properly. The same goes if you are extremely restrictive to your users, and only want to let them reach HTTP and FTP servers on the Internet and block all other ports. Consider the following image and its bearing on Passive FTP.
Some conntrack helpers are already available within the kernel itself. More specifically, the FTP and IRC protocols have conntrack helpers as of writing this. If you can not find the conntrack helpers that you need within the kernel itself, you should have a look at the patch-o-matic tree within user-land iptables. The patch-o-matic tree may contain more conntrack helpers, such as for the ntalk or H.323 protocols. If they are not available in the patch-o-matic tree, you have a number of options. Either you can look at the CVS source of iptables, if it has recently gone into that tree, or you can contact the Netfilter-devel mailing list and ask if it is available. If it is not, and there are no plans for adding it, you are left to your own devices and would most probably want to read the Rusty Russell's Unreliable Netfilter Hacking HOW-TO which is linked from the Other resources and links appendix.
Conntrack helpers may either be statically compiled into the kernel, or as modules. If they are compiled as modules, you can load them with the following command
modprobe ip_conntrack_*
Do note that connection tracking has nothing to do with NAT, and hence you may require more modules if you are NAT'ing connections as well. For example, if you were to want to NAT and track FTP connections, you would need the NAT module as well. All NAT helpers starts with ip_nat_ and follow that naming convention; so for example the FTP NAT helper would be named ip_nat_ftp and the IRC module would be named ip_nat_irc. The conntrack helpers follow the same naming convention, and hence the IRC conntrack helper would be named ip_conntrack_irc, while the FTP conntrack helper would be named ip_conntrack_ftp.
Chapter 5. Saving and restoring large rule-sets
The iptables package comes with two more tools that are very useful, specially if you are dealing with larger rule-sets. These two tools are called iptables-save and iptables-restore and are used to save and restore rule-sets to a specific file-format that looks a quite a bit different from the standard shell code that you will see in the rest of this tutorial.
5.1. Speed considerations
One of the largest reasons for using the iptables-save and iptables-restore commands is that they will speed up the loading and saving of larger rule-sets considerably. The main problem with running a shell script that contains iptables rules is that each invocation of iptables within the script will first extract the whole rule-set from the Netfilter kernel space, and after this, it will insert or append rules, or do whatever change to the rule-set that is needed by this specific command. Finally, it will insert the new rule-set from its own memory into kernel space. Using a shell script, this is done for each and every rule that we want to insert, and for each time we do this, it takes more time to extract and insert the rule-set.
To solve this problem, there is the iptables-save and restore commands. The iptables-save command is used to save the rule-set into a specially formatted text-file, and the iptables-restore command is used to load this text-file into kernel again. The best parts of these commands is that they will load and save the rule-set in one single request. iptables-save will grab the whole rule-set from kernel and save it to a file in one single movement. iptables-restore will upload that specific rule-set to kernel in a single movement for each table. In other words, instead of dropping the rule-set out of kernel some 30.000 times, for really large rule-sets, and then upload it to kernel again that many times, we can now save the whole thing into a file in one movement and then upload the whole thing in as little as three movements depending on how many tables you use.
As you can understand, these tools are definitely something for you if you are working on a huge set of rules that needs to be inserted. However, they do have drawbacks that we will discuss more in the next section.
5.2. Drawbacks with restore
As you may have already wondered, can iptables-restore handle any kind of scripting? So far, no, it can not and it will most probably never be able to. This is the main flaw in using iptables-restore since you will not be able to do a huge set of things with these files. For example, what if you have a connection that has a dynamically assigned IP address and you want to grab this dynamic IP every-time the computer boots up and then use that value within your scripts? With iptables-restore, this is more or less impossible.
One possibility to get around this is to make a small script which grabs the values you would like to use in the script, then sed the iptables-restore file for specific keywords and replace them with the values collected via the small script. At this point, you could save it to a temporary file, and then use iptables-restore to load the new values. This causes a lot of problems however, and you will be unable to use iptables-save properly since it would probably erase your manually added keywords in the restore script. It is in other words a clumsy solution.
Another solution is to load the iptables-restore scripts first, and then load a specific shell script that inserts more dynamic rules in their proper places. Of course, as you can understand, this is just as clumsy as the first solution. iptables-restore is simply not very well suited for configurations where IP addresses are dynamically assigned to your firewall or where you want different behaviors depending on configuration options and so on.
Another drawback with iptables-restore and iptables-save is that it is not fully functional as of writing this. The problem is simply that not a lot of people use it as of today and hence there is not a lot of people finding bugs, and in turn some matches and targets will simply be inserted badly, which may lead to some strange behaviors that you did not expect. Even though these problems exist, I would highly recommend using these tools which should work extremely well for most rule-sets as long as they do not contain some of the new targets or matches that it does not know how to handle properly.
5.3. iptables-save
The iptables-save command is, as we have already explained, a tool to save the current rule-set into a file that iptables-restore can use. This command is quite simple really, and takes only two arguments. Take a look at the following example to understand the syntax of the command.
iptables-save [-c] [-t table]
The -c argument tells iptables-save to keep the values specified in the byte and packet counters. This could for example be useful if we would like to reboot our main firewall, but not loose byte and packet counters which we may use for statistical purposes. Issuing a iptables-save command with the -c argument would then make it possible for us to reboot but without breaking our statistical and accounting routines. The default value is, of course, to not keep the counters intact when issuing this command.
The -t argument tells the iptables-save command which tables to save. Without this argument the command will automatically save all tables available into the file. The following is an example on what output you can expect from the iptables-save command if you do not have any rule-set loaded.
# Generated by iptables-save v1.2.6a on Wed Apr 24 10:19:17 2002
*filter
:INPUT ACCEPT [404:19766]
:FORWARD ACCEPT [0:0]
:OUTPUT ACCEPT [530:43376]
COMMIT
# Completed on Wed Apr 24 10:19:17 2002
# Generated by iptables-save v1.2.6a on Wed Apr 24 10:19:17 2002
*mangle
:PREROUTING ACCEPT [451:22060]
:INPUT ACCEPT [451:22060]
:FORWARD ACCEPT [0:0]
:OUTPUT ACCEPT [594:47151]
:POSTROUTING ACCEPT [594:47151]
COMMIT
# Completed on Wed Apr 24 10:19:17 2002
# Generated by iptables-save v1.2.6a on Wed Apr 24 10:19:17 2002
*nat
:PREROUTING ACCEPT [0:0]
:POSTROUTING ACCEPT [3:450]
:OUTPUT ACCEPT [3:450]
COMMIT
# Completed on Wed Apr 24 10:19:17 2002
This contains a few comments starting with a # sign. Each table is marked like *<table-name>, for example *mangle. Then within each table we have the chain specifications and rules. A chain specification looks like :<chain-name> <chain-policy> [<packet-counter>:<byte-counter>]. The chain-name may be for example PREROUTING, the policy is described previously and can for example be ACCEPT. Finally the packet-counter and byte-counters are the same counters as in the output from iptables -L -v. Finally, each table declaration ends in a COMMIT keyword. The COMMIT keyword tells us that at this point we should commit all rules currently in the pipeline to kernel.
The above example is pretty basic, and hence I believe it is nothing more than proper to show a brief example which contains a very small Iptables-save ruleset. If we would run iptables-save on this, it would look something like this in the output:
# Generated by iptables-save v1.2.6a on Wed Apr 24 10:19:55 2002
*filter
:INPUT DROP [1:229]
:FORWARD DROP [0:0]
:OUTPUT DROP [0:0]
-A INPUT -m state --state RELATED,ESTABLISHED -j ACCEPT
-A FORWARD -i eth0 -m state --state RELATED,ESTABLISHED -j ACCEPT
-A FORWARD -i eth1 -m state --state NEW,RELATED,ESTABLISHED -j ACCEPT
-A OUTPUT -m state --state NEW,RELATED,ESTABLISHED -j ACCEPT
COMMIT
# Completed on Wed Apr 24 10:19:55 2002
# Generated by iptables-save v1.2.6a on Wed Apr 24 10:19:55 2002
*mangle
:PREROUTING ACCEPT [658:32445]
:INPUT ACCEPT [658:32445]
:FORWARD ACCEPT [0:0]
:OUTPUT ACCEPT [891:68234]
:POSTROUTING ACCEPT [891:68234]
COMMIT
# Completed on Wed Apr 24 10:19:55 2002
# Generated by iptables-save v1.2.6a on Wed Apr 24 10:19:55 2002
*nat
:PREROUTING ACCEPT [1:229]
:POSTROUTING ACCEPT [3:450]
:OUTPUT ACCEPT [3:450]
-A POSTROUTING -o eth0 -j SNAT --to-source 195.233.192.1
COMMIT
# Completed on Wed Apr 24 10:19:55 2002
As you can see, each command has now been prefixed with the byte and packet counters since we used the -c argument. Except for this, the command-line is quite intact from the script. The only problem now, is how to save the output to a file. Quite simple, and you should already know how to do this if you have used linux at all before. It is only a matter of piping the command output on to the file that you would like to save it as. This could look like the following:
iptables-save -c > /etc/iptables-save
The above command will in other words save the whole rule-set to a file called /etc/iptables-save with byte and packet counters still intact.
5.4. iptables-restore
The iptables-restore command is used to restore the iptables rule-set that was saved with the iptables-save command. It takes all the input from standard input and can not load from files as of writing this, unfortunately. This is the command syntax for iptables-restore:
iptables-restore [-c] [-n]
The -c argument restores the byte and packet counters and must be used if you want to restore counters that was previously saved with iptables-save. This argument may also be written in its long form --counters.
The -n argument tells iptables-restore to not overwrite the previously written rules in the table, or tables, that it is writing to. The default behavior of iptables-restore is to flush and destroy all previously inserted rules. The short -n argument may also be replaced with the longer format --noflush.
To load rule-set with the iptables-restore command, we could do this in several ways, but we will mainly look at the simplest and most common way here.
cat /etc/iptables-save | iptables-restore -c
This would cat the rule-set located within the /etc/iptables-save file and then pipe it to iptables-restore which takes the rule-set on the standard input and then restores it, including byte and packet counters. It is that simple to begin with. This command could be varied until oblivion and we could show different piping possibilities, however, this is a bit out of the scope of this chapter, and hence we will skip that part and leave it as an exercise for the reader to experiment with.
The rule-set should now be loaded properly to kernel and everything should work. If not, you may possibly have run into a bug in these commands, however likely that sounds.
Chapter 6. How a rule is built
This chapter will discuss at length how to build your own rules. A rule could be described as the directions the firewall will adhere to when blocking or permitting different connections and packets in a specific chain. Each line you write that's inserted to a chain should be considered a rule. We will also discuss the basic matches that are available, and how to use them, as well as the different targets and how we can construct new targets of our own (i.e., new sub chains).
6.1. Basics
As we have already explained, each rule is a line that the kernel looks at to find out what to do with a packet. If all the criteria - or matches - are met, we perform the target - or jump - instruction. Normally we would write our rules in a syntax that looks something like this:
iptables [-t table] command [match] [target/jump]
There is nothing that says that the target instruction has to be last function in the line. However, you would usually adhere to this syntax to get the best readability. Anyway, most of the rules you'll see are written in this way. Hence, if you read someone else's script, you'll most likely recognize the syntax and easily understand the rule.
If you want to use another table than the standard table, you could insert the table specification at the point at which [table] is specified. However, it is not necessary to state explicitly what table to use, since by default iptables uses the filter table on which to implement all commands. Neither do you have to specify the table at just this point in the rule. It could be set pretty much anywhere along the line. However, it is more or less standard to put the table specification at the beginning.
One thing to think about though: The command should always come first, or alternatively directly after the table specification. We use 'command' to tell the program what to do, for example to insert a rule or to add a rule to the end of the chain, or to delete a rule. We shall take a further look at this below.
The match is the part of the rule that we send to the kernel that details the specific character of the packet, what makes it different from all other packets. Here we could specify what IP address the packet comes from, from which network interface, the intended IP address, port, protocol or whatever. There is a heap of different matches that we can use that we will look closer at further on in this chapter.
Finally we have the target of the packet. If all the matches are met for a packet, we tell the kernel what to do with it. We could, for example, tell the kernel to send the packet to another chain that we've created ourselves, and which is part of this particular table. We could tell the kernel to drop the packet dead and do no further processing, or we could tell the kernel to send a specified reply to the sender. As with the rest of the content in this section, we'll look closer at it further on in the chapter.
6.2. Tables
The -t option specifies which table to use. Per default, the filter table is used. We may specify one of the following tables with the -t option. Do note that this is an extremely brief summary of some of the contents of the Traversing of tables and chains chapter.
Table 6-1. Tables
| Table | Explanation |
|---|---|
| nat | The nat table is used mainly for Network Address Translation. "NAT"ed packets get their IP addresses altered, according to our rules. Packets in a stream only traverse this table once. We assume that the first packet of a stream is allowed. The rest of the packets in the same stream are automatically "NAT"ed or Masqueraded etc, and will be subject to the same actions as the first packet. These will, in other words, not go through this table again, but will nevertheless be treated like the first packet in the stream. This is the main reason why you should not do any filtering in this table, which we will discuss at greater length further on. The PREROUTING chain is used to alter packets as soon as they get in to the firewall. The OUTPUT chain is used for altering locally generated packets (i.e., on the firewall) before they get to the routing decision. Finally we have the POSTROUTING chain which is used to alter packets just as they are about to leave the firewall. |
| mangle | This table is used mainly for mangling packets. Among other things, we can change the contents of different packets and that of their headers. Examples of this would be to change the TTL, TOS or MARK. Note that the MARK is not really a change to the packet, but a mark value for the packet is set in kernel space. Other rules or programs might use this mark further along in the firewall to filter or do advanced routing on; tc is one example. The table consists of five built in chains, the PREROUTING, POSTROUTING, OUTPUT, INPUT and FORWARD chains. PREROUTING is used for altering packets just as they enter the firewall and before they hit the routing decision. POSTROUTING is used to mangle packets just after all routing decisions has been made. OUTPUT is used for altering locally generated packets before they enter the routing decision. INPUT is used to alter packets after they have been routed to the local computer itself, but before the user space application actually sees the data. FORWARD is used to mangle packets after they have hit the first routing decision, but before they actually hit the last routing decision. Note that mangle can not be used for any kind of Network Address Translation or Masquerading, the nat table was made for these kinds of operations. |
| filter | The filter table should be used exclusively for filtering packets. For example, we could DROP, LOG, ACCEPT or REJECT packets without problems, as we can in the other tables. There are three chains built in to this table. The first one is named FORWARD and is used on all non-locally generated packets that are not destined for our local host (the firewall, in other words). INPUT is used on all packets that are destined for our local host (the firewall) and OUTPUT is finally used for all locally generated packets. |
The above details should have explained the basics about the three different tables that are available. They should be used for totally different purposes, and you should know what to use each chain for. If you do not understand their usage, you may well dig a pit for yourself in your firewall, into which you will fall as soon as someone finds it and pushes you into it. We have already discussed the requisite tables and chains in more detail within the Traversing of tables and chains chapter. If you do not understand this fully, I advise you to go back and read through it again.
6.3. Commands
In this section we will cover all the different commands and what can be done with them. The command tells iptables what to do with the rest of the rule that we send to the parser. Normally we would want either to add or delete something in some table or another. The following commands are available to iptables:
Table 6-2. Commands
| Command | -A, --append |
| Example | iptables -A INPUT ... |
| Explanation | This command appends the rule to the end of the chain. The rule will in other words always be put last in the rule-set and hence be checked last, unless you append more rules later on. |
| Command | -D, --delete |
| Example | iptables -D INPUT --dport 80 -j DROP, iptables -D INPUT 1 |
| Explanation | This command deletes a rule in a chain. This could be done in two ways; either by entering the whole rule to match (as in the first example), or by specifying the rule number that you want to match. If you use the first method, your entry must match the entry in the chain exactly. If you use the second method, you must match the number of the rule you want to delete. The rules are numbered from the top of each chain, starting with number 1. |
| Command | -R, --replace |
| Example | iptables -R INPUT 1 -s 192.168.0.1 -j DROP |
| Explanation | This command replaces the old entry at the specified line. It works in the same way as the --delete command, but instead of totally deleting the entry, it will replace it with a new entry. The main use for this might be while you're experimenting with iptables. |
| Command | -I, --insert |
| Example | iptables -I INPUT 1 --dport 80 -j ACCEPT |
| Explanation | Insert a rule somewhere in a chain. The rule is inserted as the actual number that we specify. In other words, the above example would be inserted as rule 1 in the INPUT chain, and hence from now on it would be the very first rule in the chain. |
| Command | -L, --list |
| Example | iptables -L INPUT |
| Explanation | This command lists all the entries in the specified chain. In the above case, we would list all the entries in the INPUT chain. It's also legal to not specify any chain at all. In the last case, the command would list all the chains in the specified table (To specify a table, see the Tables section). The exact output is affected by other options sent to the parser, for example the -n and -v options, etc. |
| Command | -F, --flush |
| Example | iptables -F INPUT |
| Explanation | This command flushes all rules from the specified chain and is equivalent to deleting each rule one by one, but is quite a bit faster. The command can be used without options, and will then delete all rules in all chains within the specified table. |
| Command | -Z, --zero |
| Example | iptables -Z INPUT |
| Explanation | This command tells the program to zero all counters in a specific chain, or in all chains. If you have used the -v option with the -L command, you have probably seen the packet counter at the beginning of each field. To zero this packet counter, use the -Z option. This option works the same as -L, except that -Z won't list the rules. If -L and -Z is used together (which is legal), the chains will first be listed, and then the packet counters are zeroed. |
| Command | -N, --new-chain |
| Example | iptables -N allowed |
| Explanation | This command tells the kernel to create a new chain of the specified name in the specified table. In the above example we create a chain called allowed. Note that there must not already be a chain or target of the same name. |
| Command | -X, --delete-chain |
| Example | iptables -X allowed |
| Explanation | This command deletes the specified chain from the table. For this command to work, there must be no rules that refer to the chain that is to be deleted. In other words, you would have to replace or delete all rules referring to the chain before actually deleting the chain. If this command is used without any options, all chains but those built in to the specified table will be deleted. |
| Command | -P, --policy |
| Example | iptables -P INPUT DROP |
| Explanation | This command tells the kernel to set a specified default target, or policy, on a chain. All packets that don't match any rule will then be forced to use the policy of the chain. Legal targets are DROP and ACCEPT (There might be more, mail me if so). |
| Command | -E, --rename-chain |
| Example | iptables -E allowed disallowed |
| Explanation | The -E command tells iptables to change the first name of a chain, to the second name. In the example above we would, in other words, change the name of the chain from allowed to disallowed. Note that this will not affect the actual way the table will work. It is, in other words, just a cosmetic change to the table. |
You should always enter a complete command line, unless you just want to list the built-in help for iptables or get the version of the command. To get the version, use the -v option and to get the help message, use the -h option. As usual, in other words. Next comes a few options that can be used with various different commands. Note that we tell you with which commands the options can be used and what effect they will have. Also note that we do not include any options here that affect rules or matches. Instead, we'll take a look at matches and targets in a later section of this chapter.
Table 6-3. Options
| Option | -v, --verbose |
| Commands used with | --list, --append, --insert, --delete, --replace |
| Explanation | This command gives verbose output and is mainly used together with the --list command. If used together with the --list command, it outputs the interface address, rule options and TOS masks. The --list command will also include a bytes and packet counter for each rule, if the --verbose option is set. These counters uses the K (x1000), M (x1,000,000) and G (x1,000,000,000) multipliers. To overrule this and get exact output, you can use the -x option, described later. If this option is used with the --append, --insert, --delete or --replace commands, the program will output detailed information on how the rule was interpreted and whether it was inserted correctly, etc. |
| Option | -x, --exact |
| Commands used with | --list |
| Explanation | This option expands the numerics. The output from --list will in other words not contain the K, M or G multipliers. Instead we will get an exact output from the packet and byte counters of how many packets and bytes that have matched the rule in question. Note that this option is only usable in the --list command and isn't really relevant for any of the other commands. |
| Option | -n, --numeric |
| Commands used with | --list |
| Explanation | This option tells iptables to output numerical values. IP addresses and port numbers will be printed by using their numerical values and not host-names, network names or application names. This option is only applicable to the --list command. This option overrides the default of resolving all numerics to hosts and names, where this is possible. |
| Option | --line-numbers |
| Commands used with | --list |
| Explanation | The --line-numbers command, together with the --list command, is used to output line numbers. Using this option, each rule is output with its number. It could be convenient to know which rule has which number when inserting rules. This option only works with the --list command. |
| Option | -c, --set-counters |
| Commands used with | --insert, --append, --replace |
| Explanation | This option is used when creating a rule or modifying it in some way. We can then use the option to initialize the packet and byte counters for the rule. The syntax would be something like --set-counters 20 4000, which would tell the kernel to set the packet counter to 20 and byte counter to 4000. |
| Option | --modprobe |
| Commands used with | All |
| Explanation | The --modprobe option is used to tell iptables which module to use when probing for modules or adding them to the kernel. It could be used if your modprobe command is not somewhere in the search path etc. In such cases, it might be necessary to specify this option so the program knows what to do in case a needed module is not loaded. This option can be used with all commands. |
6.4. Matches
In this section we'll talk a bit more about matches. I've chosen to narrow down the matches into five different subcategories. First of all we have the generic matches, which can be used in all rules. Then we have the TCP matches which can only be applied to TCP packets. We have UDP matches which can only be applied to UDP packets, and ICMP matches which can only be used on ICMP packets. Finally we have special matches, such as the state, owner and limit matches and so on. These final matches have in turn been narrowed down to even more subcategories, even though they might not necessarily be different matches at all. I hope this is a reasonable breakdown and that all people out there can understand it.
6.4.1. Generic matches
This section will deal with Generic matches. A generic match is a kind of match that is always available, whatever kind of protocol we are working on, or whatever match extensions we have loaded. No special parameters at all are needed to use these matches; in other words. I have also included the --protocol match here, even though it is more specific to protocol matches. For example, if we want to use a TCP match, we need to use the --protocol match and send TCP as an option to the match. However, --protocol is also a match in itself, since it can be used to match specific protocols. The following matches are always available.
Table 6-4. Generic matches
| Match | -p, --protocol |
| Example | iptables -A INPUT -p tcp |
| Explanation | This match is used to check for certain protocols. Examples of protocols are TCP, UDP and ICMP. The protocol must either be one of the internally specified TCP, UDP or ICMP. It may also take a value specified in the /etc/protocols file, and if it can not find the protocol there it will reply with an error. The protocl may also be a integer value. For example, the ICMP protocol is integer value 1, TCP is 6 and UDP is 17. Finally, it may also take the value ALL. ALL means that it matches only TCP, UDP and ICMP. The command may also take a comma delimited list of protocols, such as udp,tcp which would match all UDP and TCP packets. If this match is given the integer value of zero (0), it means ALL protocols, which in turn is the default behavior, if the --protocol match is not used. This match can also be inversed with the ! sign, so --protocol ! tcp would mean to match UDP and ICMP. |
| Match | -s, --src, --source |
| Example | iptables -A INPUT -s 192.168.1.1 |
| Explanation | This is the source match, which is used to match packets, based on their source IP address. The main form can be used to match single IP addresses, such as 192.168.1.1. It could also be used with a netmask in a CIDR "bit" form, by specifying the number of ones (1's) on the left side of the network mask. This means that we could for example add /24 to use a 255.255.255.0 netmask. We could then match whole IP ranges, such as our local networks or network segments behind the firewall. The line would then look something like 192.168.0.0/24. This would match all packets in the 192.168.0.x range. Another way is to do it with an regular netmask in the 255.255.255.255 form (i.e., 192.168.0.0/255.255.255.0). We could also invert the match with an ! just as before. If we were in other words to use a match in the form of --source ! 192.168.0.0/24, we would match all packets with a source address not coming from within the 192.168.0.x range. The default is to match all IP addresses. |
| Match | -d, --dst, --destination |
| Example | iptables -A INPUT -d 192.168.1.1 |
| Explanation | The --destination match is used for packets based on their destination address or addresses. It works pretty much the same as the --source match and has the same syntax, except that the match is based on where the packets are going to. To match an IP range, we can add a netmask either in the exact netmask form, or in the number of ones (1's) counted from the left side of the netmask bits. Examples are: 192.168.0.0/255.255.255.0 and 192.168.0.0/24. Both of these are equivalent. We could also invert the whole match with an ! sign, just as before. --destination ! 192.168.0.1 would in other words match all packets except those not destined to the 192.168.0.1 IP address. |
| Match | -i, --in-interface |
| Example | iptables -A INPUT -i eth0 |
| Explanation | This match is used for the interface the packet came in on. Note that this option is only legal in the INPUT, FORWARD and PREROUTING chains and will return an error message when used anywhere else. The default behavior of this match, if no particular interface is specified, is to assume a string value of +. The + value is used to match a string of letters and numbers. A single + would in other words tell the kernel to match all packets without considering which interface it came in on. The + string can also be appended to the type of interface, so eth+ would all Ethernet devices. We can also invert the meaning of this option with the help of the ! sign. The line would then have a syntax looking something like -i ! eth0, which would match all incoming interfaces, except eth0. |
| Match | -o, --out-interface |
| Example | iptables -A FORWARD -o eth0 |
| Explanation | The --out-interface match is used for packets on the interface from which they are leaving. Note that this match is only available in the OUTPUT, FORWARD and POSTROUTING chains, the opposite in fact of the --in-interface match. Other than this, it works pretty much the same as the --in-interface match. The + extension is understood as matching all devices of similar type, so eth+ would match all eth devices and so on. To invert the meaning of the match, you can use the ! sign in exactly the same way as for the --in-interface match. If no --out-interface is specified, the default behavior for this match is to match all devices, regardless of where the packet is going. |
| Match | -f, --fragment |
| Example | iptables -A INPUT -f |
| Explanation | This match is used to match the second and third part of a fragmented packet. The reason for this is that in the case of fragmented packets, there is no way to tell the source or destination ports of the fragments, nor ICMP types, among other things. Also, fragmented packets might in rather special cases be used to compound attacks against other computers. Packet fragments like this will not be matched by other rules, and hence this match was created. This option can also be used in conjunction with the ! sign; however, in this case the ! sign must precede the match, i.e. ! -f. When this match is inverted, we match all header fragments and/or unfragmented packets. What this means, is that we match all the first fragments of fragmented packets, and not the second, third, and so on. We also match all packets that have not been fragmented during transfer. Note also that there are really good defragmentation options within the kernel that you can use instead. As a secondary note, if you use connection tracking you will not see any fragmented packets, since they are dealt with before hitting any chain or table in iptables. |
6.4.2. Implicit matches
This section will describe the matches that are loaded implicitly. Implicit matches are implied, taken for granted, automatic. For example when we match on --protocol tcp without any further criteria. There are currently three types of implicit matches for three different protocols. These are TCP matches, UDP matches and ICMP matches. The TCP based matches contain a set of unique criteria that are available only for TCP packets. UDP based matches contain another set of criteria that are available only for UDP packets. And the same thing for ICMP packets. On the other hand, there can be explicit matches that are loaded explicitly. Explicit matches are not implied or automatic, you have to specify them specifically. For these you use the -m or --match option, which we will discuss in the next section.
6.4.2.1. TCP matches
These matches are protocol specific and are only available when working with TCP packets and streams. To use these matches, you need to specify --protocol tcp on the command line before trying to use them. Note that the --protocol tcp match must be to the left of the protocol specific matches. These matches are loaded implicitly in a sense, just as the UDP and ICMP matches are loaded implicitly. The other matches will be looked over in the continuation of this section, after the TCP match section.
Table 6-5. TCP matches
| Match | --sport, --source-port |
| Example | iptables -A INPUT -p tcp --sport 22 |
| Explanation | The --source-port match is used to match packets based on their source port. Without it, we imply all source ports. This match can either take a service name or a port number. If you specify a service name, the service name must be in the /etc/services file, since iptables uses this file in which to find. If you specify the port by its number, the rule will load slightly faster, since iptables don't have to check up the service name. However, the match might be a little bit harder to read than if you use the service name. If you are writing a rule-set consisting of a 200 rules or more, you should definitely use port numbers, since the difference is really noticeable. (On a slow box, this could make as much as 10 seconds' difference, if you have configured a large rule-set containing 1000 rules or so). You can also use the --source-port match to match any range of ports, --source-port 22:80 for example. This example would match all source ports between 22 and 80. If you omit specifying the first port, port 0 is assumed (is implicit). --source-port :80 would then match port 0 through 80. And if the last port specification is omitted, port 65535 is assumed. If you were to write --source-port 22:, you would have specified a match for all ports from port 22 through port 65535. If you invert the port range, iptables automatically reverses your inversion. If you write --source-port 80:22, it is simply interpreted as --source-port 22:80. You can also invert a match by adding a ! sign. For example, --source-port ! 22 means that you want to match all ports but port 22. The inversion could also be used together with a port range and would then look like --source-port ! 22:80, which in turn would mean that you want to match all ports but port 22 through 80. Note that this match does not handle multiple separated ports and port ranges. For more information about those, look at the multiport match extension. |
| Match | --dport, --destination-port |
| Example | iptables -A INPUT -p tcp --dport 22 |
| Explanation | This match is used to match TCP packets, according to their destination port. It uses exactly the same syntax as the --source-port match. It understands port and port range specifications, as well as inversions. It also reverses high and low ports in port range specifications, as above. The match will also assume values of 0 and 65535 if the high or low port is left out in a port range specification. In other words, exactly the same as the --source-port syntax. Note that this match does not handle multiple separated ports and port ranges. For more information about those, look at the multiport match extension. |
| Match | --tcp-flags |
| Example | iptables -p tcp --tcp-flags SYN,FIN,ACK SYN |
| Explanation | This match is used to match on the TCP flags in a packet. First of all, the match takes a list of flags to compare (a mask) and secondly it takes list of flags that should be set to 1, or turned on. Both lists should be comma-delimited. The match knows about the SYN, ACK, FIN, RST, URG, PSH flags, and it also recognizes the words ALL and NONE. ALL and NONE is pretty much self describing: ALL means to use all flags and NONE means to use no flags for the option. --tcp-flags ALL NONE would in other words mean to check all of the TCP flags and match if none of the flags are set. This option can also be inverted with the ! sign. For example, if we specify ! SYN,FIN,ACK SYN, we would get a match that would match packets that had the ACK and FIN bits set, but not the SYN bit. Also note that the comma delimitation should not include spaces. You can see the correct syntax in the example above. |
| Match | --syn |
| Example | iptables -p tcp --syn |
| Explanation | The --syn match is more or less an old relic from the ipchains days and is still there for backward compatibility and for and to make transition one to the other easier. It is used to match packets if they have the SYN bit set and the ACK and RST bits unset. This command would in other words be exactly the same as the --tcp-flags SYN,RST,ACK SYN match. Such packets are mainly used to request new TCP connections from a server. If you block these packets, you should have effectively blocked all incoming connection attempts. However, you will not have blocked the outgoing connections, which a lot of exploits today use (for example, hacking a legitimate service and then installing a program or suchlike that enables initiating an existing connection to your host, instead of opening up a new port on it). This match can also be inverted with the ! sign in this, ! --syn, way. This would match all packets with the RST or the ACK bits set, in other words packets in an already established connection. |
| Match | --tcp-option |
| Example | iptables -p tcp --tcp-option 16 |
| Explanation | This match is used to match packets depending on their TCP options. A TCP Option is a specific part of the header. This part consists of 3 different fields. The first one is 8 bits long and tells us which Options are used in this stream, the second one is also 8 bits long and tells us how long the options field is. The reason for this length field is that TCP options are, well, optional. To be compliant with the standards, we do not need to implement all options, but instead we can just look at what kind of option it is, and if we do not support it, we just look at the length field and can then jump over this data. This match is used to match different TCP options depending on their decimal values. It may also be inverted with the ! flag, so that the match matches all TCP options but the option given to the match. For a complete list of all options, take a closer look at the Internet Engineering Task Force who maintains a list of all the standard numbers used on the Internet. |
6.4.2.2. UDP matches
This section describes matches that will only work together with UDP packets. These matches are implicitly loaded when you specify the --protocol UDP match and will be available after this specification. Note that UDP packets are not connection oriented, and hence there is no such thing as different flags to set in the packet to give data on what the datagram is supposed to do, such as open or closing a connection, or if they are just simply supposed to send data. UDP packets do not require any kind of acknowledgment either. If they are lost, they are simply lost (Not taking ICMP error messaging etc into account). This means that there are quite a lot less matches to work with on a UDP packet than there is on TCP packets. Note that the state machine will work on all kinds of packets even though UDP or ICMP packets are counted as connectionless protocols. The state machine works pretty much the same on UDP packets as on TCP packets.
Table 6-6. UDP matches
| Match | --sport, --source-port |
| Example | iptables -A INPUT -p udp --sport 53 |
| Explanation | This match works exactly the same as its TCP counterpart. It is used to perform matches on packets based on their source UDP ports. It has support for port ranges, single ports and port inversions with the same syntax. To specify a UDP port range, you could use 22:80 which would match UDP ports 22 through 80. If the first value is omitted, port 0 is assumed. If the last port is omitted, port 65535 is assumed. If the high port comes before the low port, the ports switch place with each other automatically. Single UDP port matches look as in the example above. To invert the port match, add a ! sign, --source-port ! 53. This would match all ports but port 53. The match can understand service names, as long as they are available in the /etc/services file. Note that this match does not handle multiple separated ports and port ranges. For more information about this, look at the multiport match extension. |
| Match | --dport, --destination-port |
| Example | iptables -A INPUT -p udp --dport 53 |
| Explanation | The same goes for this match as for --source-port above. It is exactly the same as for the equivalent TCP match, but here it applies to UDP packets. It matches packets based on their UDP destination port. The match handles port ranges, single ports and inversions. To match a single port you use, for example, --destination-port 53, to invert this you would use --destination-port ! 53. The first would match all UDP packets going to port 53 while the second would match packets but those going to the destination port 53. To specify a port range, you would, for example, use --destination-port 9:19. This example would match all packets destined for UDP port 9 through 19. If the first port is omitted, port 0 is assumed. If the second port is omitted, port 65535 is assumed. If the high port is placed before the low port, they automatically switch place, so the low port winds up before the high port. Note that this match does not handle multiple ports and port ranges. For more information about this, look at the multiport match extension. |
6.4.2.3. ICMP matches
These are the ICMP matches. These packets are even more ephemeral, that is to say short lived, than UDP packets, in the sense that they are connectionless. The ICMP protocol is mainly used for error reporting and for connection controlling and suchlike. ICMP is not a protocol subordinated to the IP protocol, but more of a protocol that augments the IP protocol and helps in handling errors. The headers of ICMP packets are very similar to those of the IP headers, but differ in a number of ways. The main feature of this protocol is the type header, that tells us what the packet is for. One example is, if we try to access an unaccessible IP address, we would normally get an ICMP host unreachable in return. For a complete listing of ICMP types, see the ICMP types appendix. There is only one ICMP specific match available for ICMP packets, and hopefully this should suffice. This match is implicitly loaded when we use the --protocol ICMP match and we get access to it automatically. Note that all the generic matches can also be used, so that among other things we can match on the source and destination addresses.
Table 6-7. ICMP matches
| Match | --icmp-type |
| Example | iptables -A INPUT -p icmp --icmp-type 8 |
| Explanation | This match is used to specify the ICMP type to match. ICMP types can be specified either by their numeric values or by their names. Numerical values are specified in RFC 792. To find a complete listing of the ICMP name values, do an iptables --protocol icmp --help, or check the ICMP types appendix. This match can also be inverted with the ! sign in this, --icmp-type ! 8, fashion. Note that some ICMP types are obsolete, and others again may be "dangerous" for an unprotected host since they may, among other things, redirect packets to the wrong places. |
6.4.3. Explicit matches
Explicit matches are those that have to be specifically loaded with the -m or --match option. State matches, for example, demand the directive -m state prior to entering the actual match that you want to use. Some of these matches may be protocol specific . Some may be unconnected with any specific protocol - for example connection states. These might be NEW (the first packet of an as yet unestablished connection), ESTABLISHED (a connection that is already registered in the kernel), RELATED (a new connection that was created by an older, established one) etc. A few may just have been evolved for testing or experimental purposes, or just to illustrate what iptables is capable of. This in turn means that not all of these matches may at first sight be of any use. Nevertheless, it may well be that you personally will find a use for specific explicit matches. And there are new ones coming along all the time, with each new iptables release. Whether you find a use for them or not depends on your imagination and your needs. The difference between implicitly loaded matches and explicitly loaded ones, is that the implicitly loaded matches will automatically be loaded when, for example, you match on the properties of TCP packets, while explicitly loaded matches will never be loaded automatically - it is up to you to discover and activate explicit matches.
6.4.3.1. Limit match
The limit match extension must be loaded explicitly with the -m limit option. This match can, for example, be used to advantage to give limited logging of specific rules etc. For example, you could use this to match all packets that does not exceed a given value, and after this value has been exceeded, limit logging of the event in question. Think of a time limit : You could limit how many times a certain rule may be matched in a certain time frame, for example to lessen the effects of DoS syn flood attacks. This is its main usage, but there are more usages, of course. The limit match may also be inverted by adding a ! flag in front of the limit match. It would then be expressed as -m limit ! --limit 5/s.This means that all packets will be matched after they have broken thelimit.
To further explain the limit match, it is basically a token bucket filter. Consider having a leaky bucket where the bucket leaks X packets per time-unit. X is defined depending on how many matching packets we get, so if we get 3 packets, the bucket leaks 3 packets per that time-unit. The --limit option tells us how many packets to refill the bucket with per time-unit, while the --limit-burst option tells us how big the bucket is in the first place. So, setting --limit 3/minute --limit-burst 5, and then receiving 5 matches will empty the bucket. After 20 seconds, the bucket is refilled with another token, and so on until the --limit-burst is reached again or until they get used.
Consider the example below for further explanation of how this may look.
We set a rule with -m limit --limit 5/second --limit-burst 10/second. The limit-burst token bucket is set to 10 initially. Each packet that matches the rule uses a token.
We get packet that matches, 1-2-3-4-5-6-7-8-9-10, all within a 1/1000 of a second.
The token bucket is now empty. Once the token bucket is empty, the packets that qualify for the rule otherwise no longer match the rule and proceed to the next rule if any, or hit the chain policy.
For each 1/5 s without a matching packet, the token count goes up by 1, upto a maximum of 10. 1 second after receiving the 10 packets, we will once again have 5 tokens left.
And of course, the bucket will be emptied by 1 token for each packet it receives.
Table 6-8. Limit match options
| Match | --limit |
| Example | iptables -A INPUT -m limit --limit 3/hour |
| Explanation | This sets the maximum average match rate for the limit match. You specify it with a number and an optional time unit. The following time units are currently recognized: /second /minute /hour /day. The default value here is 3 per hour, or 3/hour. This tells the limit match how many times to allow the match to occur per time unit (e.g. per minute). |
| Match | --limit-burst |
| Example | iptables -A INPUT -m limit --limit-burst 5 |
| Explanation | This is the setting for the burst limit of the limit match. It tells iptables the maximum number of packets to match within the given time unit. This number gets decremented by one for every time unit (specified by the --limit option) in which the event does not occur, back down to the lowest possible value, 1. If the event is repeated, the counter is again incremented, until the count reaches the burst limit. And so on. The default --limit-burst value is 5. For a simple way of checking out how this works, you can use the example Limit-match.txt one-rule-script. Using this script, you can see for yourself how the limit rule works, by simply sending ping packets at different intervals and in different burst numbers. All echo replies will be blocked until the threshold for the burst limit has again been reached. |
6.4.3.2. MAC match
The MAC (Ethernet Media Access Control) match can be used to match packets based on their MAC source address. As of writing this documentation, this match is a little bit limited, however, in the future this may be more evolved and may be more useful. This match can be used to match packets on the source MAC address only as previously said.
Do note that to use this module we explicitly load it with the -m mac option. The reason that I am saying this is that a lot of people wonder if it should not be -m mac-source, which it should not. |
Table 6-9. MAC match options
| Match | --mac-source |
| Example | iptables -A INPUT -m mac --mac-source 00:00:00:00:00:01 |
| Explanation | This match is used to match packets based on their MAC source address. The MAC address specified must be in the form XX:XX:XX:XX:XX:XX, else it will not be legal. The match may be reversed with an ! sign and would look like --mac-source ! 00:00:00:00:00:01. This would in other words reverse the meaning of the match, so that all packets except packets from this MAC address would be matched. Note that since MAC addresses are only used on Ethernet type networks, this match will only be possible to use for Ethernet interfaces. The MAC match is only valid in the PREROUTING, FORWARD and INPUT chains and nowhere else. |
6.4.3.3. Mark match
The mark match extension is used to match packets based on the marks they have set. A mark is a special field, only maintained within the kernel, that is associated with the packets as they travel through the computer. Marks may be used by different kernel routines for such tasks as traffic shaping and filtering. As of today, there is only one way of setting a mark in Linux, namely the MARK target in iptables. This was previously done with the FWMARK target in ipchains, and this is why people still refer to FWMARK in advanced routing areas. The mark field is currently set to an unsigned integer, or 4294967296 possible values on a 32 bit system. In other words, you are probably not going to run into this limit for quite some time.
Table 6-10. Mark match options
| Match | --mark |
| Example | iptables -t mangle -A INPUT -m mark --mark 1 |
| Explanation | This match is used to match packets that have previously been marked. Marks can be set with the MARK target which we will discuss in the next section. All packets traveling through Netfilter get a special mark field associated with them. Note that this mark field is not in any way propagated, within or outside the packet. It stays inside the computer that made it. If the mark field matches the mark, it is a match. The mark field is an unsigned integer, hence there can be a maximum of 4294967296 different marks. You may also use a mask with the mark. The mark specification would then look like, for example, --mark 1/1. If a mask is specified, it is logically AND ed with the mark specified before the actual comparison. |
6.4.3.4. Multiport match
The multiport match extension can be used to specify multiple destination ports and port ranges. Without the possibility this match gives, you would have to use multiple rules of the same type, just to match different ports.
You can not use both standard port matching and multiport matching at the same time, for example you can't write: --sport 1024:63353 -m multiport --dport 21,23,80. This will simply not work. What in fact happens, if you do, is that iptables honors the first element in the rule, and ignores the multiport instruction. |
Table 6-11. Multiport match options
| Match | --source-port |
| Example | iptables -A INPUT -p tcp -m multiport --source-port 22,53,80,110 |
| Explanation | This match matches multiple source ports. A maximum of 15 separate ports may be specified. The ports must be comma delimited, as in the above example. The match may only be used in conjunction with the -p tcp or -p udp matches. It is mainly an enhanced version of the normal --source-port match. |
| Match | --destination-port |
| Example | iptables -A INPUT -p tcp -m multiport --destination-port 22,53,80,110 |
| Explanation | This match is used to match multiple destination ports. It works exactly the same way as the above mentioned source port match, except that it matches destination ports. It too has a limit of 15 ports and may only be used in conjunction with -p tcp and -p udp. |
| Match | --port |
| Example | iptables -A INPUT -p tcp -m multiport --port 22,53,80,110 |
| Explanation | This match extension can be used to match packets based both on their destination port and their source port. It works the same way as the --source-port and --destination-port matches above. It can take a maximum of 15 ports and can only be used in conjunction with -p tcp and -p udp. Note that the --port match will only match packets coming in from and going to the same port, for example, port 80 to port 80, port 110 to port 110 and so on. |
6.4.3.5. Owner match
The owner match extension is used to match packets based on the identity of the process that created them. The owner can be specified as the process ID either of the user who issued the command in question, that of the group, the process, the session, or that of the command itself. This extension was originally written as an example of what iptables could be used for. The owner match only works within the OUTPUT chain, for obvious reasons: It is pretty much impossible to find out any information about the identity of the instance that sent a packet from the other end, or where there is an intermediate hop to the real destination. Even within the OUTPUT chain it is not very reliable, since certain packets may not have an owner. Notorious packets of that sort are (among other things) the different ICMP responses. ICMP responses will never match.
Table 6-12. Owner match options
| Match | --uid-owner |
| Example | iptables -A OUTPUT -m owner --uid-owner 500 |
| Explanation | This packet match will match if the packet was created by the given User ID (UID). This could be used to match outgoing packets based on who created them. One possible use would be to block any other user than root from opening new connections outside your firewall. Another possible use could be to block everyone but the http user from sending packets from the HTTP port. |
| Match | --gid-owner |
| Example | iptables -A OUTPUT -m owner --gid-owner 0 |
| Explanation | This match is used to match all packets based on their Group ID (GID). This means that we match all packets based on what group the user creating the packets are in. This could be used to block all but the users in the network group from getting out onto the Internet or, as described above, only to allow members of the http group to create packets going out from the HTTP port. |
| Match | --pid-owner |
| Example | iptables -A OUTPUT -m owner --pid-owner 78 |
| Explanation | This match is used to match packets based on the Process ID (PID) that was responsible for them. This match is a bit harder to use, but one example would be only to allow PID 94 to send packets from the HTTP port (if the HTTP process is not threaded, of course). Alternatively we could write a small script that grabs the PID from a ps output for a specific daemon and then adds a rule for it. For an example, you could have a rule as shown in the Pid-owner.txt example. |
| Match | --sid-owner |
| Example | iptables -A OUTPUT -m owner --sid-owner 100 |
| Explanation | This match is used to match packets based on the Session ID used by the program in question. The value of the SID, or Session ID of a process, is that of the process itself and all processes resulting from the originating process. These latter could be threads, or a child of the original process. So, for example, all of our HTTPD processes should have the same SID as their parent process (the originating HTTPD process), if our HTTPD is threaded (most HTTPDs are, Apache and Roxen for instance). To show this in example, we have created a small script called Sid-owner.txt. This script could possibly be run every hour or so together with some extra code to check if the HTTPD is actually running and start it again if necessary, then flush and re-enter our OUTPUT chain if needed. |
6.4.3.6. State match
The state match extension is used in conjunction with the connection tracking code in the kernel. The state match accesses the connection tracking state of the packets from the conntracking machine. This allows us to know in what state the connection is, and works for pretty much all protocols, including stateless protocols such as ICMP and UDP. In all cases, there will be a default timeout for the connection and it will then be dropped from the connection tracking database. This match needs to be loaded explicitly by adding a -m state statement to the rule. You will then have access to one new match called state. The concept of state matching is covered more fully in the The state machine chapter, since it is such a large topic.
Table 6-13. State matches
| Match | --state |
| Example | iptables -A INPUT -m state --state RELATED,ESTABLISHED |
| Explanation | This match option tells the state match what states the packets must be in to be matched. There are currently 4 states that can be used. INVALID, ESTABLISHED, NEW and RELATED. INVALID means that the packet is associated with no known stream or connection and that it may contain faulty data or headers. ESTABLISHED means that the packet is part of an already established connection that has seen packets in both directions and is fully valid. NEW means that the packet has or will start a new connection, or that it is associated with a connection that has not seen packets in both directions. Finally, RELATED means that the packet is starting a new connection and is associated with an already established connection. This could for example mean an FTP data transfer, or an ICMP error associated with an TCP or UDP connection. Note that the NEW state does not look for SYN bits in TCP packets trying to start a new connection and should, hence, not be used unmodified in cases where we have only one firewall and no load balancing between different firewalls. However, there may be times where this could be useful. For more information on how this could be used, read the The state machine chapter. |
6.4.3.7. TOS match
The TOS match can be used to match packets based on their TOS field. TOS stands for Type Of Service, consists of 8 bits, and is located in the IP header. This match is loaded explicitly by adding -m tos to the rule. TOS is normally used to inform intermediate hosts of the precedence of the stream and its content (it doesn't really, but it informs of any specific requirements for the stream, such as it having to be sent as fast as possible, or it needing to be able to send as much payload as possible). How different routers and administrators deal with these values depends. Most do not care at all, while others try their best to do something good with the packets in question and the data they provide.
Table 6-14. TOS matches
| Match | --tos |
| Example | iptables -A INPUT -p tcp -m tos --tos 0x16 |
| Explanation | This match is used as described above. It can match packets based on their TOS field and their value. This could be used, among other things together with the iproute2 and advanced routing functions in Linux, to mark packets for later usage. The match takes an hex or numeric value as an option, or possibly one of the names resulting from 'iptables -m tos -h'. At the time of writing it contained the following named values: Minimize-Delay 16 (0x10), Maximize-Throughput 8 (0x08), Maximize-Reliability 4 (0x04), Minimize-Cost 2 (0x02), and Normal-Service 0 (0x00). Minimize-Delay means to minimize the delay in putting the packets through - example of standard services that would require this include telnet, SSH and FTP-control. Maximize-Throughput means to find a path that allows as big a throughput as possible - a standard protocol would be FTP-data. Maximize-Reliability means to maximize the reliability of the connection and to use lines that are as reliable as possible - a couple of typical examples are BOOTP and TFTP. Minimize-Cost means minimizing the cost of packets getting through each link to the client or server; for example finding the route that costs the least to travel along. Examples of normal protocols that would use this would be RTSP (Real Time Stream Control Protocol) and other streaming video/radio protocols. Finally, Normal-Service would mean any normal protocol that has no special needs. |
6.4.3.8. TTL match
The TTL match is used to match packets based on their TTL (Time To Live) field residing in the IP headers. The TTL field contains 8 bits of data and is decremented once every time it is processed by an intermediate host between the client and recipient host. If the TTL reaches 0, an ICMP type 11 code 0 (TTL equals 0 during transit) or code 1 (TTL equals 0 during reassembly) is transmitted to the party sending the packet and informing it of the problem. This match is only used to match packets based on their TTL, and not to change anything. The latter, incidentally, applies to all kinds of matches. To load this match, you need to add an -m ttl to the rule.
Table 6-15. TTL matches
| Match | --ttl |
| Example | iptables -A OUTPUT -m ttl --ttl 60 |
| Explanation | This match option is used to specify the TTL value to match. It takes a numeric value and matches this value within the packet. There is no inversion and there are no other specifics to match. It could, for example, be used for debugging your local network - e.g. LAN hosts that seem to have problems connecting to hosts on the Internet - or to find possible ingress by Trojans etc. The usage is relatively limited, however; its usefulness really depends on your imagination. One example would be to find hosts with bad default TTL values (could be due to a badly implemented TCP/IP stack, or simply to misconfiguration). |
6.4.4. Unclean match
The unclean match takes no options and requires no more than explicitly loading it when you want to use it. Note that this option is regarded as experimental and may not work at all times, nor will it take care of all unclean packages or problems. The unclean match tries to match packets that seem malformed or unusual, such as packets with bad headers or checksums and so on. This could be used to DROP connections and to check for bad streams, for example; however you should be aware that it could possibly break legal connections.
6.5. Targets/Jumps
The target/jumps tells the rule what to do with a packet that is a perfect match with the match section of the rule. There are a couple of basic targets, the ACCEPT and DROP targets, which we will deal with first. However, before we do that, let us have a brief look at how a jump is done.
The jump specification is done in exactly the same way as in the target definition, except that it requires a chain within the same table to jump to. To jump to a specific chain, it is of course a prerequisite that that chain exists. As we have already explained, a user-defined chain is created with the -N command. For example, let's say we create a chain in the filter table called tcp_packets, like this:
iptables -N tcp_packets
We could then add a jump target to it like this:
iptables -A INPUT -p tcp -j tcp_packets
We would then jump from the INPUT chain to the tcp_packets chain and start traversing that chain. When/If we reach the end of that chain, we get dropped back to the INPUT chain and the packet starts traversing from the rule one step below where it jumped to the other chain (tcp_packets in this case). If a packet is ACCEPTed within one of the sub chains, it will be ACCEPT'ed in the superset chain also and it will not traverse any of the superset chains any further. However, do note that the packet will traverse all other chains in the other tables in a normal fashion. For more information on table and chain traversing, see the Traversing of tables and chains chapter.
Targets on the other hand specify an action to take on the packet in question. We could for example, DROP or ACCEPT the packet depending on what we want to do. There are also a number of other actions we may want to take, which we will describe further on in this section. Jumping to targets may incur different results, as it were. Some targets will cause the packet to stop traversing that specific chain and superior chains as described above. Good examples of such rules are DROP and ACCEPT. Rules that are stopped, will not pass through any of the rules further on in the chain or in superior chains. Other targets, may take an action on the packet, after which the packet will continue passing through the rest of the rules. A good example of this would be the LOG, ULOG and TOS targets. These targets can log the packets, mangle them and then pass them on to the other rules in the same set of chains. We might, for example, want this so that we in addition can mangle both the TTL and the TOS values of a specific packet/stream. Some targets will accept extra options (What TOS value to use etc), while others don't necessarily need any options - but we can include them if we want to (log prefixes, masquerade-to ports and so on). We will try to cover all of these points as we go through the target descriptions. Let us have a look at what kinds of targets there are.
6.5.1. ACCEPT target
This target needs no further options. As soon as the match specification for a packet has been fully satisfied, and we specify ACCEPT as the target, the rule is accepted and will not continue traversing the current chain or any other ones in the same table. Note however, that a packet that was accepted in one chain might still travel through chains within other tables, and could still be dropped there. There is nothing special about this target whatsoever, and it does not require, nor have the possibility of, adding options to the target. To use this target, we simply specify -j ACCEPT.
6.5.2. DNAT target
The DNAT target is used to do Destination Network Address Translation, which means that it is used to rewrite the Destination IP address of a packet. If a packet is matched, and this is the target of the rule, the packet, and all subsequent packets in the same stream will be translated, and then routed on to the correct device, host or network. This target can be extremely useful, for example, when you have an host running your web server inside a LAN, but no real IP to give it that will work on the Internet. You could then tell the firewall to forward all packets going to its own HTTP port, on to the real web server within the LAN. We may also specify a whole range of destination IP addresses, and the DNAT mechanism will choose the destination IP address at random for each stream. Hence, we will be able to deal with a kind of load balancing by doing this.
Note that the DNAT target is only available within the PREROUTING and OUTPUT chains in the nat table, and any of the chains called upon from any of those listed chains. Note that chains containing DNAT targets may not be used from any other chains, such as the POSTROUTING chain.
Table 6-16. DNAT target
| Option | --to-destination |
| Example | iptables -t nat -A PREROUTING -p tcp -d 15.45.23.67 --dport 80 -j DNAT --to-destination 192.168.1.1-192.168.1.10 |
| Explanation | The --to-destination option tells the DNAT mechanism which Destination IP to set in the IP header, and where to send packets that are matched. The above example would send on all packets destined for IP address 15.45.23.67 to a range of LAN IP's, namely 192.168.1.1 through 10. Note, as described previously, that a single stream will always use the same host, and that each stream will randomly be given an IP address that it will always be Destined for, within that stream. We could also have specified only one IP address, in which case we would always be connected to the same host. Also note that we may add a port or port range to which the traffic would be redirected to. This is done by adding, for example, an :80 statement to the IP addresses to which we want to DNAT the packets. A rule could then look like --to-destination 192.168.1.1:80 for example, or like --to-destination 192.168.1.1:80-100 if we wanted to specify a port range. As you can see, the syntax is pretty much the same for the DNAT target, as for the SNAT target even though they do two totally different things. Do note that port specifications are only valid for rules that specify the TCP or UDP protocols with the --protocol option. |
Since DNAT requires quite a lot of work to work properly, I have decided to add a larger explanation on how to work with it. Let's take a brief example on how things would be done normally. We want to publish our website via our Internet connection. We only have one IP address, and the HTTP server is located on our internal network. Our firewall has the external IP address $INET_IP, and our HTTP server has the internal IP address $HTTP_IP and finally the firewall has the internal IP address $LAN_IP. The first thing to do is to add the following simple rule to the PREROUTING chain in the nat table:
iptables -t nat -A PREROUTING --dst $INET_IP -p tcp --dport 80 -j DNAT \
--to-destination $HTTP_IP
Now, all packets from the Internet going to port 80 on our firewall are redirected (or DNAT'ed) to our internal HTTP server. If you test this from the Internet, everything should work just perfect. So, what happens if you try connecting from a host on the same local network as the HTTP server? It will simply not work. This is a problem with routing really. We start out by dissect what happens in a normal case. The external box has IP address $EXT_BOX, to maintain readability.
Packet leaves the connecting host going to $INET_IP and source $EXT_BOX.
Packet reaches the firewall.
Firewall DNAT's the packet and runs the packet through all different chains etcetera.
Packet leaves the firewall and travels to the $HTTP_IP.
Packet reaches the HTTP server, and the HTTP box replies back through the firewall, if that is the box that the routing database has entered as the gateway for $EXT_BOX. Normally, this would be the default gateway of the HTTP server.
Firewall Un-DNAT's the packet again, so the packet looks as if it was replied to from the firewall itself.
Reply packet travels as usual back to the client $EXT_BOX.
Now, we will consider what happens if the packet was instead generated by a client on the same network as the HTTP server itself. The client has the IP address $LAN_BOX, while the rest of the machines maintain the same settings.
Packet leaves $LAN_BOX to $INET_IP.
The packet reaches the firewall.
The packet gets DNAT'ed, and all other required actions are taken, however, the packet is not SNAT'ed, so the same source IP address is used on the packet.
The packet leaves the firewall and reaches the HTTP server.
The HTTP server tries to respond to the packet, and sees in the routing databases that the packet came from a local box on the same network, and hence tries to send the packet directly to the original source IP address (which now becomes the destination IP address).
The packet reaches the client, and the client gets confused since the return packet does not come from the host that it sent the original request to. Hence, the client drops the reply packet, and waits for the "real" reply.
The simple solution to this problem is to SNAT all packets entering the firewall and leaving for a host or IP that we know we do DNAT to. For example, consider the above rule. We SNAT the packets entering our firewall that are destined for $HTTP_IP port 80 so that they look as if they came from $LAN_IP. This will force the HTTP server to send the packets back to our firewall, which Un-DNAT's the packets and sends them on to the client. The rule would look something like this:
iptables -t nat -A POSTROUTING -p tcp --dst $HTTP_IP --dport 80 -j SNAT \
--to-source $LAN_IP
Remember that the POSTROUTING chain is processed last of the chains, and hence the packet will already be DNAT'ed once it reaches that specific chain. This is the reason that we match the packets based on the internal address.
This last rule will seriously harm your logging, so it is really advisable not to use this method, but the whole example is still a valid one for all of those who can't afford to set up a specific DMZ or alike. What will happen is this, packet comes from the Internet, gets SNAT'ed and DNAT'ed, and finally hits the HTTP server (for example). The HTTP server now only sees the request as if it was coming from the firewall, and hence logs all requests from the internet as if they came from the firewall. This can also have even more severe implications. Take a SMTP server on the LAN, that allows requests from the internal network, and you have your firewall set up to forward SMTP traffic to it. You have now effectively created an open relay SMTP server, with horrenduously bad logging! You will in other words be better off solving these problems by either setting up a separate DNS server for your LAN, or to actually set up a separate DMZ, the latter being preferred if you have the money. |
You think this should be enough by now, and it really is, unless considering one final aspect to this whole scenario. What if the firewall itself tries to access the HTTP server, where will it go? As it looks now, it will unfortunately try to get to its own HTTP server, and not the server residing on $HTTP_IP. To get around this, we need to add a DNAT rule in the OUTPUT chain as well. Following the above example, this should look something like the following:
iptables -t nat -A OUTPUT --dst $INET_IP -p tcp --dport 80 -j DNAT \
--to-destination $HTTP_IP
Adding this final rule should get everything up and running. All separate networks that do not sit on the same net as the HTTP server will run smoothly, all hosts on the same network as the HTTP server will be able to connect and finally, the firewall will be able to do proper connections as well. Now everything works and no problems should arise.
Everyone should realize that these rules only effects how the packet is DNAT'ed and SNAT'ed properly. In addition to these rules, you may also need extra rules in the filter table (FORWARD chain) to allow the packets to traverse through those chains as well. Don't forget that all packets have already gone through the PREROUTING chain, and should hence have their destination addresses rewritten already by DNAT. |
6.5.3. DROP target
The DROP target does just what it says, it drops packets dead and will not carry out any further processing. A packet that matches a rule perfectly and is then Dropped will be blocked. Note that this action might in certain cases have an unwanted effect, since it could leave dead sockets around on either host. A better solution in cases where this is likely would be to use the REJECT target, especially when you want to block port scanners from getting too much information, such on as filtered ports and so on. Also note that if a packet has the DROP action taken on it in a subchain, the packet will not be processed in any of the main chains either in the present or in any other table. The packet is in other words totally dead. As we've seen previously, the target will not send any kind of information in either direction, nor to intermediaries such as routers.
6.5.4. LOG target
The LOG target is specially designed for logging detailed information about packets. These could for example be considered as illegal. Or, logging can be used purely for bug hunting and error finding. The LOG target will return specific information on packets, such as most of the IP headers and other information considered interesting. It does this via the kernel logging facility, normally syslogd. This information may then be read directly with dmesg, or from the syslogd logs, or with other programs or applications. This is an excellent target to use in debug your rule-sets, so that you can see what packets go where and what rules are applied on what packets. Note as well that it could be a really great idea to use the LOG target instead of the DROP target while you are testing a rule you are not 100% sure about on a production firewall, since a syntax error in the rule-sets could otherwise cause severe connectivity problems for your users. Also note that the ULOG target may be interesting if you are using really extensive logging, since the ULOG target has support direct logging to MySQL databases and suchlike.
Note that if you get undesired logging direct to consoles, this is not an iptables or Netfilter problem, but rather a problem caused by your syslogd configuration - most probably /etc/syslog.conf. Read more in man syslog.conf for information about this kind of problem. |
The LOG target currently takes five options that could be of interest if you have specific information needs, or want to set different options to specific values. They are all listed below.
Table 6-17. LOG target options
| Option | --log-level |
| Example | iptables -A FORWARD -p tcp -j LOG --log-level debug |
| Explanation | This is the option to tell iptables and syslog which log level to use. For a complete list of log levels read the syslog.conf manual. Normally there are the following log levels, or priorities as they are normally referred to: debug, info, notice, warning, warn, err, error, crit, alert, emerg and panic. The keyword error is the same as err, warn is the same as warning and panic is the same as emerg. Note that all three of these are deprecated, in other words do not use error, warn and panic. The priority defines the severity of the message being logged. All messages are logged through the kernel facility. In other words, setting kern.=info /var/log/iptables in your syslog.conf file and then letting all your LOG messages in iptables use log level info, would make all messages appear in the /var/log/iptables file. Note that there may be other messages here as well from other parts of the kernel that uses the info priority. For more information on logging I recommend you to read the syslog and syslog.conf man-pages as well as other HOWTOs etc. |
| Option | --log-prefix |
| Example | iptables -A INPUT -p tcp -j LOG --log-prefix "INPUT packets" |
| Explanation | This option tells iptables to prefix all log messages with a specific prefix, which can the easily be combined with grep or other tools to track specific problems and output from different rules. The prefix may be up to 29 letters long, including white-spaces and other special symbols. |
| Option | --log-tcp-sequence |
| Example | iptables -A INPUT -p tcp -j LOG --log-tcp-sequence |
| Explanation | This option will log the TCP Sequence numbers, together with the log message. The TCP Sequence number are special numbers that identify each packet and where it fits into a TCP sequence, as well as how the stream should be reassembled. Note that this option constitutes a security risk if the logs are readable by unauthorized users, or by the world for that matter. As does any log that contains output from iptables. |
| Option | --log-tcp-options |
| Example | iptables -A FORWARD -p tcp -j LOG --log-tcp-options |
| Explanation | The --log-tcp-options option logs the different options from the TCP packet headers and can be valuable when trying to debug what could go wrong, or what has actually gone wrong. This option does not take any variable fields or anything like that, just as most of the LOG options don't. |
| Option | --log-ip-options |
| Example | iptables -A FORWARD -p tcp -j LOG --log-ip-options |
| Explanation | The --log-ip-options option will log most of the IP packet header options. This works exactly the same as the --log-tcp-options option, but instead works on the IP options. These logging messages may be valuable when trying to debug or track specific culprits, as well as for debugging - in just the same way as the previous option. |
6.5.5. MARK target
The MARK target is used to set Netfilter mark values that are associated with specific packets. This target is only valid in the mangle table, and will not work outside there. The MARK values may be used in conjunction with the advanced routing capabilities in Linux to send different packets through different routes and to tell them to use different queue disciplines (qdisc), etc. For more information on advanced routing, check out the Linux Advanced Routing and Traffic Control HOW-TO. Note that the mark value is not set within the actual package, but is an value that is associated within the kernel with the packet. In other words, you can not set a MARK for a packet and then expect the MARK still to be there on another host. If this is what you want, you will be better off with the TOS target which will mangle the TOS value in the IP header.
Table 6-18. MARK target options
| Option | --set-mark |
| Example | iptables -t mangle -A PREROUTING -p tcp --dport 22 -j MARK --set-mark 2 |
| Explanation | The --set-mark option is required to set a mark. The --set-mark match takes an integer value. For example, we may set mark 2 on a specific stream of packets, or on all packets from a specific host and then do advanced routing on that host, to decrease or increase the network bandwidth, etc. |
6.5.6. MASQUERADE target
The MASQUERADE target is used basically the same as the SNAT target, but it does not require any --to-source option. The reason for this is that the MASQUERADE target was made to work with, for example, dial-up connections, or DHCP connections, which gets dynamic IP addresses when connecting to the network in question. This means that you should only use the MASQUERADE target with dynamically assigned IP connections, which we don't know the actual address of at all times. If you have a static IP connection, you should instead use the SNAT target.
When you masquerade a connection, it means that we set the IP address used on a specific network interface instead of the --to-source option, and the IP address is automatically grabbed from the information about the specific interface. The MASQUERADE target also has the effect that connections are forgotten when an interface goes down, which is extremely good if we, for example, kill a specific interface. If we would have used the SNAT target, we may have been left with a lot of old connection tracking data, which would be lying around for days, swallowing up worth-full connection tracking memory. This is in general the correct behavior when dealing with dial-up lines that are probable to be assigned a different IP every time it is brought up. In case we are assigned a different IP, the connection is lost anyways, and it is more or less idiotic to keep the entry around.
It is still possible to use the MASQUERADE target instead of SNAT even though you do have an static IP, however, it is not favorable since it will add extra overhead, and there may be inconsistencies in the future which will thwart your existing scripts and render them "unusable".
Note that the MASQUERADE target is only valid within the POSTROUTING chain in the nat table, just as the SNAT target. The MASQUERADE target takes one option specified below, which is optional.
Table 6-19. MASQUERADE target
| Option | --to-ports |
| Example | iptables -t nat -A POSTROUTING -p TCP -j MASQUERADE --to-ports 1024-31000 |
| Explanation | The --to-ports option is used to set the source port or ports to use on outgoing packets. Either you can specify a single port like --to-ports 1025 or you may specify a port range as --to-ports 1024-3000. In other words, the lower port range delimiter and the upper port range delimiter separated with a hyphen. This alters the default SNAT port-selection as described in the SNAT target section. The --to-ports option is only valid if the rule match section specifies the TCP or UDP protocols with the --protocol match. |
6.5.7. MIRROR target
The MIRROR target is an experimental and demonstration target only, and you are warned against using it, since it may result in really bad loops hence, among other things, resulting in serious Denial of Service. The MIRROR target is used to invert the source and destination fields in the IP header, and then to retransmit the packet. This can cause some really funny effects, and I'll bet that thanks to this target not just one red faced cracker has cracked his own box by now. The effect of using this target is stark, to say the least. Let's say we set up a MIRROR target for port 80 at computer A. If host B were to come from yahoo.com, and try to access the HTTP server at host A, the MIRROR target would return the yahoo host's own web page (since this is where it came from).
Note that the MIRROR target is only valid within the INPUT, FORWARD and PREROUTING chains, and any user-defined chains which are called from those chains. Also note that outgoing packets resulting from the MIRROR target are not seen by any of the normal chains in the filter, nat or mangle tables, which could give rise to loops and other problems. This could make the target the cause of unforeseen headaches. For example, a host might send a spoofed packet to another host that uses the MIRROR command with a TTL of 255, at the same time spoofing its own packet, so as to seem as if it comes from a third host that uses the MIRROR command. The packet will then bounce back and forth incessantly, for the number of hops there are to be completed. If there is only 1 hop, the packet will jump back and forth 240-255 times. Not bad for a cracker, in other words, to send 1500 bytes of data and eat up 380 kbyte of your connection. Note that this is a best case scenario for the cracker or script kiddie, whatever we want to call them.
6.5.8. QUEUE target
The QUEUE target is used to queue packets to User-land programs and applications. It is used in conjunction with programs or utilities that are extraneous to iptables and may be used, for example, with network accounting, or for specific and advanced applications which proxy or filter packets. We will not discuss this target in depth, since the coding of such applications is out of the scope of this tutorial. First of all it would simply take too much time, and secondly such documentation does not have anything to do with the programming side of Netfilter and iptables. All of this should be fairly well covered in the Netfilter Hacking HOW-TO.
6.5.9. REDIRECT target
The REDIRECT target is used to redirect packets and streams to the machine itself. This means that we could for example REDIRECT all packets destined for the HTTP ports to an HTTP proxy like squid, on our own host. Locally generated packets are mapped to the 127.0.0.1 address. In other words, this rewrites the destination address to our own host for packets that are forwarded, or something alike. The REDIRECT target is extremely good to use when we want, for example, transparent proxying, where the LAN hosts do not know about the proxy at all.
Note that the REDIRECT target is only valid within the PREROUTING and OUTPUT chains of the nat table. It is also valid within user-defined chains that are only called from those chains, and nowhere else. The REDIRECT target takes only one option, as described below.
Table 6-20. REDIRECT target
| Option | --to-ports |
| Example | iptables -t nat -A PREROUTING -p tcp --dport 80 -j REDIRECT --to-ports 8080 |
| Explanation | The --to-ports option specifies the destination port, or port range, to use. Without the --to-ports option, the destination port is never altered. This is specified, as above, --to-ports 8080 in case we only want to specify one port. If we would want to specify an port range, we would do it like --to-ports 8080-8090, which tells the REDIRECT target to redirect the packets to the ports 8080 through 8090. Note that this option is only available in rules specifying the TCP or UDP protocol with the --protocol matcher, since it wouldn't make any sense anywhere else. |
6.5.10. REJECT target
The REJECT target works basically the same as the DROP target, but it also sends back an error message to the host sending the packet that was blocked. The REJECT target is as of today only valid in the INPUT, FORWARD and OUTPUT chains or their sub chains. After all, these would be the only chains in which it would make any sense to put this target. Note that all chains that use the REJECT target may only be called by the INPUT, FORWARD, and OUTPUT chains, else they won't work. There is currently only one option which controls the nature of how this target works, though this may in turn take a huge set of variables. Most of them are fairly easy to understand, if you have a basic knowledge of TCP/IP.
Table 6-21. REJECT target
| Option | --reject-with |
| Example | iptables -A FORWARD -p TCP --dport 22 -j REJECT --reject-with tcp-reset |
| Explanation | This option tells the REJECT target what response to send to the host that sent the packet that we are rejecting. Once we get a packet that matches a rule in which we have specified this target, our host will first of all send the associated reply, and the packet will then be dropped dead, just as the DROP target would drop it. The following reject types are currently valid: icmp-net-unreachable, icmp-host-unreachable, icmp-port-unreachable, icmp-proto-unreachable, icmp-net-prohibited and icmp-host-prohibited. The default error message is to send an port-unreachable to the host. All of the above are ICMP error messages and may be set as you wish. You can find further information on their various purposes in the appendix ICMP types. There is also the option echo-reply, but this option may only be used in conjunction with rules which would match ICMP ping packets. Finally, there is one more option called tcp-reset, which may only be used together with the TCP protocol. The tcp-reset option will tell REJECT to send an TCP RST packet in reply to the sending host. TCP RST packets are used to close open TCP connections gracefully. For more information about the TCP RST read RFC 793 - Transmission Control Protocol. As stated in the iptables man page, this is mainly useful for blocking ident probes which frequently occur when sending mail to broken mail hosts, that won't otherwise accept your mail. |
6.5.11. RETURN target
The RETURN target will cause the current packet to stop traveling through the chain where it hit the rule. If it is the subchain of another chain, the packet will continue to travel through the superior chains as if nothing had happened. If the chain is the main chain, for example the INPUT chain, the packet will have the default policy taken on it. The default policy is normally set to ACCEPT, DROP or similar.
For example, let's say a packet enters the INPUT chain and then hits a rule that it matches and that tells it to --jump EXAMPLE_CHAIN. The packet will then start traversing the EXAMPLE_CHAIN, and all of a sudden it matches a specific rule which has the --jump RETURN target set. It will then jump back to the INPUT chain. Another example would be if the packet hit a --jump RETURN rule in the INPUT chain. It would then be dropped to the default policy as previously described, and no more actions would be taken in this chain.
6.5.12. SNAT target
The SNAT target is used to do Source Network Address Translation, which means that this target will rewrite the Source IP address in the IP header of the packet. This is what we want, for example, when several hosts have to share an Internet connection. We can then turn on ip forwarding in the kernel, and write an SNAT rule which will translate all packets going out from our local network to the source IP of our own Internet connection. Without doing this, the outside world would not know where to send reply packets, since our local networks mostly use the IANA specified IP addresses which are allocated for LAN networks. If we forwarded these packets as is, no one on the Internet would know that they where actually from us. The SNAT target does all the translation needed to do this kind of work, letting all packets leaving our LAN look as if they came from a single host, which would be our firewall.
The SNAT target is only valid within the nat table, within the POSTROUTING chain. This is in other words the only chain in which you may use SNAT. Only the first packet in a connection is mangled by SNAT, and after that all future packets using the same connection will also be SNATted. Furthermore, the initial rules in the POSTROUTING chain will be applied to all the packets in the same stream.
Table 6-22. SNAT target
| Option | --to-source |
| Example | iptables -t nat -A POSTROUTING -p tcp -o eth0 -j SNAT --to-source 194.236.50.155-194.236.50.160:1024-32000 |
| Explanation | The --to-source option is used to specify which source the packet should use. This option, at its simplest, takes one IP address which we want to use for the source IP address in the IP header. If we want to balance between several IP addresses, we can use a range of IP addresses, separated by a hyphen. The --to--source IP numbers could then, for instance, be something like in the above example: 194.236.50.155-194.236.50.160. The source IP for each stream that we open would then be allocated randomly from these, and a single stream would always use the same IP address for all packets within that stream. We can also specify a range of ports to be used by SNAT. All the source ports would then be confined to the ports specified. The port bit of the rule would then look like in the example above, :1024-32000. This is only valid if -p tcp or -p udp was specified somewhere in the match of the rule in question. iptables will always try to avoid making any port alterations if possible, but if two hosts try to use the same ports, iptables will map one of them to another port. If no port range is specified, then if they're needed, all source ports below 512 will be mapped to other ports below 512. Those between source ports 512 and 1023 will be mapped to ports below 1024. All other ports will be mapped to 1024 or above. As previously stated, iptables will always try to maintain the source ports used by the actual workstation making the connection. Note that this has nothing to do with destination ports, so if a client tries to make contact with an HTTP server outside the firewall, it will not be mapped to the FTP control port. |
6.5.13. TOS target
The TOS target is used to set the Type of Service field within the IP header. The TOS field consists of 8 bits which are used to help in routing packets. This is one of the fields that can be used directly within iproute2 and its subsystem for routing policies. Worth noting, is that that if you handle several separate firewalls and routers, this is the only way to propagate routing information within the actual packet between these routers and firewalls. As previously noted, the MARK target - which sets a MARK associated with a specific packet - is only available within the kernel, and can not be propagated with the packet. If you feel a need to propagate routing information for a specific packet or stream, you should therefore set the TOS field, which was developed for this.
There are currently a lot of routers on the Internet which do a pretty bad job at this, so as of now it may prove to be a bit useless to attempt TOS mangling before sending the packets on to the Internet. At best the routers will not pay any attention to the TOS field. At worst, they will look at the TOS field and do the wrong thing. However, as stated above, the TOS field can most definitely be put to good use if you have a large WAN or LAN with multiple routers. You then in fact have the possibility of giving packets different routes and preferences, based on their TOS value - even though this might be confined to your own network.
The TOS target is only capable of setting specific values, or named values on packets. These predefined TOS values can be found in the kernel include files, or more precisely, the Linux/ip.h file. The reasons are many, and you should actually never need to set any other values; however, there are ways around this limitation. To get around the limitation of only being able to set the named values on packets, you can use the FTOS patch available at the Paksecured Linux Kernel patches site maintained by Matthew G. Marsh. However, be cautious with this patch! You should not need to use any other than the default values, except in extreme cases. |
Note that this target is only valid within the mangle table and can not be used outside it. |
Also note that some old versions (1.2.2 or below) of iptables provided a broken implementation of this target which did not fix the packet checksum upon mangling, hence rendered the packets bad and in need of retransmission. That in turn would most probably lead to further mangling and the connection never working. |
The TOS target only takes one option as described below.
Table 6-23. TOS target
| Option | --set-tos |
| Example | iptables -t mangle -A PREROUTING -p TCP --dport 22 -j TOS --set-tos 0x10 |
| Explanation | The --set-tos option tells the TOS mangler what TOS value to set on packets that are matched. The option takes a numeric value, either in hex or in decimal value. As the TOS value consists of 8 bits, the value may be 0-255, or in hex 0x00-0xFF. Note that in the standard TOS target you are limited to using the named values available (which should be more or less standardized), as mentioned in the previous warning. These values are Minimize-Delay (decimal value 16, hex value 0x10), Maximize-Throughput (decimal value 8, hex value 0x08), Maximize-Reliability (decimal value 4, hex value 0x04), Minimize-Cost (decimal value 2, hex 0x02) or Normal-Service (decimal value 0, hex value 0x00). The default value on most packets is Normal-Service, or 0. Note that you can, of course, use the actual names instead of the actual hex values to set the TOS value; in fact this is generally to be recommended, since the values associated with the names may be changed in future. For a complete listing of the "descriptive values", do an iptables -j TOS -h. This listing is complete as of iptables 1.2.5 and should hopefully remain so for a while. |
6.5.14. TTL target
This patch requires the TTL patch from the patch-o-matic tree available im the base directory from http://www.netfilter.org/documentation/index.html#FAQ - The official Netfilter Frequently Asked Questions. Also a good place to start at when wondering what iptables and Netfilter is about.. |
The TTL target is used to modify the Time To Live field in the IP header. One useful application of this is to change all Time To Live values to the same value on all outgoing packets. One reason for doing this is if you have a bully ISP which don't allow you to have more than one machine connected to the same Internet connection, and who actively pursue this. Setting all TTL values to the same value, will effectively make it a little bit harder for them to notify that you are doing this. We may then reset the TTL value for all outgoing packets to a standardized value, such as 64 as specified in Linux kernel.
For more information on how to set the default value used in Linux, read the ip-sysctl.txt, which you may find within the Other resources and links appendix.
The TTL target is only valid within the mangle table, and nowhere else. It takes 3 options as of writing this, all of them described below in the table.
Table 6-24. TTL target
| Option | --ttl-set |
| Example | iptables -t mangle -A PREROUTING -i eth0 -j TTL --ttl-set 64 |
| Explanation | The --ttl-set option tells the TTL target which TTL value to set on the packet in question. A good value would be around 64 somewhere. It's not too long, and it is not too short. Do not set this value too high, since it may affect your network and it is a bit immoral to set this value to high, since the packet may start bouncing back and forth between two mis-configured routers, and the higher the TTL, the more bandwidth will be eaten unnecessary in such a case. This target could be used to limit how far away our clients are. A good case of this could be DNS servers, where we don't want the clients to be too far away. |
| Option | --ttl-dec |
| Example | iptables -t mangle -A PREROUTING -i eth0 -j TTL --ttl-dec 1 |
| Explanation | The --ttl-dec option tells the TTL target to decrement the Time To Live value by the amount specified after the --ttl-dec option. In other words, if the TTL for an incoming packet was 53 and we had set --ttl-dec 3, the packet would leave our host with a TTL value of 49. The reason for this is that the networking code will automatically decrement the TTL value by 1, hence the packet will be decremented by 4 steps, from 53 to 49. This could for example be used when we want to limit how far away the people using our services are. For example, users should always use a close-by DNS, and hence we could match all packets leaving our DNS server and then decrease it by several steps. Of course, the --set-ttl may be a better idea for this usage. |
| Option | --ttl-inc |
| Example | iptables -t mangle -A PREROUTING -i eth0 -j TTL --ttl-inc 1 |
| Explanation | The --ttl-inc option tells the TTL target to increment the Time To Live value with the value specified to the --ttl-inc option. This means that we should raise the TTL value with the value specified in the --ttl-inc option, and if we specified --ttl-inc 4, a packet entering with a TTL of 53 would leave the host with TTL 56. Note that the same thing goes here, as for the previous example of the --ttl-dec option, where the network code will automatically decrement the TTL value by 1, which it always does. This may be used to make our firewall a bit more stealthy to trace-routes among other things. By setting the TTL one value higher for all incoming packets, we effectively make the firewall hidden from trace-routes. Trace-routes are a loved and hated thing, since they provide excellent information on problems with connections and where it happens, but at the same time, it gives the hacker/cracker some good information about your upstreams if they have targeted you. For a good example on how this could be used, see the Ttl-inc.txt script. |
6.5.15. ULOG target
The ULOG target is used to provide user-space logging of matching packets. If a packet is matched and the ULOG target is set, the packet information is multicasted together with the whole packet through a netlink socket. One or more user-space processes may then subscribe to various multicast groups and receive the packet. This is in other words a more complete and more sophisticated logging facility that is only used by iptables and Netfilter so far, and it contains much better facilities for logging packets. This target enables us to log information to MySQL databases, and other databases, making it much simpler to search for specific packets, and to group log entries. You can find the ULOGD user-land applications at the ULOGD project page.
Table 6-25. ULOG target
| Option | --ulog-nlgroup |
| Example | iptables -A INPUT -p TCP --dport 22 -j ULOG --ulog-nlgroup 2 |
| Explanation | The --ulog-nlgroup option tells the ULOG target which netlink group to send the packet to. There are 32 netlink groups, which are simply specified as 1-32. If we would like to reach netlink group 5, we would simply write --ulog-nlgroup 5. The default netlink group used is 1. |
| Option | --ulog-prefix |
| Example | iptables -A INPUT -p TCP --dport 22 -j ULOG --ulog-prefix "SSH connection attempt: " |
| Explanation | The --ulog-prefix option works just the same as the prefix value for the standard LOG target. This option prefixes all log entries with a user-specified log prefix. It can be 32 characters long, and is definitely most useful to distinguish different log-messages and where they came from. |
| Option | --ulog-cprange |
| Example | iptables -A INPUT -p TCP --dport 22 -j ULOG --ulog-cprange 100 |
| Explanation | The --ulog-cprange option tells the ULOG target how many bytes of the packet to send to the user-space daemon of ULOG. If we specify 100 as above, we would copy 100 bytes of the whole packet to user-space, which would include the whole header hopefully, plus some leading data within the actual packet. If we specify 0, the whole packet will be copied to user-space, regardless of the packets size. The default value is 0, so the whole packet will be copied to user-space. |
| Option | --ulog-qthreshold |
| Example | iptables -A INPUT -p TCP --dport 22 -j ULOG --ulog-qthreshold 10 |
| Explanation | The --ulog-qthreshold option tells the ULOG target how many packets to queue inside the kernel before actually sending the data to user-space. For example, if we set the threshold to 10 as above, the kernel would first accumulate 10 packets inside the kernel, and then transmit it outside to the user-space as one single netlink multi part message. The default value here is 1 because of backward compatibility, the user-space daemon did not know how to handle multi-part messages previously. |
Chapter 7. rc.firewall file
This chapter will deal with an example firewall setup and how the script file could look. We have used one of the basic setups and dug deeper into how it works and what we do in it. This should be used to get a basic idea on how to solve different problems and what you may need to think about before actually putting your scripts into work. It could be used as is with some changes to the variables, but is not suggested since it may not work perfectly together with your network setup. As long as you have a very basic setup however, it will very likely run quite smooth with just a few fixes to it.
note that there might be more efficient ways of making the rule-set, however, the script has been written for readability so that everyone can understand it without having to know too much BASH scripting before reading this |
7.1. example rc.firewall
OK, so you have everything set up and are ready to check out an example configuration script. You should at least be if you have come this far. This example rc.firewall.txt (also included in the Example scripts code-base appendix) is fairly large but not a lot of comments in it. Instead of looking for comments, I suggest you read through the script file to get a basic hum about how it looks, and then you return here to get the nitty gritty about the whole script.
7.2. explanation of rc.firewall
7.2.1. Configuration options
The first section you should note within the example rc.firewall.txt is the configuration section. This should always be changed since it contains the information that is vital to your actual configuration. For example, your IP address will always change, hence it is available here. The $INET_IP should always be a fully valid IP address, if you got one (if not, then you should probably look closer at the rc.DHCP.firewall.txt, however, read on since this script will introduce a lot of interesting stuff anyways). Also, the $INET_IFACE variable should point to the actual device used for your Internet connection. This could be eth0, eth1, ppp0, tr0, etc just to name a few possible device names.
This script does not contain any special configuration options for DHCP or PPPoE, hence these sections are empty. The same goes for all sections that are empty, they are however left there so you can spot the differences between the scripts in a more efficient way. If you need these parts, then you could always create a mix of the different scripts, or (hold yourself) create your own from scratch.
The Local Area Network section contains most of the configuration options for your LAN, which are necessary. For example, you need to specify the IP address of the physical interface connected to the LAN as well as the IP range which the LAN uses and the interface that the box is connected to the LAN through.
Also, as you may see there is a Localhost configuration section. We do provide it, however you will with 99% certainty not change any of the values within this section since you will almost always use the 127.0.0.1 IP address and the interface will almost certainly be named lo. Also, just below the Localhost configuration, you will find a brief section that pertains to the iptables. Mainly, this section only consists of the $IPTABLES variable, which will point the script to the exact location of the iptables application. This may vary a bit, and the default location when compiling the iptables package by hand is /usr/local/sbin/iptables. However, many distributions put the actual application in another location such as /usr/sbin/iptables and so on.
7.2.2. Initial loading of extra modules
First, we see to it that the module dependencies files are up to date by issuing an /sbin/depmod -a command. After this we load the modules that we will require for this script. Always avoid loading modules that you do not need, and if possible try to avoid having modules lying around at all unless you will be using them. This is for security reasons, since it will take some extra effort to make additional rules this way. Now, for example, if you want to have support for the LOG, REJECT and MASQUERADE targets and don't have this compiled statically into your kernel, we load these modules as follows:
/sbin/insmod ipt_LOG
/sbin/insmod ipt_REJECT
/sbin/insmod ipt_MASQUERADE
In these scripts we forcedly load the modules, which could lead to failures of loading the modules. If a module fails to load, it could depend upon a lot of factors, and it will generate an error message. If some of the more basic modules fail to load, its biggest probable error is that the module, or functionality, is statically compiled into the kernel. For further information on this subject, read the Problems loading modules section in the Common problems and questions appendix. |
Next is the option to load ipt_owner module, which could for example be used to only allow certain users to make certain connections, etc. I will not use that module in this example but basically, you could allow only root to do FTP and HTTP connections to redhat.com and DROP all the others. You could also disallow all users but your own user and root to connect from your box to the Internet, might be boring for others, but you will be a bit more secure to bouncing hacker attacks and attacks where the hacker will only use your host as an intermediate host. For more information about the ipt_owner match, look at the Owner match section within the How a rule is built chapter.
We may also load extra modules for the state matching code here. All modules that extend the state matching code and connection tracking code are called ip_conntrack_* and ip_nat_*. Connection tracking helpers are special modules that tells the kernel how to properly track the specific connections. Without these so called helpers, the kernel would not know what to look for when it tries to track specific connections. The NAT helpers on the other hand, are extensions of the connection tracking helpers that tells the kernel what to look for in specific packets and how to translate these so the connections will actually work. For example, FTP is a complex protocol by definition, and it sends connection information within the actual payload of the packet. So, if one of your NATed boxes connect to a FTP server on the Internet, it will send its own local network IP address within the payload of the packet, and tells the FTP server to connect to that IP address. Since this local network address is not valid outside your own network, the FTP server will not know what to do with it and hence the connection will break down. The FTP NAT helpers do all of the translations within these connections so the FTP server will actually know where to connect. The same thing applies for DCC file transfers (sends) and chats. Creating these kind of connections requires the IP address and ports to be sent within the IRC protocol, which in turn requires some translation to be done. Without these helpers, some FTP and IRC stuff will work no doubt, however, some other things will not work. For example, you may be able to receive files over DCC, but not be able to send files. This is due to how the DCC starts a connection. First off, you tell the receiver that you want to send a file and where he should connect to. Without the helpers, the DCC connection will look as if it wants the receiver to connect to some host on the receivers own local network. In other words, the whole connection will be broken. However, the other way around, it will work flawlessly since the sender will (most probably) give you the correct address to connect to.
If you are experiencing problems with mIRC DCCs over your firewall and everything works properly with other IRC clients, read the mIRC DCC problems section in the Common problems and questions appendix. |
As of this writing, there is only the option to load modules which add support for the FTP and IRC protocols. For a long explanation of these conntrack and nat modules, read the Common problems and questions appendix. There are also H.323 conntrack helpers within the patch-o-matic, as well as some other conntrack as well as NAT helpers. To be able to use these helpers, you need to use the patch-o-matic and compile your own kernel. For a better explanation on how this is done, read the Preparations chapter.
Note that you need to load the ip_nat_irc and ip_nat_ftp if you want Network Address Translation to work properly on any of the FTP and IRC protocols. You will also need to load the ip_conntrack_irc and ip_conntrack_ftp modules before actually loading the NAT modules. They are used the same way as the conntrack modules, but it will make it possible for the computer to do NAT on these two protocols. |
7.2.3. proc set up
At this point we start the IP forwarding by echoing a 1 to /proc/sys/net/ipv4/ip_forward in this fashion:
echo "1" > /proc/sys/net/ipv4/ip_forward
It may be worth a thought where and when we turn on the IP forwarding. In this script and all others within the tutorial, we turn it on before actually creating any kind of IP filters (i.e., iptables rule-sets). This will lead to a brief period of time where the firewall will accept forwarding any kind of traffic for everything between a millisecond to a minute depending on what script we are running and on what box. This may give malicious people a small time-frame to actually get through our firewall. In other words, this option should really be turned on after creating all firewall rules, however, I have chosen to turn it on before loading any rules to maintain consistency with the script breakdown currently used in all scripts. |
In case you need dynamic IP support, for example if you use SLIP, PPP or DHCP you may enable the next option, ip_dynaddr by doing the following :
echo "1" > /proc/sys/net/ipv4/ip_dynaddr
If there is any other options you might need to turn on you should follow that style, there's other documentations on how to do these things and this is out of the scope of this documentation. There is a good but rather brief document about the proc system available within the kernel, which is also available within the Other resources and links appendix. The Other resources and links appendix is generally a good place to start looking when you have specific areas that you are looking for information on, that you do not find here.
The rc.firewall.txt script, and all other scripts contained within this tutorial, do contain a small section of non-required proc settings. These may be a good primer to look at when something is not working exactly as you want it to, however, do not change these values before actually knowing what they mean. |
7.2.4. Displacement of rules to different chains
This section will briefly describe my choices within the tutorial regarding user specified chains and some choices specific to the rc.firewall.txt script. Some of the paths I have chosen to go here may be wrong from one or another of aspect. I hope to point these aspects and possible problems out to you when and where they occur. Also, this section contains a brief look back to the Traversing of tables and chains chapter. Hopefully, this will remind you a little bit of how the specific tables and chains are traversed in a real live example.
I have displaced all the different user-chains in the fashion I have to save as much CPU as possible but at the same time put the main weight on security and readability. Instead of letting a TCP packet traverse ICMP, UDP and TCP rules, I simply match all TCP packets and then let the TCP packets traverse an user specified chain. This way we do not get too much overhead out of it all. The following picture will try to explain the basics of how an incoming packet traverses Netfilter. With these pictures and explanations, I wish to explain and clarify the goals of this script. We will not discuss any specific details yet, but instead further on in the chapter. This is a really trivial picture in comparison to the one in the Traversing of tables and chains chapter where we discussed the whole traversal of chains and tables in depth.
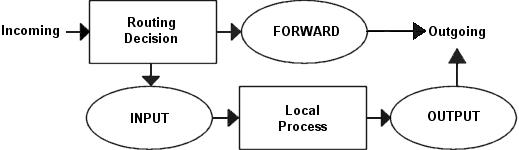
Based upon this picture, let us make clear what our goals are. This whole example script is based upon the assumption that we are looking at a scenario containing one local network, one firewall and an Internet connection connected to the firewall. This example is also based upon the assumption that we have a static IP to the Internet (as opposed to DHCP, PPP and SLIP and others). In this case, we also want to allow the firewall to act as a server for certain services on the Internet, and we trust our local network fully and hence we will not block any of the traffic from the local network. Also, this script has as a main priority to only allow traffic that we explicitly want to allow. To do this, we want to set default policies within the chains to DROP. This will effectively kill all connections and all packets that we do not explicitly allow inside our network or our firewall.
In the case of this scenario, we would also like to let our local network do connections to the Internet. Since the local network is fully trusted, we want to allow all kind of traffic from the local network to the Internet. However, the Internet is most definitely not a trusted network and hence we want to block them from getting to our local network. Based upon these general assumptions, let's look at what we need to do and what we do not need and want to do.

First of all, we want the local network to be able to connect to the Internet, of course. To do this, we will need to NAT all packets since none of the local computers have real IP addresses. All of this is done within the PREROUTING chain, which is created last in this script. This means that we will also have to do some filtering within the FORWARD chain since we will otherwise allow outsiders full access to our local network. We trust our local network to the fullest, and because of that we specifically allow all traffic from our local network to the Internet. Since no one on the Internet should be allowed to contact our local network computers, we will want to block all traffic from the Internet to our local network except already established and related connections, which in turn will allow all return traffic from the Internet to our local network.
As for our firewall, we may be a bit low on funds perhaps, or we just want to offer a few services to people on the Internet. Therefore, we have decided to allow HTTP, FTP, SSH and IDENTD access to the actual firewall. All of these protocols are available on the actual firewall, and hence it should be allowed through the INPUT chain, and we need to allow the return traffic through the OUTPUT chain. However, we also trust the local network fully, and the loopback device and IP address are also trusted. Because of this, we want to add special rules to allow all traffic from the local network as well as the loopback network interface. Also, we do not want to allow specific packets or packet headers in specific conjunctions, nor do we want to allow some IP ranges to reach the firewall from the Internet. For instance, the 10.0.0.0/8 address range is reserved for local networks and hence we would normally not want to allow packets from such a address range since they would with 90% certainty be spoofed. However, before we implement this, we must note that certain Internet Service Providers actually use these address ranges within their own networks. For a closer discussion of this, read the Common problems and questions chapter.
Since we have an FTP server running on the server, as well as the fact we want to traverse as few rules as possible, we add a rule which lets all established and related traffic through at the top of the INPUT chain. For the same reason, we want to split the rules down into sub-chains. By doing this, our packets will hopefully only need to traverse as few rules as possible. By traversing less rules, we make the rule-set less time consuming for each packet, and reduce redundancy within the network.
In this script, we choose to split the different packets down by their protocol family, for example TCP, UDP or ICMP. All TCP packets traverse a specific chain named tcp_packets, which will contain rules for all TCP ports and protocols that we want to allow. Also, we want to do some extra checking on the TCP packets, so we would like to create one more subchain for all packets that are accepted for using valid port numbers to the firewall. This chain we choose to call the allowed chain, and should contain a few extra checks before finally accepting the packet. As for ICMP packets, these will traverse the icmp_packets chain. When we decided on how to create this chain, we could not see any specific needs for extra checks before allowing the ICMP packets through if we agree with the type and code of the ICMP packet, and hence we accept them directly. Finally, we have the UDP packets which need to be dealt with. These packets, we send to the udp_packets chain which handles all incoming UDP packets. All incoming UDP packets should be sent to this chain, and if they are of an allowed type we should accept them immediately without any further checking.
Since we are running on a relatively small network, this box is also used as a secondary workstation and to give some extra levy for this, we want to allow certain specific protocols to make contact with the firewall itself, such as speak freely and ICQ.
Finally, we have the firewalls OUTPUT chain. Since we actually trust the firewall quite a lot, we allow pretty much all traffic leaving the firewall. We do not do any specific user blocking, nor do we do any blocking of specific protocols. However, we do not want people to use this box to spoof packets leaving the firewall itself, and hence we only want to allow traffic from the IP addresses assigned to the firewall itself. We would most likely implement this by adding rules that ACCEPT all packets leaving the firewall in case they come from one of the IP addresses assigned to the firewall, and if not they will be dropped by the default policy in the OUTPUT chain.
7.2.5. Setting up default policies
Quite early on in the process of creating our rule-set, we set up the default policies. We set up the default policies on the different chains with a fairly simple command, as described below.
iptables [-P {chain} {policy}]
The default policy is used every time the packets do not match a rule in the chain. For example, let's say we get a packet that match no single rule in our whole rule-set. If this happens, we must decide what should happen to the packet in question, and this is where the default policy comes into the picture. The default policy is used on all packets that does not match with any other rule in our rule-set.
Do be cautious with what default policy you set on chains in other tables since they are simply not made for filtering, and it may lead to very strange behaviors. |
7.2.6. Setting up user specified chains in the filter table
Now you got a good picture on what we want to accomplish with this firewall, so let us get on to the actual implementation of the rule-set. It is now high time that we take care of setting up all the rules and chains that we wish to create and to use, as well as all of the rule-sets within the chains.
After this, we create the different special chains that we want to use with the -N command. The new chains are created and set up with no rules inside of them. The chains we will use are, as previously described, icmp_packets, tcp_packets, udp_packets and the allowed chain, which is used by the tcp_packets chain. Incoming packets on $INET_IFACE, of ICMP type, will be redirected to the chain icmp_packets. Packets of TCP type, will be redirected to the tcp_packets chain and incoming packets of UDP type from $INET_IFACE go to udp_packets chain. All of this will be explained more in detail in the INPUT chain section below. To create a chain is quite simple and only consists of a short declaration of the chain as this:
iptables [-N chain]
In the upcoming sections we will have a closer look at each and one of the user defined chains that we have by now created. Let us have a closer look at how they look and what rules they contain and what we will accomplish within them.
7.2.6.1. The bad_tcp_packets chain
The bad_tcp_packets chain is devoted to contain rules that inspects incoming packets for malformed headers or other problems. As it is, we have only chosen to include a packet filter which blocks all incoming TCP packets that are considered as NEW but does not have the SYN bit set, as well as a rule that blocks SYN/ACK packets that are considered NEW. This chain could be used to check for all possible inconsistencies, such as above or XMAS port-scans etc. We could also add rules that looks for state INVALID.
If you want to fully understand the NEW not SYN, you need to look at the State NEW packets but no SYN bit set section in the Common problems and questions appendix regarding state NEW and non-SYN packets getting through other rules. These packets could be allowed under certain circumstances but in 99% of the cases we wouldn't want these packets to get through. Hence, we log them to our logs and then we DROP them.
The reason that we REJECT SYN/ACK packets that are considered NEW is also very simple. It is described in more depth in the SYN/ACK and NEW packets section in the Common problems and questions appendix. Basically, we do this out of courtesy to other hosts, since we will prevent them from being attacked in a sequence number prediction attack.
7.2.6.2. The allowed chain
If a packet comes in on $INET_IFACE and is of TCP type, it travels through the tcp_packets chain and if the connection is against a port that we want to allow traffic on, we want to do some final checks on it to see if we actually do want to allow it or not. All of these final checks are done within the allowed chain.
First of all, we check if the packet is a SYN packet. If it is a SYN packet, it is most likely to be the first packet in a new connection so, of course, we allow this. Then we check if the packet comes from an ESTABLISHED or RELATED connection, if it does, then we, again of course, allow it. An ESTABLISHED connection is a connection that has seen traffic in both directions, and since we have seen a SYN packet, the connection then must be in state ESTABLISHED, according to the state machine. The last rule in this chain will DROP everything else. In this case this pretty much means everything that has not seen traffic in both directions, i.e., we didn't reply to the SYN packet, or they are trying to start the connection with a non SYN packet. There is no practical use of not starting a connection with a SYN packet, except to port scan people pretty much. There is no currently available TCP/IP implementation that supports opening a TCP connection with something else than a SYN packet to my knowledge, hence, DROP it since it is 99% sure to be a port scan.
7.2.6.3. The TCP chain
The tcp_packets chain specifies what ports that are allowed to use on the firewall from the Internet. There is, however, even more checks to do, hence we send each and one of the packets on to the allowed chain, which we described previously.
-A tcp_packets tells iptables in which chain to add the new rule, the rule will be added to the end of the chain. -p TCP tells it to match TCP packets and -s 0/0 matches all source addresses from 0.0.0.0 with netmask 0.0.0.0, in other words all source addresses. This is actually the default behavior but I am using it just to make everything as clear as possible. --dport 21 means destination port 21, in other words if the packet is destined for port 21 they also match. If all the criteria are matched, then the packet will be targeted for the allowed chain. If it doesn't match any of the rules, they will be passed back to the original chain that sent the packet to the tcp_packets chain.
As it is now, I allow TCP port 21, or FTP control port, which is used to control FTP connections and later on I also allow all RELATED connections, and that way we allow PASSIVE and ACTIVE connections since the ip_conntrack_ftp module is, hopefully, loaded. If we do not want to allow FTP at all, we can unload the ip_conntrack_ftp module and delete the $IPTABLES -A tcp_packets -p TCP -s 0/0 --dport 21 -j allowed line from the rc.firewall.txt file.
Port 22 is SSH, which is much better than allowing telnet on port 23 if you want to allow anyone from the outside to use a shell on your box at all. Note that you are dealing with a firewall. It is always a bad idea to give others than yourself any kind of access to a firewall box. Firewalls should always be kept to a bare minimum and no more.
Port 80 is HTTP, in other words your web server, delete it if you do not want to run a web server directly on your firewall.
And finally we allow port 113, which is IDENTD and might be necessary for some protocols like IRC, etc to work properly. Do note that it may be worth to use the oidentd package if you NAT several hosts on your local network. oidentd has support for relaying IDENTD requests on to the correct boxes within your local network.
If you feel like adding more open ports with this script, well, it should be quite obvious how to do that by now. Just cut and paste one of the other lines in the tcp_packets chain and change it to the port you want to open.
7.2.6.4. The UDP chain
If we do get a UDP packet on the INPUT chain, we send them on to udp_packets where we once again do a match for the UDP protocol with -p UDP and then match everything with a source address of 0.0.0.0 and netmask 0.0.0.0, in other words everything again. Except this, we only accept specific UDP ports that we want to be open for hosts on the Internet. Do note that we do not need to open up holes depending on the sending hosts source port, since this should be taken care of by the state machine. We only need to open up ports on our host if we are to run a server on any UDP port, such as DNS etc. Packets that are entering the firewall and that are part of an already established connection (by our local network) will automatically be accepted back in by the --state ESTABLISHED,RELATED rules at the top of the INPUT chain.
As it is, we do not ACCEPT incoming UDP packets from port 53, which is what we use to do DNS lookups. The rule is there, but it is per default commented out. If you want your firewall to act as an DNS server, uncomment this line.
I personally also allow port 123, which is NTP or network time protocol. This protocol is used to set your computer clock to the same time as certain other time servers which have very accurate clocks. Most of you probably do not use this protocol and hence I am not allowing it per default. The same thing applies here however, the rule is there and it is simple to uncomment to get it working.
We do currently allow port 2074, which is used for certain real-time multimedia applications like speak freely which you can use to talk to other people in real-time by using speakers and a microphone, or even better, a headset. If you would not like to use this, you could turn it off quite simply by commenting it out.
Port 4000 is the ICQ protocol. This should be an extremely well known protocol that is used by the Mirabilis application named ICQ. There is at least 2-3 different ICQ clones for Linux and it is one of the most widely used chat programs in the world. I doubt there is any further need to explain what it is.
At this point, two extra rules are available if you are experiencing a lot of log entries due to different circumstances. The first rule will block broadcast packets to destination ports 135 through 139. These are used by NetBIOS, or SMB for most Microsoft users. This will block all log entries we may get from Microsoft Networks on our outside otherwise. The second rule was also created to take care of excessive logging problems, but instead takes care of DHCP queries from the outside. This is specifically true if your outside network consists of a non-switched Ethernet type of network, where the clients receive their IP addresses by DHCP. During these circumstances, you could wind up with a lot of logs from just that.
Do note that the last two rules are specifically opted out since some people may be interested in these kind of logs. If you are experiencing problems with excessive legit logging, try to drop these types of packages at this point. There are also more rules of this type just before the log rules in the INPUT chain. |
7.2.6.5. The ICMP chain
This is where we decide what ICMP types to allow. If a packet of ICMP type comes in on eth0 on the INPUT chain, we then redirect it to the icmp_packets chain as explained before. Here we check what kind of ICMP types to allow. For now, I only allow incoming ICMP Echo requests, TTL equals 0 during transit and TTL equals 0 during reassembly. The reason that we do not allow any other ICMP types per default here, is that almost all other ICMP types should be covered by the RELATED state rules.
If an ICMP packet is sent as a reply to an already existing packet or packet stream it is considered RELATED to the original stream. For more information on the states, read the The state machine chapter. |
The reason that I allow these ICMP packets are as follows, Echo Requests are used to request an echo reply, which in turn is used to mainly ping other hosts to see if they are available on any of the networks. Without this rule, other hosts will not be able to ping us to see if we are available on any network connection. Do note that some people would tend to erase this rule, since they simple do not want to be seen on the Internet. Deleting this rule will effectively render any pings to our firewall totally useless from the Internet since the firewall will simply not respond to them.
Time Exceeded (i.e., TTL equals 0 during transit and TTL equals 0 during reassembly), is allowed in the case we want to trace-route some host or if a packet gets its Time To Live set to 0, we will get a reply about this. For example, when you trace-route someone, you start out with TTL = 1, and it gets down to 0 at the first hop on the way out, and a Time Exceeded is sent back from the first gateway en route to the host we are trying to trace-route, then TTL = 2 and the second gateway sends Time Exceeded, and so on until we get an actual reply from the host we finally want to get to. This way, we will get a reply from each host on our way to the actual host we want to reach, and we can see every host in between and find out what host is broken.
For a complete listing of all ICMP types, see the ICMP types appendix . For more information on ICMP types and their usage, i suggest reading the following documents and reports:
The Internet Control Message Protocol by Ralph Walden.
RFC 792 - Internet Control Message Protocol by J. Postel.
As a side-note, I might be wrong in blocking some of these ICMP types for you, but in my case, everything works perfectly while blocking all the ICMP types that I do not allow. |
7.2.7. INPUT chain
The INPUT chain as I have written it uses mostly other chains to do the hard work. This way we do not get too much load from iptables, and it will work much better on slow machines which might otherwise drop packets at high loads. This is done by checking for specific details that should be the same for a lot of different packets, and then sending those packets into specific user specified chains. By doing this, we can split down our rule-set to contain much less rules that needs to be traversed by each packet and hence the firewall will be put through a lot less overhead by packet filtering.
First of all we do certain checks for bad packets. This is done by sending all TCP packets to the bad_tcp_packets chain. This chain contains a few rules that will check for badly formed packets or other anomalies that we do not want to accept. For a full explanation of the The bad_tcp_packets chain section in this chapter.
At this point we start looking for traffic from generally trusted networks. These include the local network adapter and all traffic coming from there, all traffic to and from our loopback interface, including all our currently assigned IP addresses (this means all of them, including our Internet IP address). As it is, we have chosen to put the rule that allows LAN activity to the firewall at the top, since our local network generates more traffic than the Internet connection. This allows for less overhead used to try and match each packet with each rule and it is always a good idea to look through what kind of traffic mostly traverses the firewall. By doing this, we can shuffle around the rules to be more efficient, leading to less overhead on the firewall and less congestion on your network.
Before we start touching the "real" rules which decides what we allow from the Internet interface and not, we have a related rule set up to reduce our overhead. This is a state rule which allows all packets part of an already ESTABLISHED or RELATED stream to the Internet IP address. This rule has an equivalent rule in the allowed chain, which are made rather redundant by this rule, which will be evaluated before the allowed ones are. However, the --state ESTABLISHED,RELATED rule in the allowed chain has been retained for several reasons, such as people wanting to cut and pasting the function.
After this, We match all TCP packets in the INPUT chain that comes in on the $INET_IFACE interface, and send those to the tcp_packets, which was previously described. Now we do the same match for UDP packets on the $INET_IFACE and send those to the udp_packets chain, and after this all ICMP packets are sent to the icmp_packets chain. Normally, a firewall would be hardest hit by TCP packets, then UDP and last of them all ICMP packets. This is in normal case, mind you, and it may be wrong for you. The absolute same thing should be looked upon here, as with the network specific rules. Which causes the most traffic? Should the rules be thrown around to generate less overhead? On networks sending huge amounts of data, this is an absolute necessity since a Pentium III equivalent machine may be brought to its knees by a simple rule-set containing 100 rules and a single 100mbit Ethernet card running at full capacity if the rule-set is badly written. This is an important piece to look at when writing a rule-set for your own local network.
At this point we have one extra rule, that is per default opted out, that can be used to get rid of some excessive logging in case we have some Microsoft network on the outside of our Linux firewall. Microsoft clients have a bad habit of sending out tons of multicast packets to the 224.0.0.0/8 range, and hence we have the opportunity to block those packets here so we don't fill our logs with them. There are also two more rules doing something similar tasks in the udp_packets chain described in the The UDP chain.
Before we hit the default policy of the INPUT chain, we log it so we may be able to find out about possible problems and/or bugs. Either it might be a packet that we just do not want to allow or it might be someone who is doing something bad to us, or finally it might be a problem in our firewall not allowing traffic that should be allowed. In either case we want to know about it so it can be dealt with. Though, we do not log more than 3 packets per minute as we do not want to flood our logs with crap which in turn may fill up our whole logging partition, also we set a prefix to all log entries so we know where it came from.
Everything that has not yet been caught will be DROPed by the default policy on the INPUT chain. The default policy was set quite some time back, in the Setting up default policies section, in this chapter.
7.2.8. FORWARD chain
The FORWARD chain contains quite few rules in this scenario. We have a single rule which sends all packets to the bad_tcp_packets chain, which was also used in the INPUT chain as described previously. The bad_tcp_packets chain is constructed in such a fashion that it can be used recycled in several calling chains, disregarding of what packet traverses it.
After this first check for bad TCP packets, we have the main rules in the FORWARD chain. The first rule will allow all traffic from our $LAN_IFACE to any other interface to flow freely, without restrictions. This rule will in other words allow all traffic from our LAN to the Internet. The second rule will allow ESTABLISHED and RELATED traffic back through the firewall. This will in other words allow packets belonging to connections that was initiated from our internal network to flow freely back to our local network. These rules are required for our local network to be able to access the Internet, since the default policy of the FORWARD chain was previously set to DROP. This is quite clever, since it will allow hosts on our local network to connect to hosts on the Internet, but at the same time block hosts on the Internet from connecting to the hosts on our internal network.
Finally we also have a logging rule which will log packets that are not allowed in one or another way to pass through the FORWARD chain. This will most likely show one or another occurrence of a badly formed packet or other problem. One cause may be hacker attacks, and others may be malformed packets. This is exactly the same rule as the one used in the INPUT chain except for the logging prefix, "IPT FORWARD packet died: ". The logging prefix is mainly used to separate log entries, and may be used to distinguish log entries to find out where the packet was logged from and some header options.
7.2.9. OUTPUT chain
Since i know that there is pretty much no one but me using this box which is partially used as a Firewall and a workstation currently, I allow almost everything that goes out from it that has a source address $LOCALHOST_IP, $LAN_IP or $STATIC_IP. Everything else might be spoofed in some fashion, even though I doubt anyone that I know would do it on my box. Last of all we log everything that gets dropped. If it does get dropped, we will most definitely want to know about it so we may take action against the problem. Either it is a nasty error, or it is a weird packet that is spoofed. Finally we DROP the packet in the default policy.
7.2.10. PREROUTING chain of the nat table
The PREROUTING chain is pretty much what it says, it does network address translation on packets before they actually hit the routing decision that sends them onward to the INPUT or FORWARD chains in the filter table. The only reason that we talk about this chain in this script is that we once again feel obliged to point out that you should not do any filtering in it. The PREROUTING chain is only traversed by the first packet in a stream, which means that all subsequent packets will go totally unchecked in this chain. As it is with this script, we do not use the PREROUTING chain at all, however, this is the place we would be working in right now if we wanted to do DNAT on any specific packets, for example if you want to host your web server within your local network. For more information about the PREROUTING chain, read the Traversing of tables and chains chapter.
The PREROUTING chain should not be used for any filtering since, among other things, this chain is only traversed by the first packet in a stream. The PREROUTING chain should be used for network address translation only, unless you really know what you are doing. |
7.2.11. Starting SNAT and the POSTROUTING chain
So, our final mission would be to get the Network Address Translation up, correct? At least to me. First of all we add a rule to the nat table, in the POSTROUTING chain that will NAT all packets going out on our interface connected to the Internet. For me this would be eth0. However, there are specific variables added to all of the example scripts that may be used to automatically configure these settings. The -t option tells iptables which table to insert the rule in, in this case the nat table. The -A command tells us that we want to Append a new rule to an existing chain named POSTROUTING and -o $INET_IFACE tells us to match all outgoing packets on the INET_IFACE interface (or eth0, per default settings in this script) and finally we set the target to SNAT the packets. So all packets that match this rule will be SNAT'ed to look as it came from your Internet interface. Do note that you must set which IP address to give outgoing packets with the --to-source option sent to the SNAT target.
In this script we have chosen to use the SNAT target instead of MASQUERADE for a couple of reasons. The first one is that this script was supposed to run on a firewall that has a static IP address. A follow up reason to the first one, would hence be that it is faster and more efficient to use the SNAT target if possible. Of course, it was also used to show how it would work and how it would be used in a real live example. If you do not have a static IP address, you should definitely give thought to use the MASQUERADE target instead which provides a simple and easy facility that will also do NAT for you, but that will automatically grab the IP address that it should use. This takes a little bit extra computing power, but it may most definitely be worth it if you use DHCP for instance. If you would like to have a closer look at how the MASQUERADE target may look, you should look at the rc.DHCP.firewall.txt script.
Chapter 8. Example scripts
The objective of this chapter is to give a fairly brief and short explanation of each script available with this tutorial, and to provide an overlook of the scripts and what services they provide. These scripts are not in any way perfect, and they may not fit your exact intentions perfectly. It is in other words up to you to make these scripts suitable for your needs. The rest of this tutorial should most probably be helpful in making this feat. The first section of this tutorial deals with the actual structure that I have established in each script so we may find our way within the script a bit easier.
8.1. rc.firewall.txt script structure
All scripts written for this tutorial has been written after a specific structure. The reason for this is that they should be fairly conformable to each other and to make it easier to find the differences between the scripts. This structure should be fairly well documented in this brief chapter. This chapter should hopefully give a short understanding to why all the scripts has been written as they have, and why I have chosen to maintain this structure.
Even though this is the structure I have chosen, do note that this may not be the best structure for your scripts. It is only a structure that I have chosen to use since it fits the need of being easy to read and follow the best according to my logic. |
8.1.1. The structure
This is the structure that all scripts in this tutorial should follow. If they differ in some way it is probably an error on my part, unless it is specifically explained why I have broken this structure.
Configuration - First of all we have the configuration options which the rest of the script should use. Configuration options should pretty much always be the first thing in any shell-script.
Internet - This is the configuration section which pertains to the Internet connection. This could be skipped if we do not have any Internet connection. Note that there may be more subsections than those listed here, but only such that pertains to our Internet connection.
DHCP - If there are possibly any special DHCP requirements with this specific script, we will add the DHCP specific configuration options here.
PPPoE - If there are a possibility that the user that wants to use this specific script, and if there are any special circumstances that raises the chances that he is using a PPPoE connection, we will add specific options for those here.
LAN - If there is any LAN available behind the firewall, we will add options pertaining to that in this section. This is most likely, hence this section will almost always be available.
DMZ - If there is any reason to it, we will add a DMZ zone configuration at this point. Most scripts lacks this section, mainly because any normal home network, or small corporate network, will not have one.
Localhost - These options pertain to our local-host. These variables are highly unlikely to change, but we have put most of it into variables anyway. Hopefully, there should be no reason to change these variables.
iptables - This section contains iptables specific configuration. In most scripts and situations this should only require one variable which tells us where the iptables binary is located.
Other - If there are any other specific options and variables, they should first of all be fitted into the correct subsection (If it pertains to the Internet connection, it should be sub-sectioned there, etc). If it does not fit in anywhere, it should be sub-sectioned directly to the configuration options somewhere.
Module loading - This section of the scripts should maintain a list of modules. The first part should contain the required modules, while the second part should contain the non-required modules.
Note that some modules that may raise security, or add certain services or possibilities, may have been added even though they are not required. This should normally be noted in such cases within the example scripts.
Required modules - This section should contain the required modules, and possibly special modules that adds to the security or adds special services to the administrator or clients.
Non-required modules - This section contains modules that are not required for normal operations. All of these modules should be commented out per default, and if you want to add the service it provides, it is up to you.
proc configuration - This section should take care of any special configuration needed in the proc file system. If some of these options are required, they will be listed as such, if not, they should be commented out per default, and listed under the non-required proc configurations. Most of the useful proc configurations will be listed here, but far from all of them.
Required proc configuration - This section should contain all of the required proc configurations for the script in question to work. It could possibly also contain configurations that raises security, and possibly which adds special services or possibilities for the administrator or clients.
Non-required proc configuration - This section should contain non-required proc configurations that may prove useful. All of them should be commented out, since they are not actually necessary to get the script to work. This list will contain far from all of the proc configurations or nodes.
rules set up - By now the scripts should most probably be ready to insert the rule-set. I have chosen to split all the rules down after table and then chain names. All user specified chains are created before we do anything to the system built in chains. I have also chosen to set the chains and their rule specifications in the same order as they are output by the iptables -L command.
Filter table - First of all we go through the filter table and its content. First of all we should set up all the policies in the table.
Set policies - Set up all the default policies for the system chains. Normally I will set DROP policies on the chains in the filter table, and specifically ACCEPT services and streams that I want to allow inside. This way we will get rid of all ports that we do not want to let people use.
Create user specified chains - At this point we create all the user specified chains that we want to use later on within this table. We will not be able to use these chains in the system chains anyways if they are not already created so we could as well get to it as soon as possible.
Create content in user specified chains - After creating the user specified chains we may as well enter all the rules within these chains. The only reason I have to enter this data at this point already is that may as well put it close to the creation of the user specified chains. You may as well put this later on in your script, it is totally up to you.
INPUT chain - When we have come this far, we do not have a lot of things left to do within the filter table so we get onto the INPUT chain. At this point we should add all rules within the INPUT chain.
At this point we start following the output from the iptables -L command as you may see. There is no reason for you to stay with this structure, however, do try to avoid mixing up data from different tables and chains since it will become much harder to read such rule-sets and to fix possible problems.
FORWARD chain - At this point we go on to add the rules within the FORWARD chain. Nothing special about this decision.
OUTPUT chain - Last of all in the filter table, we add the rules dealing with the OUTPUT chain. There should hopefully not be too much to do at this point.
nat table - After the filter table we take care of the nat table. This is done after the filter table because of a number of reasons within these scripts. First of all we do not want to turn the whole forwarding mechanism and NAT function on at a too early stage, which could possibly lead to packets getting through the firewall at just the wrong time point (i.e., when the NAT has been turned on, but none of the filter rules has been run). Also, I look upon the nat table as a sort of layer that lies just outside the filter table and kind of surrounds it. The filter table would hence be the core, while the nat table acts as a layer lying around the filter table, and finally the mangle table lies around the nat table as a second layer. This may be wrong in some perspectives, but not too far from reality.
Set policies - First of all we set up all the default policies within the nat table. Normally, I will be satisfied with the default policy set from the beginning, namely the ACCEPT policy. This table should not be used for filtering anyways, and we should not let packets be dropped here since there are some really nasty things that may happen in such cases due to our own presumptions. I let these chains be set to ACCEPT since there is no reason not to do so.
Create user specified chains - At this point we create any user specified chains that we want within the nat table. Normally I do not have any of these, but I have added this section anyways, just in case. Note that the user specified chains must be created before they can actually be used within the system chains.
Create content in user specified chains - By now it should be time to add all the rules to the user specified chains in the nat table. The same thing goes here as for the user specified chains in the filter table. We add this material here since I do not see any reason not to.
PREROUTING chain - The PREROUTING chain is used to do DNAT on packets in case we have any need for it. In most scripts this feature is not used, or at the very least commented out, reason being that we do not want to open up big holes to our local network without knowing about it. Within some scripts we have this turned on by default since the sole purpose of those scripts are to provide such services.
POSTROUTING chain - The POSTROUTING chain should be fairly well used by the scripts I have written since most of them depend upon the fact that you have one or more local networks that we want to firewall against the Internet. Mainly we will try to use the SNAT target, but in certain cases we are forced to use the MASQUERADE target instead.
OUTPUT chain - The OUTPUT chain is barely used at all in any of the scripts. As it looks now, it is not broken, but I have been unable to find any good reasons to use this chain so far. If anyone has a reason to use this chain, send me a line and I will add it to the tutorial.
mangle table - The last table to do anything about is the mangle table. Normally I will not use this table at all, since it should normally not be used for anyone, unless they have specific needs, such as masking all boxes to use the exact same TTL or to change TOS fields etc. I have in other words chosen to leave these parts of the scripts more or less blank, with a few exceptions where I have added a few examples of what it may be used for.
Set policies - Set the default policies within the chain. The same thing goes here as for the nat table pretty much. The table was not made for filtering, and hence you should avoid it all together. I have not set any policies in any of the scripts in the mangle table one way or the other, and you are encouraged not to do so either.
Create user specified chains - Create all the user specified chains. Since I have barely used the mangle table at all in the scripts, I have neither created any chains here since it is fairly unusable without any data to use within it. However, this section was added just in case someone, or I, would have the need for it in the future.
Create content in user specified chains - If you have any user specified chains within this table, you may at this point add the rules that you want within them here.
PREROUTING - At this point there is barely any information in any of the scripts in this tutorial that contains any rules here.
INPUT chain - At this point there is barely any information in any of the scripts in this tutorial that contains any rules here.
FORWARD chain - At this point there is barely any information in any of the scripts in this tutorial that contains any rules here.
OUTPUT chain - At this point there is barely any information in any of the scripts in this tutorial that contains any rules here.
POSTROUTING chain - At this point there is barely any information in any of the scripts in this tutorial that contains any rules here.
Hopefully this should explain more in detail how each script is structured and why they are structured in such a way.
Do note that these descriptions are extremely brief, and should mainly just be seen as a brief explanation to what and why the scripts has been split down as they have. There is nothing that says that this is the only and best way to go. |
8.2. rc.firewall.txt
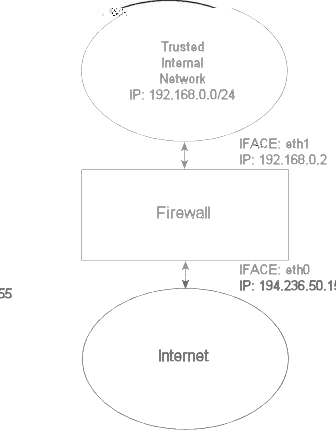
The rc.firewall.txt script is the main core on which the rest of the scripts are based upon. The rc.firewall file chapter should explain every detail in the script most thoroughly. Mainly it was written for a dual homed network. For example, where you have one LAN and one Internet Connection. This script also makes the assumption that you have a static IP to the Internet, and hence don't use DHCP, PPP, SLIP or some other protocol that assigns you an IP automatically. If you are looking for a script that will work with those setups, please take a closer look at the rc.DHCP.firewall.txt script.
The rc.firewall.txt script requires the following options to be compiled statically to the kernel, or as modules. Without one or more of these, the script will become more or less flawed since parts of the scripts required functionalities will be unusable. As you change the script you use, you could possibly need more options to be compiled into your kernel depending on what you want to use.
CONFIG_NETFILTER
CONFIG_IP_NF_CONNTRACK
CONFIG_IP_NF_IPTABLES
CONFIG_IP_NF_MATCH_LIMIT
CONFIG_IP_NF_MATCH_STATE
CONFIG_IP_NF_FILTER
CONFIG_IP_NF_NAT
CONFIG_IP_NF_TARGET_LOG
8.3. rc.DMZ.firewall.txt
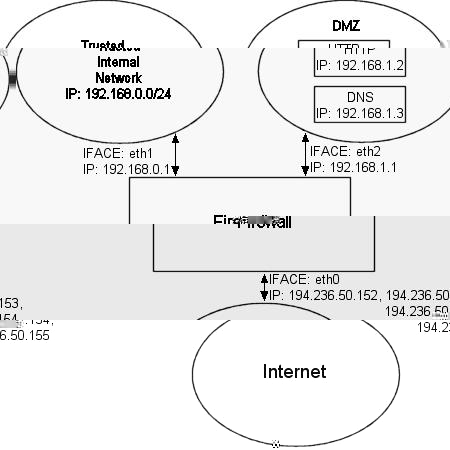
The rc.DMZ.firewall.txt script was written for those people out there that have one Trusted Internal Network, one De-Militarized Zone and one Internet Connection. The De-Militarized Zone is in this case 1-to-1 NATed and requires you to do some IP aliasing on your firewall, i.e., you must make the box recognize packets for more than one IP. There are several ways to get this to work, one is to set 1-to-1 NAT, another one if you have a whole subnet is to create a subnetwork, giving the firewall one IP both internally and externally. You could then set the IP's to the DMZed boxes as you wish. Do note that this will "steal" two IP's for you, one for the broadcast address and one for the network address. This is pretty much up to you to decide and to implement, this tutorial will give you the tools to actually accomplish the firewalling and NATing part, but it will not tell you exactly what you need to do since it is out of the scope of the tutorial.
The rc.DMZ.firewall.txt script requires these options to be compiled into your kernel, either statically or as modules. Without these options, at the very least, available in your kernel, you will not be able to use this scripts functionality. You may in other words get a lot of errors complaining about modules and targets/jumps or matches missing. If you are planning to do traffic control or any other things like that, you should see to it that you have all the required options compiled into your kernel there as well.
CONFIG_NETFILTER
CONFIG_IP_NF_CONNTRACK
CONFIG_IP_NF_IPTABLES
CONFIG_IP_NF_MATCH_LIMIT
CONFIG_IP_NF_MATCH_STATE
CONFIG_IP_NF_FILTER
CONFIG_IP_NF_NAT
CONFIG_IP_NF_TARGET_LOG
You need to have two internal networks with this script as you can see from the picture. One uses IP range 192.168.0.0/24 and consists of a Trusted Internal Network. The other one uses IP range 192.168.1.0/24 and consists of the De-Militarized Zone which we will do 1-to-1 NAT to. For example, if someone from the Internet sends a packet to our DNS_IP, then we use DNAT, to send the packet on to our DNS on the DMZ network. When the DNS sees our packet, the packet will be destined for the actual DNS internal network IP, and not to our external DNS IP. If the packet would not have been translated, the DNS wouldn't have answered the packet. We will show a short example of how the DNAT code looks:
$IPTABLES -t nat -A PREROUTING -p TCP -i $INET_IFACE -d $DNS_IP \
--dport 53 -j DNAT --to-destination $DMZ_DNS_IP
First of all, DNAT can only be performed in the PREROUTING chain of the nat table. Then we look for TCP protocol on our $INET_IFACE with destination IP that matches our $DNS_IP, and is directed to port 53, which is the TCP port for zone transfers between name servers. If we actually get such a packet we give a target of DNAT, in other words DNAT. After that we specify where we want the packet to go with the --to-destination option and give it the value of $DMZ_DNS_IP, in other words the IP of the DNS on our DMZ network. This is how basic DNAT works. When the reply to the DNATed packet is sent through the firewall, it automatically gets un-DNATed.
By now you should have enough understanding of how everything works to be able to understand this script pretty well without any huge complications. If there is something you don't understand, that hasn't been gone through in the rest of the tutorial, mail me since it is probably a fault on my side.
8.4. rc.DHCP.firewall.txt

The rc.DHCP.firewall.txt script is pretty much identical to the original rc.firewall.txt. However, this script no longer uses the STATIC_IP variable, which is the main change to the original rc.firewall.txt script. The reason is that this won't work together with a dynamic IP connection. The actual changes needed to be done to the original script is minimal, however, I've had some people mail me and ask about the problem so this script will be a good solution for you. This script will allow people who uses DHCP, PPP and SLIP connections to connect to the Internet.
The rc.DHCP.firewall.txt script requires the following options to be compiled statically to the kernel, or as modules, as a bare minimum to run properly.
CONFIG_NETFILTER
CONFIG_IP_NF_CONNTRACK
CONFIG_IP_NF_IPTABLES
CONFIG_IP_NF_MATCH_LIMIT
CONFIG_IP_NF_MATCH_STATE
CONFIG_IP_NF_FILTER
CONFIG_IP_NF_NAT
CONFIG_IP_NF_TARGET_MASQUERADE
CONFIG_IP_NF_TARGET_LOG
The main changes done to the script consists of erasing the STATIC_IP variable as I already said and deleting all references to this variable. Instead of using this variable the script now does its main filtering on the variable INET_IFACE. In other words -d $STATIC_IP has been changed to -i $INET_IFACE. This is pretty much the only changes made and that's all that's needed really.
There are some more things to think about though. We can no longer filter in the INPUT chain depending on, for example, --in-interface $LAN_IFACE --dst $INET_IP. This in turn forces us to filter only based on interfaces in such cases where the internal machines must access the Internet addressable IP. One great example is if we are running an HTTP on our firewall. If we go to the main page, which contains static links back to the same host, which could be some dyndns solution, we would get a real hard trouble. The NATed box would ask the DNS for the IP of the HTTP server, then try to access that IP. In case we filter based on interface and IP, the NATed box would be unable to get to the HTTP because the INPUT chain would DROP the packets flat to the ground. This also applies in a sense to the case where we got a static IP, but in such cases it could be gotten around by adding rules which check the LAN interface packets for our INET_IP, and if so ACCEPT them.
As you may read from above, it may be a good idea to get a script, or write one, that handles dynamic IP in a better sense. We could for example make a script that grabs the IP from ifconfig and adds it to a variable, upon boot-up of the Internet connection. A good way to do this, would be to use for example the ip-up scripts provided with pppd and some other programs. For a good site, check out the linuxguruz.org iptables site which has a huge collection of scripts available to download. You will find a link to the linuxguruz.org site from the Other resources and links appendix.
This script might be a bit less secure than the rc.firewall.txt script. I would definitely advise you to use that script if at all possible since this script is more open to attacks from the outside. |
Also, there is the possibility to add something like this to your scripts:
INET_IP=`ifconfig $INET_IFACE | grep inet | cut -d : -f 2 | \
cut -d ' ' -f 1`
The above would automatically grab the IP address of the $INET_IFACE variable, grep the correct line which contains the IP address and then cuts it down to a manageable IP address. For a more elaborate way of doing this, you could apply the snippets of code available within the retreiveip.txt script, which will automatically grab your Internet IP address when you run the script. Do note that this may in turn lead to a little bit of "weird" behaviors, such as stalling connections to and from the firewall on the internal side. The most common strange behaviors are described in the following list.
If the script is run from within a script which in turn is executed by, for example, the PPP daemon, it will hang all currently active connections due to the NEW not SYN rules (see the State NEW packets but no SYN bit set section). It is possible to get by, if you get rid of the NEW not SYN rules for example, but it is questionable.
If you got rules that are static and always want to be around, it is rather harsh to add and erase rules all the time, without hurting the already existing ones. For example, if you want to block hosts on your LAN to connect to the firewall, but at the same time operate a script from the PPP daemon, how would you do it without erasing your already active rules blocking the LAN?
It may get unnecessarily complicated, as seen above which in turn could lead to security compromises. If the script is kept simple, it is easier to spot problems, and to keep order in it.
8.5. rc.UTIN.firewall.txt
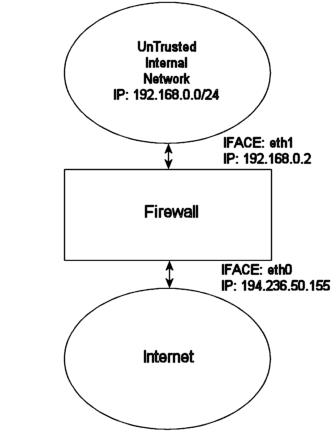
The rc.UTIN.firewall.txt script will in contrast to the other scripts block the LAN that is sitting behind us. In other words, we don't trust anyone on any networks we are connected to. We also disallow people on our LAN to do anything but specific tasks on the Internet. The only things we actually allow is POP3, HTTP and FTP access to the Internet. We also don't trust the internal users to access the firewall more than we trust users on the Internet.
The rc.UTIN.firewall.txt script requires the following options to be compiled statically to the kernel, or as modules. Without one or more of these, the script will become more or less flawed since parts of the scripts required functionalities will be unusable. As you change the script you use, you could possibly need more options to be compiled into your kernel depending on what you want to use.
CONFIG_NETFILTER
CONFIG_IP_NF_CONNTRACK
CONFIG_IP_NF_IPTABLES
CONFIG_IP_NF_MATCH_LIMIT
CONFIG_IP_NF_MATCH_STATE
CONFIG_IP_NF_FILTER
CONFIG_IP_NF_NAT
CONFIG_IP_NF_TARGET_LOG
This script follows the golden rule to not trust anyone, not even our own employees. This is a sad fact, but a large part of the hacks and cracks that a company gets hit by is a matter of people from their own staff perpetrating the hit. This script will hopefully give you some clues as to what you can do with your firewall to strengthen it up. It's not very different from the original rc.firewall.txt script, but it does give a few hints at what we would normally let through etc.
8.6. rc.test-iptables.txt
The rc.test-iptables.txt script can be used to test all the different chains, but it might need some tweaking depending on your configuration, such as turning on ip_forwarding, and setting up masquerading etc. It will work for mostly everyone though who has all the basic set up and all the basic tables loaded into kernel. All it really does is set some LOG targets which will log ping replies and ping requests. This way, you will get information on which chain was traversed and in which order. For example, run this script and then do:
ping -c 1 host.on.the.internet
And tail -n 0 -f /var/log/messages while doing the first command. This should show you all the different chains used and in which order, unless the log entries are swapped around for some reason.
This script was written for testing purposes only. In other words, it's not a good idea to have rules like this that logs everything of one sort since your log partitions might get filled up quickly and it would be an effective Denial of Service attack against you and might lead to real attacks on you that would be unlogged after the initial Denial of Service attack. |
8.7. rc.flush-iptables.txt
The rc.flush-iptables.txt script should not really be called a script in itself. The rc.flush-iptables.txt script will reset and flush all your tables and chains. The script starts by setting the default policies to ACCEPT on the INPUT, OUTPUT and FORWARD chains of the filter table. After this we reset the default policies of the PREROUTING, POSTROUTING and OUTPUT chains of the nat table. We do this first so we won't have to bother about closed connections and packets not getting through. This script is intended for actually setting up and troubleshooting your firewall, and hence we only care about opening the whole thing up and reset it to default values.
After this we flush all chains first in the filter table and then in the NAT table. This way we know there is no redundant rules lying around anywhere. When all of this is done, we jump down to the next section where we erase all the user specified chains in the NAT and filter tables. When this step is done, we consider the script done. You may consider adding rules to flush your mangle table if you use it.
One final word on this issue. Certain people have mailed me asking from me to put this script into the original rc.firewall script using Red Hat Linux syntax where you type something like rc.firewall start and the script starts. However, I will not do that since this is a tutorial and should be used as a place to fetch ideas mainly and it shouldn't be filled up with shell scripts and strange syntax. Adding shell script syntax and other things makes the script harder to read as far as I am concerned and the tutorial was written with readability in mind and will continue being so. |
8.8. Limit-match.txt
The limit-match.txt script is a minor test script which will let you test the limit match and see how it works. Load the script up, and then send ping packets at different intervals to see which gets through, and how often they get through. All echo replies will be blocked until the threshold for the burst limit has again been reached.
8.9. Pid-owner.txt
The pid-owner.txt is a small example script that shows how we could use the PID owner match. It does nothing real, but you should be able to run the script, and then from the output of iptables -L -v be able to tell that the rule actually matches.
8.10. Sid-owner.txt
The sid-owner.txt is a small example script that shows how we could use the SID owner match. It does nothing real, but you should be able to run the script, and then from the output of iptables -L -v be able to tell that the rule actually matches.
8.11. Ttl-inc.txt
A small example ttl-inc.txt script. This script shows how we could make the firewall/router invisible to traceroutes, which would otherwise reveal much information to possible attackers.
8.12. Iptables-save ruleset
A small example script used in the Saving and restoring large rule-sets chapter to illustrate how iptables-save may be used. This script is non-working, and should hence not be used for anything else than a reference.
Appendix A. Detailed explanations of special commands
A.1. Listing your active rule-set
To list your currently active rule-set you run a special option to the iptables command, which we have discussed briefly previously in the How a rule is built chapter. This would look like the following:
iptables -L
This command should list your currently active rule-set, and translate everything possible to a more readable form. For example, it will translate all the different ports according to the /etc/services file as well as DNS all the IP addresses to get DNS records instead. The later can be a bit of a problem though. For example, it will try to resolve LAN IP addresses, i.e. 192.168.1.1, to something useful. 192.168.0.0/16 is a private range though and should not resolve to anything and the command will seem to hang while resolving the IP. To get around this problem we would do something like the following:
iptables -L -n
Another thing that might be interesting is to see a few statistics about each policy, rule and chain. We could get this by adding the verbose flag. It would then look something like this:
iptables -L -n -v
Don't forget that it is also possible to list the nat and mangle tables. This is done with the -t switch, like this:
iptables -L -t nat
There are also a few files that might be interesting to look at in the /proc file system. For example, it might be interesting to know what connections are currently in the conntrack table. This table contains all the different connections currently tracked and serves as a basic table so we always know what state a connection currently is in. This table can not be edited and even if it was possible, it would be a bad idea. To see the table you can run the following command:
cat /proc/net/ip_conntrack | less
The above command will show all currently tracked connections even though it might be a bit hard to understand everything.
A.2. Updating and flushing your tables
If at some point you screw up your iptables, there are actually commands to flush them, so you don't have to reboot. I've actually gotten this question a couple times by now so I thought I'd answer it right here. If you added a rule in error, you might just change the -A parameter to -D in the line you added in error. iptables will find the erroneous line and erase it for you, in case you've got multiple lines looking exactly the same in the chain, it erases the first instance it finds matching your rule. If this is not the wanted behavior you might try to use the -D option as iptables -D INPUT 10 which will erase the 10th rule in the INPUT chain.
There are also instances where you want to flush a whole chain, in this case you might want to run the -F option. For example, iptables -F INPUT will erase the whole INPUT chain, though, this will not change the default policy, so if this is set to DROP you'll block the whole INPUT chain if used as above. To reset the chain policy, do as how you set it to DROP, for example iptables -P INPUT ACCEPT.
I have made a rc.flush-iptables.txt (available as an appendix as well) that will flush and reset your iptables that you might consider using while setting up your rc.firewall.txt file properly. One thing though, if you start mucking around in the mangle table, this script will not erase those, it is rather simple to add the few lines needed to erase those but I have not added those here since the mangle table is not used in my rc.firewall.txt script so far.
Appendix B. Common problems and questions
B.1. Problems loading modules
You may run into a few problems with loading modules. For example, you could get errors claiming that there is no module by such a name and so on. This may, for example look like the following.
insmod: iptable_filter: no module by that name found
This is no reason for concern yet. This or these modules may possibly have been statically compiled into your kernel. This is the first thing you should look at when trying to solve this problem. The simplest way to see if these modules have been loaded already or if they are statically compiled into the kernel, is to simply try and run a command that uses the specific functionality. In the above case, we could not load the filter table. If this functionality is not there, we should be unable to use the filter table at all. To check if the filter table is there, we do the following.
iptables -t filter -L
This should either output all of the chains in the filter table properly, or it should fail. If everything is o.k., then it should look something like this depending on if you have rules inserted or not.
Chain INPUT (policy ACCEPT)
target     prot opt source               destination

Chain FORWARD (policy ACCEPT)
target     prot opt source               destination

Chain OUTPUT (policy ACCEPT)
target     prot opt source               destination
If you do not have the filter table loaded, you would get an error that looks something like this instead.
iptables v1.2.5: can't initialize iptables table `filter': Table \
     does not exist (do you need to insmod?)
Perhaps iptables or your kernel needs to be upgraded.
This is a bit more serious since it points out that we first of all do not have the functionality compiled into the kernel, and second, that the module is not possible to find in our normal module paths. This may either mean that you have forgotten to install your modules, you have forgotten to run depmod -a to update your module databases or you have not compiled the functionality as either module or statically into kernel. There may of course be other reasons for the module not to be loaded, but these are the main reasons. Most of these problems are easily solved. The first problem would simply be solved by running make modules_install in the kernel source directory (if the source has already been compiled and the modules have already been built). The second problem is solved by simply running depmod -a once and see if it works afterward. The third problem is a bit out of the league for this explanation, and you are more or less left to your own wits here. You will most probably find more information about this on the Linux Documentation Project homepage.
Another error that you may get when running iptables is the following error.
iptables: No chain/target/match by that name
This error tells us that there is no such chain, target or match. This could depend upon a huge set of factors, the most common being that you have misspelled the chain, target or match in question. Also, this could be generated in case you are trying to use a match that is not available, either because you did not load the proper module, it was not compiled into kernel or iptables failed to automatically load the module. In general, you should look for all of the above solutions but also look for misspelled targets of some sort or another in your rule.
B.2. State NEW packets but no SYN bit set
There is a certain feature in iptables that is not so well documented and may therefore be overlooked by a lot of people (yes, including me). If you use state NEW, packets with the SYN bit unset will get through your firewall. This feature is there because in certain cases we want to consider that a packet may be part of an already ESTABLISHED connection on, for instance, another firewall. This feature makes it possible to have two or more firewalls, and for one of the firewalls to go down without any loss of data. The firewalling of the subnet could then be taken over by our secondary firewall. This does however lead to the fact that state NEW will allow pretty much any kind of TCP connection, regardless if this is the initial 3-way handshake or not. To take care of this problem we add the following rules to our firewalls INPUT, OUTPUT and FORWARD chain:
$IPTABLES -A INPUT -p tcp ! --syn -m state --state NEW -j LOG \
     --log-prefix "New not syn:"
$IPTABLES -A INPUT -p tcp ! --syn -m state --state NEW -j DROP
The above rules will take care of this problem. This is a badly documented behavior of the Netfilter/iptables project and should definitely be more highlighted. In other words, a huge warning is in its place for this kind of behavior on your firewall. |
Note that there are some troubles with the above rules and bad Microsoft TCP/IP implementations. The above rules will lead to certain conditions where packets generated by Microsoft products gets labeled as state NEW and hence get logged and dropped. It will however not lead to broken connections to my knowledge. The problem occurs when a connection gets closed, the final FIN/ACK is sent, the state machine of Netfilter closes the connection and it is no longer in the conntrack table. At this point the faulty Microsoft implementation sends another packet which is considered as state NEW but lacks the SYN bit and hence gets matched by the above rules. In other words, don't worry to much about this rule, or if you are worried anyways, set the --log-headers option to the rule and log the headers too and you'll get a better look at what the packet looks like.
There is one more known problem with these rules. If someone is currently connected to the firewall, let's say from the LAN, and you have the script set to be activated when running a PPP connection. In this case, when you start the PPP connection, the person previously connected through the LAN will be more or less killed. This only applies when you are running with the conntrack and nat code bases as modules, and the modules are loaded and unloaded each time you run the script. Another way to get this problem is to run the rc.firewall.txt script from a telnet connection from a host not on the actual firewall. To put it simple, you connect with telnet or some other stream connection. Start the connection tracking modules, then load the NEW not SYN packet rules. Finally, the telnet client or daemon tries to send something. the connection tracking code will not recognize this connection as a legal connection since it has not seen packets in any direction on this connection before, also there will be no SYN bits set since it is not actually the first packet in the connection. Hence, the packet will match to the rules and be logged and after-wards dropped to the ground.
B.3. SYN/ACK and NEW packets
Certain TCP spoofing attacks uses a technique called Sequence Number Prediction. In this type of attack, the attacker spoofs some other hosts IP address, while attacking someone, and tries to predict the Sequence number used by that host.
Let's look on typical TCP spoofing by sequence number prediction. Players: "attacker" [A], trying to send packets to a "victim" [V], pretending to be some "other host" [O].
[A] sends SYN to [V] with source IP of [O].
[V] replies to [O] by SYN/ACK.
now [O] should reply to an unknown SYN/ACK by RST and the attack is unsuccesful, but let's assume [O] is down (flooded, turned off or behind firewall that has dropped the packets).
if [O] didn't mess it up, [A] now can talk to [V] pretending to be [O] as long as it predicts correct sequence numbers.
As long as we do not send the RST packet to the unknown SYN/ACK in step 3, we will allow [V] to be attacked, and ourself to be incriminated. Common courtesy, would hence be to send the RST to [V] in a proper way. If we use the NEW not SYN rules specified in the ruleset, SYN/ACK packets will be dropped. Hence, we have the following rules in the bad_tcp_packets chain, just above the NEW not SYN rules:
iptables -A bad_tcp_packets -p tcp --tcp-flags SYN,ACK SYN,ACK \
-m state --state NEW -j REJECT --reject-with tcp-reset
The chance of being [O] in this scenario should be relatively small, but these rules should be safe in almost all cases. Except when you run several redundant firewalls which will often take over packets or streams from each other. In such case, some connections may be blocked, even though they are legit. This rule may actually also allow a few portscans to see our firewall as well, but they should not be able to tell much more than that.
B.4. Internet Service Providers who use assigned IP addresses
I have added this since a friend of mine told me something I have totally forgotten. Certain stupid Internet Service Providers use IP addresses assigned by IANA for their local networks on which you connect to. For example, the Swedish Internet Service Provider and phone monopoly Telia uses this approach for example on their DNS servers, which uses the 10.x.x.x IP address range. The problem you will most probably run into is that we, in this script, do not allow connections from any IP addresses in the 10.x.x.x range to us, because of spoofing possibilities. Well, here is unfortunately an example where you actually might have to lift a bit on those rules. You might just insert an ACCEPT rule above the spoof section to allow traffic from those DNS servers, or you could just comment out that part of the script. This is how it might look:
/usr/local/sbin/iptables -t nat -I PREROUTING -i eth1 -s \
     10.0.0.1/32 -j ACCEPT
I would like to take my moment to bitch at these Internet Service Providers. These IP address ranges are not assigned for you to use for dumb stuff like this, at least not to my knowledge. For large corporate sites it is more than o.k., or your own home network, but you are not supposed to force us to open up ourself just because of some winge of yours.
B.5. Letting DHCP requests through iptables
This is a fairly simple task really, once you get to know how DHCP works, however, you must be a little bit cautious with what you do let in and what you do not let in. First of all, we should know that DHCP works over the UDP protocol. Hence, this is the first thing to look for. Second, we should check which interface we get and send the request from. For example, if our eth0 interface is set up with DHCP, we should not allow DHCP requests on eth1. To make the rule a bit more specific, we only allow the actual UDP ports used by DHCP, which should be ports 67 and 68. These are the criteria that we choose to match packets on, and that we allow. The rule would now look like this:
$IPTABLES  -I INPUT -i $LAN_IFACE -p udp --dport 67:68 --sport \
     67:68 -j ACCEPT
Do note that we allow all traffic to and from UDP port 67 and 68 now, however, this should not be such a huge problem since it only allows requests from hosts doing the connection from port 67 or 68 as well. This rule could, of course, be even more restrictive, but it should be enough to actually accept all DHCP requests and updates without opening up too large holes. If you are concerned, this rule could of course be made even more restrictive.
B.6. mIRC DCC problems
mIRC uses a special setting which allows it to connect through a firewall and to make DCC connections work properly without the firewall knowing about it. If this option is used together with iptables and specifically the ip_conntrack_irc and ip_nat_irc modules, it will simply not work. The problem is that mIRC will automatically NAT the inside of the packets for you, and when the packet reaches the firewall, the firewall will simply not know how and what to do with it. mIRC does not expect the firewall to be smart enough to take care of this by itself by simply querying the IRC server for its IP address and sending DCC requests with that address instead.
Turning on the "I am behind a firewall" configuration option and using the ip_conntrack_irc and ip_nat_irc modules will result in Netfilter creating log entries with the following content "Forged DCC send packet".
The simplest possible solution is to just uncheck that configuration option in mIRC and let iptables do the work. This means, that you should tell mIRC specifically that it is not behind a firewall.
Appendix C. ICMP types
This is a complete listing of all ICMP types:
Table C-1. ICMP types
| TYPE | CODE | Description | Query | Error |
|---|---|---|---|---|
| 0 | 0 | Echo Reply | x | |
| 3 | 0 | Network Unreachable | x | |
| 3 | 1 | Host Unreachable | x | |
| 3 | 2 | Protocol Unreachable | x | |
| 3 | 3 | Port Unreachable | x | |
| 3 | 4 | Fragmentation needed but no frag. bit set | x | |
| 3 | 5 | Source routing failed | x | |
| 3 | 6 | Destination network unknown | x | |
| 3 | 7 | Destination host unknown | x | |
| 3 | 8 | Source host isolated (obsolete) | x | |
| 3 | 9 | Destination network administratively prohibited | x | |
| 3 | 10 | Destination host administratively prohibited | x | |
| 3 | 11 | Network unreachable for TOS | x | |
| 3 | 12 | Host unreachable for TOS | x | |
| 3 | 13 | Communication administratively prohibited by filtering | x | |
| 3 | 14 | Host precedence violation | x | |
| 3 | 15 | Precedence cutoff in effect | x | |
| 4 | 0 | Source quench | ||
| 5 | 0 | Redirect for network | ||
| 5 | 1 | Redirect for host | ||
| 5 | 2 | Redirect for TOS and network | ||
| 5 | 3 | Redirect for TOS and host | ||
| 8 | 0 | Echo request | x | |
| 9 | 0 | Router advertisement | ||
| 10 | 0 | Route solicitation | ||
| 11 | 0 | TTL equals 0 during transit | x | |
| 11 | 1 | TTL equals 0 during reassembly | x | |
| 12 | 0 | IP header bad (catchall error) | x | |
| 12 | 1 | Required options missing | x | |
| 13 | 0 | Timestamp request (obsolete) | x | |
| 14 | Timestamp reply (obsolete) | x | ||
| 15 | 0 | Information request (obsolete) | x | |
| 16 | 0 | Information reply (obsolete) | x | |
| 17 | 0 | Address mask request | x | |
| 18 | 0 | Address mask reply | x |
Appendix D. Other resources and links
Here is a list of links to resources and where I have gotten information from, etc :
ip-sysctl.txt - from the 2.4.14 kernel. A little bit short but a good reference for the IP networking controls and what they do to the kernel.
The Internet Control Message Protocol - A good, brief document describing the ICMP protocol in detail. Written by Ralph Walden.
RFC 792 - Internet Control Message Protocol - The definitive resource for all information about ICMP packets. Whatever technical information you need about the ICMP protocol, this is where you should turn first. Written by J. Postel.
RFC 793 - Transmission Control Protocol - This is the original resource on how TCP should behave on all hosts. This document has been the standard on how TCP should work since 1981 and forward. Extremely technical, but a must read for anyone who wants to learn TCP in every detail. This was originally a Department of Defense standard written by J. Postel.
ip_dynaddr.txt - from the 2.4.14 kernel. A really short reference to the ip_dynaddr settings available via sysctl and the proc file system.
iptables.8 - The iptables 1.2.4 man page. This is an HTMLized version of the man page which is an excellent reference when reading/writing iptables rule-sets. Always have it at hand.
Firewall rules table - A small PDF document gracefully given to this project by Stuart Clark, which gives a reference form where you can write all of the information needed for your firewall, in a simple manner.
http://www.netfilter.org/ - The official Netfilter and iptables site. It is a must for everyone wanting to set up iptables and Netfilter in linux.
http://www.netfilter.org/documentation/index.html#FAQ - The official Netfilter Frequently Asked Questions. Also a good place to start at when wondering what iptables and Netfilter is about.
http://www.netfilter.org/unreliable-guides/packet-filtering-HOWTO/index.html - Rusty Russells Unreliable Guide to packet filtering. Excellent documentation about basic packet filtering with iptables written by one of the core developers of iptables and Netfilter.
http://www.netfilter.org/unreliable-guides/NAT-HOWTO/index.html - Rusty Russells Unreliable Guide to Network Address Translation. Excellent documentation about Network Address Translation in iptables and Netfilter written by one of the core developers, Rusty Russell.
http://www.netfilter.org/unreliable-guides/netfilter-hacking-HOWTO/index.html - Rusty Russells Unreliable Netfilter Hacking HOW-TO. One of the few documentations on how to write code in the Netfilter and iptables user-space and kernel space code-base. This was also written by Rusty Russell.
http://www.linuxguruz.org/iptables/ - Excellent link-page with links to most of the pages on the Internet about iptables and Netfilter. Also maintains a list of iptables scripts for different purposes.
http://www.islandsoft.net/veerapen.html - Excellent discussion on automatic hardening of iptables and how to make small changes that will make your computer automatically add hostile sites to a special ban list in iptables.
/etc/protocols - An example protocols file taken from the Slackware distribution. This can be used to find out what protocol number different protocols have, such as the IP, ICMP or TCP protocols have.
/etc/services - An example services file taken from the Slackware distribution. This is extremely good to get used to reading once in a while, specifically if you want to get a basic look at what protocols runs on different ports.
Internet Engineering Task Force - This is one of the biggest groups when it comes to setting and maintaining Internet standards. They are the ones maintaining the RFC repository, and consist of a large group of companies and individuals that work together to ensure the interoperability of the Internet.
Linux Advanced Routing and Traffic Control HOW-TO - This site hosts the Linux Advanced Routing and Traffic Control HOWTO. It is one of the biggest and best documents regarding Linux advanced routing. Maintained by Bert Hubert.
Paksecured Linux Kernel patches - A site containing all of the kernel patches written by Matthew G. Marsh. Among others, the FTOS patch is available here.
ULOGD project page - The homepage of the ULOGD site.
The Linux Documentation Project is a great site for documentation. Most big documents for Linux is available here, and if not in the TLDP, you will have to search the net very carefully. If there is anything you want to know more about, check this site out.
http://kalamazoolinux.org/presentations/20010417/conntrack.html - This presentation contains an excellent explanation of the conntrack modules and their work in Netfilter. If you are interested in more documentation on conntrack, this is a "must read".
http://www.docum.org - Excellent information about the CBQ, tc and the ip commands in Linux. One of the few sites that has any information at all about these programs. Maintained by Stef Coene.
http://lists.samba.org/mailman/listinfo/netfilter - The official Netfilter mailing-list. Extremely useful in case you have questions about something not covered in this document or any of the other links here.
And of course the iptables source, documentation and individuals who helped me.
Appendix E. Acknowledgments
I would like to thank the following people for their help on this document:
Fabrice Marie, For major updates to my horrible grammar and spelling. Also a huge thanks for updating the tutorial to DocBook format with make files etc.
Marc Boucher, For helping me out on some aspects on using the state matching code.
Frode E. Nyboe, For greatly improving the rc.firewall rules and giving great inspiration while i was to rewrite the rule-set and being the one who introduced the multiple table traversing into the same file.
Chapman Brad, Alexander W. Janssen, Both for making me realize I was thinking wrong about how packets traverse the basic NAT and filters tables and in which order they show up.
Michiel Brandenburg, Myles Uyema, For helping me out with some of the state matching code and getting it to work.
Kent `Artech' Stahre, For helping me out with the graphics. I know I suck at graphics, and you're better than most I know who do graphics;). Also thanks for checking the tutorial for errors etc.
Anders 'DeZENT' Johansson, For hinting me about strange ISPs and so on that uses reserved networks on the Internet, or at least on the Internet for you.
Jeremy `Spliffy' Smith, For giving me hints at stuff that might screw up for people and for trying it out and checking for errors in what I've written.
Appendix F. History
Version 1.1.19 (21 May 2003)
http://iptables-tutorial.frozentux.net
By: Oskar Andreasson
Contributors: Peter van Kampen, Xavier Bartol, Jon Anderson, Thorsten Bremer
and Spanish Translation Team.
Version 1.1.18 (24 Apr 2003)
http://iptables-tutorial.frozentux.net
By: Oskar Andreasson
Contributors: Stuart Clark, Robert P. J. Day, Mark Orenstein and Edmond Shwayri.
Version 1.1.17 (6 Apr 2003)
http://iptables-tutorial.frozentux.net
By: Oskar Andreasson
Contributors: Geraldo Amaral Filho, Ondrej Suchy, Dino Conti, Robert P. J. Day,
Velev Dimo, Spencer Rouser, Daveonos, Amanda Hickman, Olle Jonsson and
Bengt Aspvall.
Version 1.1.16 (16 Dec 2002)
http://iptables-tutorial.frozentux.net
By: Oskar Andreasson
Contributors: Clemens Schwaighower, Uwe Dippel and Dave Wreski.
Version 1.1.15 (13 Nov 2002)
http://iptables-tutorial.frozentux.net
By: Oskar Andreasson
Contributors: Mark Sonarte, A. Lester Buck, Robert P. J. Day, Togan Muftuoglu,
Antony Stone, Matthew F. Barnes and Otto Matejka.
Version 1.1.14 (14 Oct 2002)
http://iptables-tutorial.frozentux.net
By: Oskar Andreasson
Contributors: Carol Anne, Manuel Minzoni, Yves Soun, Miernik, Uwe Dippel,
Dave Klipec and Eddy L O Jansson.
Version 1.1.13 (22 Aug 2002)
http://iptables-tutorial.haringstad.com
By: Oskar Andreasson
Contributors: Tons of people reporting bad HTML version.
Version 1.1.12 (19 Aug 2002)
http://www.netfilter.org/tutorial/
By: Oskar Andreasson
Contributors: Peter Schubnell, Stephen J. Lawrence, Uwe Dippel, Bradley
Dilger, Vegard Engen, Clifford Kite, Alessandro Oliveira, Tony Earnshaw,
Harald Welte, Nick Andrew and Stepan Kasal.
Version 1.1.11 (27 May 2002)
http://www.netfilter.org/tutorial/
By: Oskar Andreasson
Contributors: Steve Hnizdur, Lonni Friedman, Jelle Kalf, Harald Welte,
Valentina Barrios and Tony Earnshaw.
Version 1.1.10 (12 April 2002)
http://www.boingworld.com/workshops/linux/iptables-tutorial/
By: Oskar Andreasson
Contributors: Jelle Kalf, Theodore Alexandrov, Paul Corbett, Rodrigo
Rubira Branco, Alistair Tonner, Matthew G. Marsh, Uwe Dippel, Evan
Nemerson and Marcel J.E. Mol.
Version 1.1.9 (21 March 2002)
http://www.boingworld.com/workshops/linux/iptables-tutorial/
By: Oskar Andreasson
Contributors: Vince Herried, Togan Muftuoglu, Galen Johnson, Kelly Ashe, Janne
Johansson, Thomas Smets, Peter Horst, Mitch Landers, Neil Jolly, Jelle Kalf,
Jason Lam and Evan Nemerson.
Version 1.1.8 (5 March 2002)
http://www.boingworld.com/workshops/linux/iptables-tutorial/
By: Oskar Andreasson
Version 1.1.7 (4 February 2002)
http://www.boingworld.com/workshops/linux/iptables-tutorial/
By: Oskar Andreasson
Contributors: Parimi Ravi, Phil Schultz, Steven McClintoc, Bill Dossett,
Dave Wreski, Erik Sjölund, Adam Mansbridge, Vasoo Veerapen, Aladdin and
Rusty Russell.
Version 1.1.6 (7 December 2001)
http://people.unix-fu.org/andreasson/
By: Oskar Andreasson
Contributors: Jim Ramsey, Phil Schultz, Göran Bĺge, Doug Monroe, Jasper
Aikema, Kurt Lieber, Chris Tallon, Chris Martin, Jonas Pasche, Jan
Labanowski, Rodrigo R. Branco, Jacco van Koll and Dave Wreski.
Version 1.1.5 (14 November 2001)
http://people.unix-fu.org/andreasson/
By: Oskar Andreasson
Contributors: Fabrice Marie, Merijn Schering and Kurt Lieber.
Version 1.1.4 (6 November 2001)
http://people.unix-fu.org/andreasson
By: Oskar Andreasson
Contributors: Stig W. Jensen, Steve Hnizdur, Chris Pluta and Kurt Lieber.
Version 1.1.3 (9 October 2001)
http://people.unix-fu.org/andreasson
By: Oskar Andreasson
Contributors: Joni Chu, N.Emile Akabi-Davis and Jelle Kalf.
Version 1.1.2 (29 September 2001)
http://people.unix-fu.org/andreasson
By: Oskar Andreasson
Version 1.1.1 (26 September 2001)
http://people.unix-fu.org/andreasson
By: Oskar Andreasson
Contributors: Dave Richardson.
Version 1.1.0 (15 September 2001)
http://people.unix-fu.org/andreasson
By: Oskar Andreasson
Version 1.0.9 (9 September 2001)
http://people.unix-fu.org/andreasson
By: Oskar Andreasson
Version 1.0.8 (7 September 2001)
http://people.unix-fu.org/andreasson
By: Oskar Andreasson
Version 1.0.7 (23 August 2001)
http://people.unix-fu.org/andreasson
By: Oskar Andreasson
Contributors: Fabrice Marie.
Version 1.0.6
http://people.unix-fu.org/andreasson
By: Oskar Andreasson
Version 1.0.5
http://people.unix-fu.org/andreasson
By: Oskar Andreasson
Contributors: Fabrice Marie.
Appendix G. GNU Free Documentation License
Version 1.1, March 2000
Copyright (C) 2000 Free Software Foundation, Inc. 59 Temple Place, Suite 330, Boston, MA 02111-1307 USA Everyone is permitted to copy and distribute verbatim copies of this license document, but changing it is not allowed.
0. PREAMBLE
The purpose of this License is to make a manual, textbook, or other written document "free" in the sense of freedom: to assure everyone the effective freedom to copy and redistribute it, with or without modifying it, either commercially or noncommercially. Secondarily, this License preserves for the author and publisher a way to get credit for their work, while not being considered responsible for modifications made by others.
This License is a kind of "copyleft", which means that derivative works of the document must themselves be free in the same sense. It complements the GNU General Public License, which is a copyleft license designed for free software.
We have designed this License in order to use it for manuals for free software, because free software needs free documentation: a free program should come with manuals providing the same freedoms that the software does. But this License is not limited to software manuals; it can be used for any textual work, regardless of subject matter or whether it is published as a printed book. We recommend this License principally for works whose purpose is instruction or reference.
1. APPLICABILITY AND DEFINITIONS
This License applies to any manual or other work that contains a notice placed by the copyright holder saying it can be distributed under the terms of this License. The "Document", below, refers to any such manual or work. Any member of the public is a licensee, and is addressed as "you".
A "Modified Version" of the Document means any work containing the Document or a portion of it, either copied verbatim, or with modifications and/or translated into another language.
A "Secondary Section" is a named appendix or a front-matter section of the Document that deals exclusively with the relationship of the publishers or authors of the Document to the Document's overall subject (or to related matters) and contains nothing that could fall directly within that overall subject. (For example, if the Document is in part a textbook of mathematics, a Secondary Section may not explain any mathematics.) The relationship could be a matter of historical connection with the subject or with related matters, or of legal, commercial, philosophical, ethical or political position regarding them.
The "Invariant Sections" are certain Secondary Sections whose titles are designated, as being those of Invariant Sections, in the notice that says that the Document is released under this License.
The "Cover Texts" are certain short passages of text that are listed, as Front-Cover Texts or Back-Cover Texts, in the notice that says that the Document is released under this License.
A "Transparent" copy of the Document means a machine-readable copy, represented in a format whose specification is available to the general public, whose contents can be viewed and edited directly and straightforwardly with generic text editors or (for images composed of pixels) generic paint programs or (for drawings) some widely available drawing editor, and that is suitable for input to text formatters or for automatic translation to a variety of formats suitable for input to text formatters. A copy made in an otherwise Transparent file format whose markup has been designed to thwart or discourage subsequent modification by readers is not Transparent. A copy that is not "Transparent" is called "Opaque".
Examples of suitable formats for Transparent copies include plain ASCII without markup, Texinfo input format, LaTeX input format, SGML or XML using a publicly available DTD, and standard-conforming simple HTML designed for human modification. Opaque formats include PostScript, PDF, proprietary formats that can be read and edited only by proprietary word processors, SGML or XML for which the DTD and/or processing tools are not generally available, and the machine-generated HTML produced by some word processors for output purposes only.
The "Title Page" means, for a printed book, the title page itself, plus such following pages as are needed to hold, legibly, the material this License requires to appear in the title page. For works in formats which do not have any title page as such, "Title Page" means the text near the most prominent appearance of the work's title, preceding the beginning of the body of the text.
2. VERBATIM COPYING
You may copy and distribute the Document in any medium, either commercially or noncommercially, provided that this License, the copyright notices, and the license notice saying this License applies to the Document are reproduced in all copies, and that you add no other conditions whatsoever to those of this License. You may not use technical measures to obstruct or control the reading or further copying of the copies you make or distribute. However, you may accept compensation in exchange for copies. If you distribute a large enough number of copies you must also follow the conditions in section 3.
You may also lend copies, under the same conditions stated above, and you may publicly display copies.
3. COPYING IN QUANTITY
If you publish printed copies of the Document numbering more than 100, and the Document's license notice requires Cover Texts, you must enclose the copies in covers that carry, clearly and legibly, all these Cover Texts: Front-Cover Texts on the front cover, and Back-Cover Texts on the back cover. Both covers must also clearly and legibly identify you as the publisher of these copies. The front cover must present the full title with all words of the title equally prominent and visible. You may add other material on the covers in addition. Copying with changes limited to the covers, as long as they preserve the title of the Document and satisfy these conditions, can be treated as verbatim copying in other respects.
If the required texts for either cover are too voluminous to fit legibly, you should put the first ones listed (as many as fit reasonably) on the actual cover, and continue the rest onto adjacent pages.
If you publish or distribute Opaque copies of the Document numbering more than 100, you must either include a machine-readable Transparent copy along with each Opaque copy, or state in or with each Opaque copy a publicly-accessible computer-network location containing a complete Transparent copy of the Document, free of added material, which the general network-using public has access to download anonymously at no charge using public-standard network protocols. If you use the latter option, you must take reasonably prudent steps, when you begin distribution of Opaque copies in quantity, to ensure that this Transparent copy will remain thus accessible at the stated location until at least one year after the last time you distribute an Opaque copy (directly or through your agents or retailers) of that edition to the public.
It is requested, but not required, that you contact the authors of the Document well before redistributing any large number of copies, to give them a chance to provide you with an updated version of the Document.
4. MODIFICATIONS
You may copy and distribute a Modified Version of the Document under the conditions of sections 2 and 3 above, provided that you release the Modified Version under precisely this License, with the Modified Version filling the role of the Document, thus licensing distribution and modification of the Modified Version to whoever possesses a copy of it. In addition, you must do these things in the Modified Version:
Use in the Title Page (and on the covers, if any) a title distinct from that of the Document, and from those of previous versions (which should, if there were any, be listed in the History section of the Document). You may use the same title as a previous version if the original publisher of that version gives permission.
List on the Title Page, as authors, one or more persons or entities responsible for authorship of the modifications in the Modified Version, together with at least five of the principal authors of the Document (all of its principal authors, if it has less than five).
State on the Title page the name of the publisher of the Modified Version, as the publisher.
Preserve all the copyright notices of the Document.
Add an appropriate copyright notice for your modifications adjacent to the other copyright notices.
Include, immediately after the copyright notices, a license notice giving the public permission to use the Modified Version under the terms of this License, in the form shown in the Addendum below.
Preserve in that license notice the full lists of Invariant Sections and required Cover Texts given in the Document's license notice.
Include an unaltered copy of this License.
Preserve the section entitled "History", and its title, and add to it an item stating at least the title, year, new authors, and publisher of the Modified Version as given on the Title Page. If there is no section entitled "History" in the Document, create one stating the title, year, authors, and publisher of the Document as given on its Title Page, then add an item describing the Modified Version as stated in the previous sentence.
Preserve the network location, if any, given in the Document for public access to a Transparent copy of the Document, and likewise the network locations given in the Document for previous versions it was based on. These may be placed in the "History" section. You may omit a network location for a work that was published at least four years before the Document itself, or if the original publisher of the version it refers to gives permission.
In any section entitled "Acknowledgements" or "Dedications", preserve the section's title, and preserve in the section all the substance and tone of each of the contributor acknowledgements and/or dedications given therein.
Preserve all the Invariant Sections of the Document, unaltered in their text and in their titles. Section numbers or the equivalent are not considered part of the section titles.
Delete any section entitled "Endorsements". Such a section may not be included in the Modified Version.
Do not retitle any existing section as "Endorsements" or to conflict in title with any Invariant Section.
If the Modified Version includes new front-matter sections or appendices that qualify as Secondary Sections and contain no material copied from the Document, you may at your option designate some or all of these sections as invariant. To do this, add their titles to the list of Invariant Sections in the Modified Version's license notice. These titles must be distinct from any other section titles.
You may add a section entitled "Endorsements", provided it contains nothing but endorsements of your Modified Version by various parties--for example, statements of peer review or that the text has been approved by an organization as the authoritative definition of a standard.
You may add a passage of up to five words as a Front-Cover Text, and a passage of up to 25 words as a Back-Cover Text, to the end of the list of Cover Texts in the Modified Version. Only one passage of Front-Cover Text and one of Back-Cover Text may be added by (or through arrangements made by) any one entity. If the Document already includes a cover text for the same cover, previously added by you or by arrangement made by the same entity you are acting on behalf of, you may not add another; but you may replace the old one, on explicit permission from the previous publisher that added the old one.
The author(s) and publisher(s) of the Document do not by this License give permission to use their names for publicity for or to assert or imply endorsement of any Modified Version.
5. COMBINING DOCUMENTS
You may combine the Document with other documents released under this License, under the terms defined in section 4 above for modified versions, provided that you include in the combination all of the Invariant Sections of all of the original documents, unmodified, and list them all as Invariant Sections of your combined work in its license notice.
The combined work need only contain one copy of this License, and multiple identical Invariant Sections may be replaced with a single copy. If there are multiple Invariant Sections with the same name but different contents, make the title of each such section unique by adding at the end of it, in parentheses, the name of the original author or publisher of that section if known, or else a unique number. Make the same adjustment to the section titles in the list of Invariant Sections in the license notice of the combined work.
In the combination, you must combine any sections entitled "History" in the various original documents, forming one section entitled "History"; likewise combine any sections entitled "Acknowledgements", and any sections entitled "Dedications". You must delete all sections entitled "Endorsements."
6. COLLECTIONS OF DOCUMENTS
You may make a collection consisting of the Document and other documents released under this License, and replace the individual copies of this License in the various documents with a single copy that is included in the collection, provided that you follow the rules of this License for verbatim copying of each of the documents in all other respects.
You may extract a single document from such a collection, and distribute it individually under this License, provided you insert a copy of this License into the extracted document, and follow this License in all other respects regarding verbatim copying of that document.
7. AGGREGATION WITH INDEPENDENT WORKS
A compilation of the Document or its derivatives with other separate and independent documents or works, in or on a volume of a storage or distribution medium, does not as a whole count as a Modified Version of the Document, provided no compilation copyright is claimed for the compilation. Such a compilation is called an "aggregate", and this License does not apply to the other self-contained works thus compiled with the Document, on account of their being thus compiled, if they are not themselves derivative works of the Document.
If the Cover Text requirement of section 3 is applicable to these copies of the Document, then if the Document is less than one quarter of the entire aggregate, the Document's Cover Texts may be placed on covers that surround only the Document within the aggregate. Otherwise they must appear on covers around the whole aggregate.
8. TRANSLATION
Translation is considered a kind of modification, so you may distribute translations of the Document under the terms of section 4. Replacing Invariant Sections with translations requires special permission from their copyright holders, but you may include translations of some or all Invariant Sections in addition to the original versions of these Invariant Sections. You may include a translation of this License provided that you also include the original English version of this License. In case of a disagreement between the translation and the original English version of this License, the original English version will prevail.
9. TERMINATION
You may not copy, modify, sublicense, or distribute the Document except as expressly provided for under this License. Any other attempt to copy, modify, sublicense or distribute the Document is void, and will automatically terminate your rights under this License. However, parties who have received copies, or rights, from you under this License will not have their licenses terminated so long as such parties remain in full compliance.
10. FUTURE REVISIONS OF THIS LICENSE
The Free Software Foundation may publish new, revised versions of the GNU Free Documentation License from time to time. Such new versions will be similar in spirit to the present version, but may differ in detail to address new problems or concerns. See http://www.gnu.org/copyleft/.
Each version of the License is given a distinguishing version number. If the Document specifies that a particular numbered version of this License "or any later version" applies to it, you have the option of following the terms and conditions either of that specified version or of any later version that has been published (not as a draft) by the Free Software Foundation. If the Document does not specify a version number of this License, you may choose any version ever published (not as a draft) by the Free Software Foundation.
How to use this License for your documents
To use this License in a document you have written, include a copy of the License in the document and put the following copyright and license notices just after the title page:
Copyright (c) YEAR YOUR NAME. Permission is granted to copy, distribute and/or modify this document under the terms of the GNU Free Documentation License, Version 1.1 or any later version published by the Free Software Foundation; with the Invariant Sections being LIST THEIR TITLES, with the Front-Cover Texts being LIST, and with the Back-Cover Texts being LIST. A copy of the license is included in the section entitled "GNU Free Documentation License".
If you have no Invariant Sections, write "with no Invariant Sections" instead of saying which ones are invariant. If you have no Front-Cover Texts, write "no Front-Cover Texts" instead of "Front-Cover Texts being LIST"; likewise for Back-Cover Texts.
If your document contains nontrivial examples of program code, we recommend releasing these examples in parallel under your choice of free software license, such as the GNU General Public License, to permit their use in free software.
Appendix H. GNU General Public License
Version 2, June 1991
Copyright (C) 1989, 1991 Free Software Foundation, Inc. 59 Temple Place, Suite 330, Boston, MA 02111-1307 USA Everyone is permitted to copy and distribute verbatim copies of this license document, but changing it is not allowed.
0. Preamble
The licenses for most software are designed to take away your freedom to share and change it. By contrast, the GNU General Public License is intended to guarantee your freedom to share and change free software--to make sure the software is free for all its users. This General Public License applies to most of the Free Software Foundation's software and to any other program whose authors commit to using it. (Some other Free Software Foundation software is covered by the GNU Library General Public License instead.) You can apply it to your programs, too.
When we speak of free software, we are referring to freedom, not price. Our General Public Licenses are designed to make sure that you have the freedom to distribute copies of free software (and charge for this service if you wish), that you receive source code or can get it if you want it, that you can change the software or use pieces of it in new free programs; and that you know you can do these things.
To protect your rights, we need to make restrictions that forbid anyone to deny you these rights or to ask you to surrender the rights. These restrictions translate to certain responsibilities for you if you distribute copies of the software, or if you modify it.
For example, if you distribute copies of such a program, whether gratis or for a fee, you must give the recipients all the rights that you have. You must make sure that they, too, receive or can get the source code. And you must show them these terms so they know their rights.
We protect your rights with two steps: (1) copyright the software, and (2) offer you this license which gives you legal permission to copy, distribute and/or modify the software.
Also, for each author's protection and ours, we want to make certain that everyone understands that there is no warranty for this free software. If the software is modified by someone else and passed on, we want its recipients to know that what they have is not the original, so that any problems introduced by others will not reflect on the original authors' reputations.
Finally, any free program is threatened constantly by software patents. We wish to avoid the danger that redistributors of a free program will individually obtain patent licenses, in effect making the program proprietary. To prevent this, we have made it clear that any patent must be licensed for everyone's free use or not licensed at all.
The precise terms and conditions for copying, distribution and modification follow.
1. TERMS AND CONDITIONS FOR COPYING, DISTRIBUTION AND MODIFICATION
This License applies to any program or other work which contains a notice placed by the copyright holder saying it may be distributed under the terms of this General Public License. The "Program", below, refers to any such program or work, and a "work based on the Program" means either the Program or any derivative work under copyright law: that is to say, a work containing the Program or a portion of it, either verbatim or with modifications and/or translated into another language. (Hereinafter, translation is included without limitation in the term "modification".) Each licensee is addressed as "you".
Activities other than copying, distribution and modification are not covered by this License; they are outside its scope. The act of running the Program is not restricted, and the output from the Program is covered only if its contents constitute a work based on the Program (independent of having been made by running the Program). Whether that is true depends on what the Program does.
You may copy and distribute verbatim copies of the Program's source code as you receive it, in any medium, provided that you conspicuously and appropriately publish on each copy an appropriate copyright notice and disclaimer of warranty; keep intact all the notices that refer to this License and to the absence of any warranty; and give any other recipients of the Program a copy of this License along with the Program.
You may charge a fee for the physical act of transferring a copy, and you may at your option offer warranty protection in exchange for a fee.
You may modify your copy or copies of the Program or any portion of it, thus forming a work based on the Program, and copy and distribute such modifications or work under the terms of Section 1 above, provided that you also meet all of these conditions:
You must cause the modified files to carry prominent notices stating that you changed the files and the date of any change.
You must cause any work that you distribute or publish, that in whole or in part contains or is derived from the Program or any part thereof, to be licensed as a whole at no charge to all third parties under the terms of this License.
If the modified program normally reads commands interactively when run, you must cause it, when started running for such interactive use in the most ordinary way, to print or display an announcement including an appropriate copyright notice and a notice that there is no warranty (or else, saying that you provide a warranty) and that users may redistribute the program under these conditions, and telling the user how to view a copy of this License. (Exception: if the Program itself is interactive but does not normally print such an announcement, your work based on the Program is not required to print an announcement.)
These requirements apply to the modified work as a whole. If identifiable sections of that work are not derived from the Program, and can be reasonably considered independent and separate works in themselves, then this License, and its terms, do not apply to those sections when you distribute them as separate works. But when you distribute the same sections as part of a whole which is a work based on the Program, the distribution of the whole must be on the terms of this License, whose permissions for other licensees extend to the entire whole, and thus to each and every part regardless of who wrote it.
Thus, it is not the intent of this section to claim rights or contest your rights to work written entirely by you; rather, the intent is to exercise the right to control the distribution of derivative or collective works based on the Program.
In addition, mere aggregation of another work not based on the Program with the Program (or with a work based on the Program) on a volume of a storage or distribution medium does not bring the other work under the scope of this License.
You may copy and distribute the Program (or a work based on it, under Section 2) in object code or executable form under the terms of Sections 1 and 2 above provided that you also do one of the following:
Accompany it with the complete corresponding machine-readable source code, which must be distributed under the terms of Sections 1 and 2 above on a medium customarily used for software interchange; or,
Accompany it with a written offer, valid for at least three years, to give any third party, for a charge no more than your cost of physically performing source distribution, a complete machine-readable copy of the corresponding source code, to be distributed under the terms of Sections 1 and 2 above on a medium customarily used for software interchange; or,
Accompany it with the information you received as to the offer to distribute corresponding source code. (This alternative is allowed only for noncommercial distribution and only if you received the program in object code or executable form with such an offer, in accord with Subsection b above.)
The source code for a work means the preferred form of the work for making modifications to it. For an executable work, complete source code means all the source code for all modules it contains, plus any associated interface definition files, plus the scripts used to control compilation and installation of the executable. However, as a special exception, the source code distributed need not include anything that is normally distributed (in either source or binary form) with the major components (compiler, kernel, and so on) of the operating system on which the executable runs, unless that component itself accompanies the executable.
If distribution of executable or object code is made by offering access to copy from a designated place, then offering equivalent access to copy the source code from the same place counts as distribution of the source code, even though third parties are not compelled to copy the source along with the object code.
You may not copy, modify, sublicense, or distribute the Program except as expressly provided under this License. Any attempt otherwise to copy, modify, sublicense or distribute the Program is void, and will automatically terminate your rights under this License. However, parties who have received copies, or rights, from you under this License will not have their licenses terminated so long as such parties remain in full compliance.
You are not required to accept this License, since you have not signed it. However, nothing else grants you permission to modify or distribute the Program or its derivative works. These actions are prohibited by law if you do not accept this License. Therefore, by modifying or distributing the Program (or any work based on the Program), you indicate your acceptance of this License to do so, and all its terms and conditions for copying, distributing or modifying the Program or works based on it.
Each time you redistribute the Program (or any work based on the Program), the recipient automatically receives a license from the original licensor to copy, distribute or modify the Program subject to these terms and conditions. You may not impose any further restrictions on the recipients' exercise of the rights granted herein. You are not responsible for enforcing compliance by third parties to this License.
If, as a consequence of a court judgment or allegation of patent infringement or for any other reason (not limited to patent issues), conditions are imposed on you (whether by court order, agreement or otherwise) that contradict the conditions of this License, they do not excuse you from the conditions of this License. If you cannot distribute so as to satisfy simultaneously your obligations under this License and any other pertinent obligations, then as a consequence you may not distribute the Program at all. For example, if a patent license would not permit royalty-free redistribution of the Program by all those who receive copies directly or indirectly through you, then the only way you could satisfy both it and this License would be to refrain entirely from distribution of the Program.
If any portion of this section is held invalid or unenforceable under any particular circumstance, the balance of the section is intended to apply and the section as a whole is intended to apply in other circumstances.
It is not the purpose of this section to induce you to infringe any patents or other property right claims or to contest validity of any such claims; this section has the sole purpose of protecting the integrity of the free software distribution system, which is implemented by public license practices. Many people have made generous contributions to the wide range of software distributed through that system in reliance on consistent application of that system; it is up to the author/donor to decide if he or she is willing to distribute software through any other system and a licensee cannot impose that choice.
This section is intended to make thoroughly clear what is believed to be a consequence of the rest of this License.
If the distribution and/or use of the Program is restricted in certain countries either by patents or by copyrighted interfaces, the original copyright holder who places the Program under this License may add an explicit geographical distribution limitation excluding those countries, so that distribution is permitted only in or among countries not thus excluded. In such case, this License incorporates the limitation as if written in the body of this License.
The Free Software Foundation may publish revised and/or new versions of the General Public License from time to time. Such new versions will be similar in spirit to the present version, but may differ in detail to address new problems or concerns.
Each version is given a distinguishing version number. If the Program specifies a version number of this License which applies to it and "any later version", you have the option of following the terms and conditions either of that version or of any later version published by the Free Software Foundation. If the Program does not specify a version number of this License, you may choose any version ever published by the Free Software Foundation.
If you wish to incorporate parts of the Program into other free programs whose distribution conditions are different, write to the author to ask for permission. For software which is copyrighted by the Free Software Foundation, write to the Free Software Foundation; we sometimes make exceptions for this. Our decision will be guided by the two goals of preserving the free status of all derivatives of our free software and of promoting the sharing and reuse of software generally.
NO WARRANTY
BECAUSE THE PROGRAM IS LICENSED FREE OF CHARGE, THERE IS NO WARRANTY FOR THE PROGRAM, TO THE EXTENT PERMITTED BY APPLICABLE LAW. EXCEPT WHEN OTHERWISE STATED IN WRITING THE COPYRIGHT HOLDERS AND/OR OTHER PARTIES PROVIDE THE PROGRAM "AS IS" WITHOUT WARRANTY OF ANY KIND, EITHER EXPRESSED OR IMPLIED, INCLUDING, BUT NOT LIMITED TO, THE IMPLIED WARRANTIES OF MERCHANTABILITY AND FITNESS FOR A PARTICULAR PURPOSE. THE ENTIRE RISK AS TO THE QUALITY AND PERFORMANCE OF THE PROGRAM IS WITH YOU. SHOULD THE PROGRAM PROVE DEFECTIVE, YOU ASSUME THE COST OF ALL NECESSARY SERVICING, REPAIR OR CORRECTION.
IN NO EVENT UNLESS REQUIRED BY APPLICABLE LAW OR AGREED TO IN WRITING WILL ANY COPYRIGHT HOLDER, OR ANY OTHER PARTY WHO MAY MODIFY AND/OR REDISTRIBUTE THE PROGRAM AS PERMITTED ABOVE, BE LIABLE TO YOU FOR DAMAGES, INCLUDING ANY GENERAL, SPECIAL, INCIDENTAL OR CONSEQUENTIAL DAMAGES ARISING OUT OF THE USE OR INABILITY TO USE THE PROGRAM (INCLUDING BUT NOT LIMITED TO LOSS OF DATA OR DATA BEING RENDERED INACCURATE OR LOSSES SUSTAINED BY YOU OR THIRD PARTIES OR A FAILURE OF THE PROGRAM TO OPERATE WITH ANY OTHER PROGRAMS), EVEN IF SUCH HOLDER OR OTHER PARTY HAS BEEN ADVISED OF THE POSSIBILITY OF SUCH DAMAGES.
END OF TERMS AND CONDITIONS
2. How to Apply These Terms to Your New Programs
If you develop a new program, and you want it to be of the greatest possible use to the public, the best way to achieve this is to make it free software which everyone can redistribute and change under these terms.
To do so, attach the following notices to the program. It is safest to attach them to the start of each source file to most effectively convey the exclusion of warranty; and each file should have at least the "copyright" line and a pointer to where the full notice is found.
<one line to give the program's name and a brief idea of what it does.>
Copyright (C) <year> <name of author>
This program is free software; you can redistribute it and/or modify it under the terms of the GNU General Public License as published by the Free Software Foundation; either version 2 of the License, or (at your option) any later version.
This program is distributed in the hope that it will be useful, but WITHOUT ANY WARRANTY; without even the implied warranty of MERCHANTABILITY or FITNESS FOR A PARTICULAR PURPOSE. See the GNU General Public License for more details.
You should have received a copy of the GNU General Public License along with this program; if not, write to the Free Software Foundation, Inc., 59 Temple Place, Suite 330, Boston, MA 02111-1307 USA
Also add information on how to contact you by electronic and paper mail.
If the program is interactive, make it output a short notice like this when it starts in an interactive mode:
Gnomovision version 69, Copyright (C) year name of author Gnomovision comes with ABSOLUTELY NO WARRANTY; for details type `show w'. This is free software, and you are welcome to redistribute it under certain conditions; type `show c' for details.
The hypothetical commands `show w' and `show c' should show the appropriate parts of the General Public License. Of course, the commands you use may be called something other than `show w' and `show c'; they could even be mouse-clicks or menu items--whatever suits your program.
You should also get your employer (if you work as a programmer) or your school, if any, to sign a "copyright disclaimer" for the program, if necessary. Here is a sample; alter the names:
Yoyodyne, Inc., hereby disclaims all copyright interest in the program
`Gnomovision' (which makes passes at compilers) written by James Hacker.
<signature of Ty Coon>, 1 April 1989
Ty Coon, President of Vice
This General Public License does not permit incorporating your program into proprietary programs. If your program is a subroutine library, you may consider it more useful to permit linking proprietary applications with the library. If this is what you want to do, use the GNU Library General Public License instead of this License.
Appendix I. Example scripts code-base
I.1. Example rc.firewall script
#!/bin/sh
#
# rc.firewall - Initial SIMPLE IP Firewall script for Linux 2.4.x and iptables
#
# Copyright (C) 2001  Oskar Andreasson <bluefluxATkoffeinDOTnet>
#
# This program is free software; you can redistribute it and/or modify
# it under the terms of the GNU General Public License as published by
# the Free Software Foundation; version 2 of the License.
#
# This program is distributed in the hope that it will be useful,
# but WITHOUT ANY WARRANTY; without even the implied warranty of
# MERCHANTABILITY or FITNESS FOR A PARTICULAR PURPOSE.  See the
# GNU General Public License for more details.
#
# You should have received a copy of the GNU General Public License
# along with this program or from the site that you downloaded it
# from; if not, write to the Free Software Foundation, Inc., 59 Temple
# Place, Suite 330, Boston, MA  02111-1307   USA
#

###########################################################################
#
# 1. Configuration options.
#

#
# 1.1 Internet Configuration.
#

INET_IP="194.236.50.155"
INET_IFACE="eth0"
INET_BROADCAST="194.236.50.255"

#
# 1.1.1 DHCP
#

#
# 1.1.2 PPPoE
#

#
# 1.2 Local Area Network configuration.
#
# your LAN's IP range and localhost IP. /24 means to only use the first 24
# bits of the 32 bit IP address. the same as netmask 255.255.255.0
#

LAN_IP="192.168.0.2"
LAN_IP_RANGE="192.168.0.0/16"
LAN_IFACE="eth1"

#
# 1.3 DMZ Configuration.
#

#
# 1.4 Localhost Configuration.
#

LO_IFACE="lo"
LO_IP="127.0.0.1"

#
# 1.5 IPTables Configuration.
#

IPTABLES="/usr/sbin/iptables"

#
# 1.6 Other Configuration.
#

###########################################################################
#
# 2. Module loading.
#

#
# Needed to initially load modules
#

/sbin/depmod -a

#
# 2.1 Required modules
#

/sbin/modprobe ip_tables
/sbin/modprobe ip_conntrack
/sbin/modprobe iptable_filter
/sbin/modprobe iptable_mangle
/sbin/modprobe iptable_nat
/sbin/modprobe ipt_LOG
/sbin/modprobe ipt_limit
/sbin/modprobe ipt_state

#
# 2.2 Non-Required modules
#

#/sbin/modprobe ipt_owner
#/sbin/modprobe ipt_REJECT
#/sbin/modprobe ipt_MASQUERADE
#/sbin/modprobe ip_conntrack_ftp
#/sbin/modprobe ip_conntrack_irc
#/sbin/modprobe ip_nat_ftp
#/sbin/modprobe ip_nat_irc

###########################################################################
#
# 3. /proc set up.
#

#
# 3.1 Required proc configuration
#

echo "1" > /proc/sys/net/ipv4/ip_forward

#
# 3.2 Non-Required proc configuration
#

#echo "1" > /proc/sys/net/ipv4/conf/all/rp_filter
#echo "1" > /proc/sys/net/ipv4/conf/all/proxy_arp
#echo "1" > /proc/sys/net/ipv4/ip_dynaddr

###########################################################################
#
# 4. rules set up.
#

######
# 4.1 Filter table
#

#
# 4.1.1 Set policies
#

$IPTABLES -P INPUT DROP
$IPTABLES -P OUTPUT DROP
$IPTABLES -P FORWARD DROP

#
# 4.1.2 Create userspecified chains
#

#
# Create chain for bad tcp packets
#

$IPTABLES -N bad_tcp_packets

#
# Create separate chains for ICMP, TCP and UDP to traverse
#

$IPTABLES -N allowed
$IPTABLES -N tcp_packets
$IPTABLES -N udp_packets
$IPTABLES -N icmp_packets

#
# 4.1.3 Create content in userspecified chains
#

#
# bad_tcp_packets chain
#

$IPTABLES -A bad_tcp_packets -p tcp --tcp-flags SYN,ACK SYN,ACK \
-m state --state NEW -j REJECT --reject-with tcp-reset
$IPTABLES -A bad_tcp_packets -p tcp ! --syn -m state --state NEW -j LOG \
--log-prefix "New not syn:"
$IPTABLES -A bad_tcp_packets -p tcp ! --syn -m state --state NEW -j DROP

#
# allowed chain
#

$IPTABLES -A allowed -p TCP --syn -j ACCEPT
$IPTABLES -A allowed -p TCP -m state --state ESTABLISHED,RELATED -j ACCEPT
$IPTABLES -A allowed -p TCP -j DROP

#
# TCP rules
#

$IPTABLES -A tcp_packets -p TCP -s 0/0 --dport 21 -j allowed
$IPTABLES -A tcp_packets -p TCP -s 0/0 --dport 22 -j allowed
$IPTABLES -A tcp_packets -p TCP -s 0/0 --dport 80 -j allowed
$IPTABLES -A tcp_packets -p TCP -s 0/0 --dport 113 -j allowed

#
# UDP ports
#

#$IPTABLES -A udp_packets -p UDP -s 0/0 --destination-port 53 -j ACCEPT
#$IPTABLES -A udp_packets -p UDP -s 0/0 --destination-port 123 -j ACCEPT
$IPTABLES -A udp_packets -p UDP -s 0/0 --destination-port 2074 -j ACCEPT
$IPTABLES -A udp_packets -p UDP -s 0/0 --destination-port 4000 -j ACCEPT

#
# In Microsoft Networks you will be swamped by broadcasts. These lines
# will prevent them from showing up in the logs.
#

#$IPTABLES -A udp_packets -p UDP -i $INET_IFACE -d $INET_BROADCAST \
#--destination-port 135:139 -j DROP

#
# If we get DHCP requests from the Outside of our network, our logs will
# be swamped as well. This rule will block them from getting logged.
#

#$IPTABLES -A udp_packets -p UDP -i $INET_IFACE -d 255.255.255.255 \
#--destination-port 67:68 -j DROP

#
# ICMP rules
#

$IPTABLES -A icmp_packets -p ICMP -s 0/0 --icmp-type 8 -j ACCEPT
$IPTABLES -A icmp_packets -p ICMP -s 0/0 --icmp-type 11 -j ACCEPT

#
# 4.1.4 INPUT chain
#

#
# Bad TCP packets we don't want.
#

$IPTABLES -A INPUT -p tcp -j bad_tcp_packets

#
# Rules for special networks not part of the Internet
#

$IPTABLES -A INPUT -p ALL -i $LAN_IFACE -s $LAN_IP_RANGE -j ACCEPT
$IPTABLES -A INPUT -p ALL -i $LO_IFACE -s $LO_IP -j ACCEPT
$IPTABLES -A INPUT -p ALL -i $LO_IFACE -s $LAN_IP -j ACCEPT
$IPTABLES -A INPUT -p ALL -i $LO_IFACE -s $INET_IP -j ACCEPT

#
# Special rule for DHCP requests from LAN, which are not caught properly
# otherwise.
#

$IPTABLES -A INPUT -p UDP -i $LAN_IFACE --dport 67 --sport 68 -j ACCEPT

#
# Rules for incoming packets from the internet.
#

$IPTABLES -A INPUT -p ALL -d $INET_IP -m state --state ESTABLISHED,RELATED \
-j ACCEPT
$IPTABLES -A INPUT -p TCP -i $INET_IFACE -j tcp_packets
$IPTABLES -A INPUT -p UDP -i $INET_IFACE -j udp_packets
$IPTABLES -A INPUT -p ICMP -i $INET_IFACE -j icmp_packets

#
# If you have a Microsoft Network on the outside of your firewall, you may
# also get flooded by Multicasts. We drop them so we do not get flooded by
# logs
#

#$IPTABLES -A INPUT -i $INET_IFACE -d 224.0.0.0/8 -j DROP

#
# Log weird packets that don't match the above.
#

$IPTABLES -A INPUT -m limit --limit 3/minute --limit-burst 3 -j LOG \
--log-level DEBUG --log-prefix "IPT INPUT packet died: "

#
# 4.1.5 FORWARD chain
#

#
# Bad TCP packets we don't want
#

$IPTABLES -A FORWARD -p tcp -j bad_tcp_packets

#
# Accept the packets we actually want to forward
#

$IPTABLES -A FORWARD -i $LAN_IFACE -j ACCEPT
$IPTABLES -A FORWARD -m state --state ESTABLISHED,RELATED -j ACCEPT

#
# Log weird packets that don't match the above.
#

$IPTABLES -A FORWARD -m limit --limit 3/minute --limit-burst 3 -j LOG \
--log-level DEBUG --log-prefix "IPT FORWARD packet died: "

#
# 4.1.6 OUTPUT chain
#

#
# Bad TCP packets we don't want.
#

$IPTABLES -A OUTPUT -p tcp -j bad_tcp_packets

#
# Special OUTPUT rules to decide which IP's to allow.
#

$IPTABLES -A OUTPUT -p ALL -s $LO_IP -j ACCEPT
$IPTABLES -A OUTPUT -p ALL -s $LAN_IP -j ACCEPT
$IPTABLES -A OUTPUT -p ALL -s $INET_IP -j ACCEPT

#
# Log weird packets that don't match the above.
#

$IPTABLES -A OUTPUT -m limit --limit 3/minute --limit-burst 3 -j LOG \
--log-level DEBUG --log-prefix "IPT OUTPUT packet died: "

######
# 4.2 nat table
#

#
# 4.2.1 Set policies
#

#
# 4.2.2 Create user specified chains
#

#
# 4.2.3 Create content in user specified chains
#

#
# 4.2.4 PREROUTING chain
#

#
# 4.2.5 POSTROUTING chain
#

#
# Enable simple IP Forwarding and Network Address Translation
#

$IPTABLES -t nat -A POSTROUTING -o $INET_IFACE -j SNAT --to-source $INET_IP

#
# 4.2.6 OUTPUT chain
#

######
# 4.3 mangle table
#

#
# 4.3.1 Set policies
#

#
# 4.3.2 Create user specified chains
#

#
# 4.3.3 Create content in user specified chains
#

#
# 4.3.4 PREROUTING chain
#

#
# 4.3.5 INPUT chain
#

#
# 4.3.6 FORWARD chain
#

#
# 4.3.7 OUTPUT chain
#

#
# 4.3.8 POSTROUTING chain
#
I.2. Example rc.DMZ.firewall script
#!/bin/sh
#
# rc.DMZ.firewall - DMZ IP Firewall script for Linux 2.4.x and iptables
#
# Copyright (C) 2001  Oskar Andreasson <bluefluxATkoffeinDOTnet>
#
# This program is free software; you can redistribute it and/or modify
# it under the terms of the GNU General Public License as published by
# the Free Software Foundation; version 2 of the License.
#
# This program is distributed in the hope that it will be useful,
# but WITHOUT ANY WARRANTY; without even the implied warranty of
# MERCHANTABILITY or FITNESS FOR A PARTICULAR PURPOSE.  See the
# GNU General Public License for more details.
#
# You should have received a copy of the GNU General Public License
# along with this program or from the site that you downloaded it
# from; if not, write to the Free Software Foundation, Inc., 59 Temple
# Place, Suite 330, Boston, MA  02111-1307   USA
#

###########################################################################
#
# 1. Configuration options.
#

#
# 1.1 Internet Configuration.
#

INET_IP="194.236.50.152"
HTTP_IP="194.236.50.153"
DNS_IP="194.236.50.154"
INET_IFACE="eth0"

#
# 1.1.1 DHCP
#

#
# 1.1.2 PPPoE
#

#
# 1.2 Local Area Network configuration.
#
# your LAN's IP range and localhost IP. /24 means to only use the first 24
# bits of the 32 bit IP address. the same as netmask 255.255.255.0
#

LAN_IP="192.168.0.1"
LAN_IFACE="eth1"

#
# 1.3 DMZ Configuration.
#

DMZ_HTTP_IP="192.168.1.2"
DMZ_DNS_IP="192.168.1.3"
DMZ_IP="192.168.1.1"
DMZ_IFACE="eth2"

#
# 1.4 Localhost Configuration.
#

LO_IFACE="lo"
LO_IP="127.0.0.1"

#
# 1.5 IPTables Configuration.
#

IPTABLES="/usr/sbin/iptables"

#
# 1.6 Other Configuration.
#

###########################################################################
#
# 2. Module loading.
#

#
# Needed to initially load modules
#
/sbin/depmod -a


#
# 2.1 Required modules
#

/sbin/modprobe ip_tables
/sbin/modprobe ip_conntrack
/sbin/modprobe iptable_filter
/sbin/modprobe iptable_mangle
/sbin/modprobe iptable_nat
/sbin/modprobe ipt_LOG
/sbin/modprobe ipt_limit
/sbin/modprobe ipt_state

#
# 2.2 Non-Required modules
#

#/sbin/modprobe ipt_owner
#/sbin/modprobe ipt_REJECT
#/sbin/modprobe ipt_MASQUERADE
#/sbin/modprobe ip_conntrack_ftp
#/sbin/modprobe ip_conntrack_irc
#/sbin/modprobe ip_nat_ftp
#/sbin/modprobe ip_nat_irc

###########################################################################
#
# 3. /proc set up.
#

#
# 3.1 Required proc configuration
#

echo "1" > /proc/sys/net/ipv4/ip_forward

#
# 3.2 Non-Required proc configuration
#

#echo "1" > /proc/sys/net/ipv4/conf/all/rp_filter
#echo "1" > /proc/sys/net/ipv4/conf/all/proxy_arp
#echo "1" > /proc/sys/net/ipv4/ip_dynaddr

###########################################################################
#
# 4. rules set up.
#

######
# 4.1 Filter table
#

#
# 4.1.1 Set policies
#

$IPTABLES -P INPUT DROP
$IPTABLES -P OUTPUT DROP
$IPTABLES -P FORWARD DROP

#
# 4.1.2 Create userspecified chains
#

#
# Create chain for bad tcp packets
#

$IPTABLES -N bad_tcp_packets

#
# Create separate chains for ICMP, TCP and UDP to traverse
#

$IPTABLES -N allowed
$IPTABLES -N icmp_packets

#
# 4.1.3 Create content in userspecified chains
#

#
# bad_tcp_packets chain
#

$IPTABLES -A bad_tcp_packets -p tcp --tcp-flags SYN,ACK SYN,ACK \
-m state --state NEW -j REJECT --reject-with tcp-reset
$IPTABLES -A bad_tcp_packets -p tcp ! --syn -m state --state NEW -j LOG \
--log-prefix "New not syn:"
$IPTABLES -A bad_tcp_packets -p tcp ! --syn -m state --state NEW -j DROP

#
# allowed chain
#

$IPTABLES -A allowed -p TCP --syn -j ACCEPT
$IPTABLES -A allowed -p TCP -m state --state ESTABLISHED,RELATED -j ACCEPT
$IPTABLES -A allowed -p TCP -j DROP

#
# ICMP rules
#

# Changed rules totally
$IPTABLES -A icmp_packets -p ICMP -s 0/0 --icmp-type 8 -j ACCEPT
$IPTABLES -A icmp_packets -p ICMP -s 0/0 --icmp-type 11 -j ACCEPT

#
# 4.1.4 INPUT chain
#

#
# Bad TCP packets we don't want
#

$IPTABLES -A INPUT -p tcp -j bad_tcp_packets

#
# Packets from the Internet to this box
#

$IPTABLES -A INPUT -p ICMP -i $INET_IFACE -j icmp_packets

#
# Packets from LAN, DMZ or LOCALHOST
#

#
# From DMZ Interface to DMZ firewall IP
#

$IPTABLES -A INPUT -p ALL -i $DMZ_IFACE -d $DMZ_IP -j ACCEPT

#
# From LAN Interface to LAN firewall IP
#

$IPTABLES -A INPUT -p ALL -i $LAN_IFACE -d $LAN_IP -j ACCEPT

#
# From Localhost interface to Localhost IP's
#

$IPTABLES -A INPUT -p ALL -i $LO_IFACE -s $LO_IP -j ACCEPT
$IPTABLES -A INPUT -p ALL -i $LO_IFACE -s $LAN_IP -j ACCEPT
$IPTABLES -A INPUT -p ALL -i $LO_IFACE -s $INET_IP -j ACCEPT

#
# Special rule for DHCP requests from LAN, which are not caught properly
# otherwise.
#

$IPTABLES -A INPUT -p UDP -i $LAN_IFACE --dport 67 --sport 68 -j ACCEPT

#
# All established and related packets incoming from the internet to the
# firewall
#

$IPTABLES -A INPUT -p ALL -d $INET_IP -m state --state ESTABLISHED,RELATED \
-j ACCEPT

#
# In Microsoft Networks you will be swamped by broadcasts. These lines
# will prevent them from showing up in the logs.
#

#$IPTABLES -A INPUT -p UDP -i $INET_IFACE -d $INET_BROADCAST \
#--destination-port 135:139 -j DROP

#
# If we get DHCP requests from the Outside of our network, our logs will
# be swamped as well. This rule will block them from getting logged.
#

#$IPTABLES -A INPUT -p UDP -i $INET_IFACE -d 255.255.255.255 \
#--destination-port 67:68 -j DROP

#
# If you have a Microsoft Network on the outside of your firewall, you may
# also get flooded by Multicasts. We drop them so we do not get flooded by
# logs
#

#$IPTABLES -A INPUT -i $INET_IFACE -d 224.0.0.0/8 -j DROP

#
# Log weird packets that don't match the above.
#

$IPTABLES -A INPUT -m limit --limit 3/minute --limit-burst 3 -j LOG \
--log-level DEBUG --log-prefix "IPT INPUT packet died: "

#
# 4.1.5 FORWARD chain
#

#
# Bad TCP packets we don't want
#

$IPTABLES -A FORWARD -p tcp -j bad_tcp_packets


#
# DMZ section
#
# General rules
#

$IPTABLES -A FORWARD -i $DMZ_IFACE -o $INET_IFACE -j ACCEPT
$IPTABLES -A FORWARD -i $INET_IFACE -o $DMZ_IFACE -m state \
--state ESTABLISHED,RELATED -j ACCEPT
$IPTABLES -A FORWARD -i $LAN_IFACE -o $DMZ_IFACE -j ACCEPT
$IPTABLES -A FORWARD -i $DMZ_IFACE -o $LAN_IFACE -m state \
--state ESTABLISHED,RELATED -j ACCEPT

#
# HTTP server
#

$IPTABLES -A FORWARD -p TCP -i $INET_IFACE -o $DMZ_IFACE -d $DMZ_HTTP_IP \
--dport 80 -j allowed
$IPTABLES -A FORWARD -p ICMP -i $INET_IFACE -o $DMZ_IFACE -d $DMZ_HTTP_IP \
-j icmp_packets

#
# DNS server
#

$IPTABLES -A FORWARD -p TCP -i $INET_IFACE -o $DMZ_IFACE -d $DMZ_DNS_IP \
--dport 53 -j allowed
$IPTABLES -A FORWARD -p UDP -i $INET_IFACE -o $DMZ_IFACE -d $DMZ_DNS_IP \
--dport 53 -j ACCEPT
$IPTABLES -A FORWARD -p ICMP -i $INET_IFACE -o $DMZ_IFACE -d $DMZ_DNS_IP \
-j icmp_packets

#
# LAN section
#

$IPTABLES -A FORWARD -i $LAN_IFACE -j ACCEPT
$IPTABLES -A FORWARD -m state --state ESTABLISHED,RELATED -j ACCEPT

#
# Log weird packets that don't match the above.
#

$IPTABLES -A FORWARD -m limit --limit 3/minute --limit-burst 3 -j LOG \
--log-level DEBUG --log-prefix "IPT FORWARD packet died: "

#
# 4.1.6 OUTPUT chain
#

#
# Bad TCP packets we don't want.
#

$IPTABLES -A OUTPUT -p tcp -j bad_tcp_packets

#
# Special OUTPUT rules to decide which IP's to allow.
#

$IPTABLES -A OUTPUT -p ALL -s $LO_IP -j ACCEPT
$IPTABLES -A OUTPUT -p ALL -s $LAN_IP -j ACCEPT
$IPTABLES -A OUTPUT -p ALL -s $INET_IP -j ACCEPT

#
# Log weird packets that don't match the above.
#

$IPTABLES -A OUTPUT -m limit --limit 3/minute --limit-burst 3 -j LOG \
--log-level DEBUG --log-prefix "IPT OUTPUT packet died: "

######
# 4.2 nat table
#

#
# 4.2.1 Set policies
#

#
# 4.2.2 Create user specified chains
#

#
# 4.2.3 Create content in user specified chains
#

#
# 4.2.4 PREROUTING chain
#

$IPTABLES -t nat -A PREROUTING -p TCP -i $INET_IFACE -d $HTTP_IP --dport 80 \
-j DNAT --to-destination $DMZ_HTTP_IP
$IPTABLES -t nat -A PREROUTING -p TCP -i $INET_IFACE -d $DNS_IP --dport 53 \
-j DNAT --to-destination $DMZ_DNS_IP
$IPTABLES -t nat -A PREROUTING -p UDP -i $INET_IFACE -d $DNS_IP --dport 53 \
-j DNAT --to-destination $DMZ_DNS_IP

#
# 4.2.5 POSTROUTING chain
#

#
# Enable simple IP Forwarding and Network Address Translation
#

$IPTABLES -t nat -A POSTROUTING -o $INET_IFACE -j SNAT --to-source $INET_IP

#
# 4.2.6 OUTPUT chain
#

######
# 4.3 mangle table
#

#
# 4.3.1 Set policies
#

#
# 4.3.2 Create user specified chains
#

#
# 4.3.3 Create content in user specified chains
#

#
# 4.3.4 PREROUTING chain
#

#
# 4.3.5 INPUT chain
#

#
# 4.3.6 FORWARD chain
#

#
# 4.3.7 OUTPUT chain
#

#
# 4.3.8 POSTROUTING chain
#
I.3. Example rc.UTIN.firewall script
#!/bin/sh
#
# rc.firewall - UTIN Firewall script for Linux 2.4.x and iptables
#
# Copyright (C) 2001  Oskar Andreasson <bluefluxATkoffeinDOTnet>
#
# This program is free software; you can redistribute it and/or modify
# it under the terms of the GNU General Public License as published by
# the Free Software Foundation; version 2 of the License.
#
# This program is distributed in the hope that it will be useful,
# but WITHOUT ANY WARRANTY; without even the implied warranty of
# MERCHANTABILITY or FITNESS FOR A PARTICULAR PURPOSE.  See the
# GNU General Public License for more details.
#
# You should have received a copy of the GNU General Public License
# along with this program or from the site that you downloaded it
# from; if not, write to the Free Software Foundation, Inc., 59 Temple
# Place, Suite 330, Boston, MA  02111-1307   USA
#

###########################################################################
#
# 1. Configuration options.
#

#
# 1.1 Internet Configuration.
#

INET_IP="194.236.50.155"
INET_IFACE="eth0"
INET_BROADCAST="194.236.50.255"

#
# 1.1.1 DHCP
#

#
# 1.1.2 PPPoE
#

#
# 1.2 Local Area Network configuration.
#
# your LAN's IP range and localhost IP. /24 means to only use the first 24
# bits of the 32 bit IP address. the same as netmask 255.255.255.0
#

LAN_IP="192.168.0.2"
LAN_IP_RANGE="192.168.0.0/16"
LAN_IFACE="eth1"

#
# 1.3 DMZ Configuration.
#

#
# 1.4 Localhost Configuration.
#

LO_IFACE="lo"
LO_IP="127.0.0.1"

#
# 1.5 IPTables Configuration.
#

IPTABLES="/usr/sbin/iptables"

#
# 1.6 Other Configuration.
#

###########################################################################
#
# 2. Module loading.
#

#
# Needed to initially load modules
#

/sbin/depmod -a

#
# 2.1 Required modules
#

/sbin/modprobe ip_tables
/sbin/modprobe ip_conntrack
/sbin/modprobe iptable_filter
/sbin/modprobe iptable_mangle
/sbin/modprobe iptable_nat
/sbin/modprobe ipt_LOG
/sbin/modprobe ipt_limit
/sbin/modprobe ipt_state

#
# 2.2 Non-Required modules
#

#/sbin/modprobe ipt_owner
#/sbin/modprobe ipt_REJECT
#/sbin/modprobe ipt_MASQUERADE
#/sbin/modprobe ip_conntrack_ftp
#/sbin/modprobe ip_conntrack_irc
#/sbin/modprobe ip_nat_ftp
#/sbin/modprobe ip_nat_irc

###########################################################################
#
# 3. /proc set up.
#

#
# 3.1 Required proc configuration
#

echo "1" > /proc/sys/net/ipv4/ip_forward

#
# 3.2 Non-Required proc configuration
#

#echo "1" > /proc/sys/net/ipv4/conf/all/rp_filter
#echo "1" > /proc/sys/net/ipv4/conf/all/proxy_arp
#echo "1" > /proc/sys/net/ipv4/ip_dynaddr

###########################################################################
#
# 4. rules set up.
#

######
# 4.1 Filter table
#

#
# 4.1.1 Set policies
#

$IPTABLES -P INPUT DROP
$IPTABLES -P OUTPUT DROP
$IPTABLES -P FORWARD DROP

#
# 4.1.2 Create userspecified chains
#

#
# Create chain for bad tcp packets
#

$IPTABLES -N bad_tcp_packets

#
# Create separate chains for ICMP, TCP and UDP to traverse
#

$IPTABLES -N allowed
$IPTABLES -N tcp_packets
$IPTABLES -N udp_packets
$IPTABLES -N icmp_packets

#
# 4.1.3 Create content in userspecified chains
#

#
# bad_tcp_packets chain
#

$IPTABLES -A bad_tcp_packets -p tcp --tcp-flags SYN,ACK SYN,ACK \
-m state --state NEW -j REJECT --reject-with tcp-reset
$IPTABLES -A bad_tcp_packets -p tcp ! --syn -m state --state NEW -j LOG \
--log-prefix "New not syn:"
$IPTABLES -A bad_tcp_packets -p tcp ! --syn -m state --state NEW -j DROP

#
# allowed chain
#

$IPTABLES -A allowed -p TCP --syn -j ACCEPT
$IPTABLES -A allowed -p TCP -m state --state ESTABLISHED,RELATED -j ACCEPT
$IPTABLES -A allowed -p TCP -j DROP

#
# TCP rules
#

$IPTABLES -A tcp_packets -p TCP -s 0/0 --dport 21 -j allowed
$IPTABLES -A tcp_packets -p TCP -s 0/0 --dport 22 -j allowed
$IPTABLES -A tcp_packets -p TCP -s 0/0 --dport 80 -j allowed
$IPTABLES -A tcp_packets -p TCP -s 0/0 --dport 113 -j allowed

#
# UDP ports
#

#$IPTABLES -A udp_packets -p UDP -s 0/0 --source-port 53 -j ACCEPT
#$IPTABLES -A udp_packets -p UDP -s 0/0 --source-port 123 -j ACCEPT
$IPTABLES -A udp_packets -p UDP -s 0/0 --source-port 2074 -j ACCEPT
$IPTABLES -A udp_packets -p UDP -s 0/0 --source-port 4000 -j ACCEPT

#
# In Microsoft Networks you will be swamped by broadcasts. These lines
# will prevent them from showing up in the logs.
#

#$IPTABLES -A udp_packets -p UDP -i $INET_IFACE -d $INET_BROADCAST \
#--destination-port 135:139 -j DROP

#
# If we get DHCP requests from the Outside of our network, our logs will
# be swamped as well. This rule will block them from getting logged.
#

#$IPTABLES -A udp_packets -p UDP -i $INET_IFACE -d 255.255.255.255 \
#--destination-port 67:68 -j DROP

#
# ICMP rules
#

$IPTABLES -A icmp_packets -p ICMP -s 0/0 --icmp-type 8 -j ACCEPT
$IPTABLES -A icmp_packets -p ICMP -s 0/0 --icmp-type 11 -j ACCEPT

#
# 4.1.4 INPUT chain
#

#
# Bad TCP packets we don't want.
#

$IPTABLES -A INPUT -p tcp -j bad_tcp_packets

#
# Rules for special networks not part of the Internet
#

$IPTABLES -A INPUT -p ALL -i $LO_IFACE -s $LO_IP -j ACCEPT
$IPTABLES -A INPUT -p ALL -i $LO_IFACE -s $LAN_IP -j ACCEPT
$IPTABLES -A INPUT -p ALL -i $LO_IFACE -s $INET_IP -j ACCEPT

#
# Rules for incoming packets from anywhere.
#

$IPTABLES -A INPUT -p ALL -d $INET_IP -m state --state ESTABLISHED,RELATED \
-j ACCEPT
$IPTABLES -A INPUT -p TCP -j tcp_packets
$IPTABLES -A INPUT -p UDP -j udp_packets
$IPTABLES -A INPUT -p ICMP -j icmp_packets

#
# If you have a Microsoft Network on the outside of your firewall, you may
# also get flooded by Multicasts. We drop them so we do not get flooded by
# logs
#

#$IPTABLES -A INPUT -i $INET_IFACE -d 224.0.0.0/8 -j DROP

#
# Log weird packets that don't match the above.
#

$IPTABLES -A INPUT -m limit --limit 3/minute --limit-burst 3 -j LOG \
--log-level DEBUG --log-prefix "IPT INPUT packet died: "

#
# 4.1.5 FORWARD chain
#

#
# Bad TCP packets we don't want
#

$IPTABLES -A FORWARD -p tcp -j bad_tcp_packets

#
# Accept the packets we actually want to forward
#

$IPTABLES -A FORWARD -p tcp --dport 21 -i $LAN_IFACE -j ACCEPT
$IPTABLES -A FORWARD -p tcp --dport 80 -i $LAN_IFACE -j ACCEPT
$IPTABLES -A FORWARD -p tcp --dport 110 -i $LAN_IFACE -j ACCEPT
$IPTABLES -A FORWARD -m state --state ESTABLISHED,RELATED -j ACCEPT

#
# Log weird packets that don't match the above.
#

$IPTABLES -A FORWARD -m limit --limit 3/minute --limit-burst 3 -j LOG \
--log-level DEBUG --log-prefix "IPT FORWARD packet died: "

#
# 4.1.6 OUTPUT chain
#

#
# Bad TCP packets we don't want.
#

$IPTABLES -A OUTPUT -p tcp -j bad_tcp_packets

#
# Special OUTPUT rules to decide which IP's to allow.
#

$IPTABLES -A OUTPUT -p ALL -s $LO_IP -j ACCEPT
$IPTABLES -A OUTPUT -p ALL -s $LAN_IP -j ACCEPT
$IPTABLES -A OUTPUT -p ALL -s $INET_IP -j ACCEPT

#
# Log weird packets that don't match the above.
#

$IPTABLES -A OUTPUT -m limit --limit 3/minute --limit-burst 3 -j LOG \
--log-level DEBUG --log-prefix "IPT OUTPUT packet died: "

######
# 4.2 nat table
#

#
# 4.2.1 Set policies
#

#
# 4.2.2 Create user specified chains
#

#
# 4.2.3 Create content in user specified chains
#

#
# 4.2.4 PREROUTING chain
#

#
# 4.2.5 POSTROUTING chain
#

#
# Enable simple IP Forwarding and Network Address Translation
#

$IPTABLES -t nat -A POSTROUTING -o $INET_IFACE -j SNAT --to-source $INET_IP

#
# 4.2.6 OUTPUT chain
#

######
# 4.3 mangle table
#

#
# 4.3.1 Set policies
#

#
# 4.3.2 Create user specified chains
#

#
# 4.3.3 Create content in user specified chains
#

#
# 4.3.4 PREROUTING chain
#

#
# 4.3.5 INPUT chain
#

#
# 4.3.6 FORWARD chain
#

#
# 4.3.7 OUTPUT chain
#

#
# 4.3.8 POSTROUTING chain
#
I.4. Example rc.DHCP.firewall script
#!/bin/sh
#
# rc.firewall - DHCP IP Firewall script for Linux 2.4.x and iptables
#
# Copyright (C) 2001  Oskar Andreasson <bluefluxATkoffeinDOTnet>
#
# This program is free software; you can redistribute it and/or modify
# it under the terms of the GNU General Public License as published by
# the Free Software Foundation; version 2 of the License.
#
# This program is distributed in the hope that it will be useful,
# but WITHOUT ANY WARRANTY; without even the implied warranty of
# MERCHANTABILITY or FITNESS FOR A PARTICULAR PURPOSE.  See the
# GNU General Public License for more details.
#
# You should have received a copy of the GNU General Public License
# along with this program or from the site that you downloaded it
# from; if not, write to the Free Software Foundation, Inc., 59 Temple
# Place, Suite 330, Boston, MA  02111-1307   USA
#

###########################################################################
#
# 1. Configuration options.
#

#
# 1.1 Internet Configuration.
#

INET_IFACE="eth0"

#
# 1.1.1 DHCP
#

#
# Information pertaining to DHCP over the Internet, if needed.
#
# Set DHCP variable to no if you don't get IP from DHCP. If you get DHCP
# over the Internet set this variable to yes, and set up the proper IP
# address for the DHCP server in the DHCP_SERVER variable.
#

DHCP="no"
DHCP_SERVER="195.22.90.65"

#
# 1.1.2 PPPoE
#

# Configuration options pertaining to PPPoE.
#
# If you have problem with your PPPoE connection, such as large mails not
# getting through while small mail get through properly etc, you may set
# this option to "yes" which may fix the problem. This option will set a
# rule in the PREROUTING chain of the mangle table which will clamp
# (resize) all routed packets to PMTU (Path Maximum Transmit Unit).
#
# Note that it is better to set this up in the PPPoE package itself, since
# the PPPoE configuration option will give less overhead.
#

PPPOE_PMTU="no"

#
# 1.2 Local Area Network configuration.
#
# your LAN's IP range and localhost IP. /24 means to only use the first 24
# bits of the 32 bit IP address. the same as netmask 255.255.255.0
#

LAN_IP="192.168.0.2"
LAN_IP_RANGE="192.168.0.0/16"
LAN_IFACE="eth1"

#
# 1.3 DMZ Configuration.
#

#
# 1.4 Localhost Configuration.
#

LO_IFACE="lo"
LO_IP="127.0.0.1"

#
# 1.5 IPTables Configuration.
#

IPTABLES="/usr/sbin/iptables"

#
# 1.6 Other Configuration.
#

###########################################################################
#
# 2. Module loading.
#

#
# Needed to initially load modules
#

/sbin/depmod -a

#
# 2.1 Required modules
#

/sbin/modprobe ip_conntrack
/sbin/modprobe ip_tables
/sbin/modprobe iptable_filter
/sbin/modprobe iptable_mangle
/sbin/modprobe iptable_nat
/sbin/modprobe ipt_LOG
/sbin/modprobe ipt_limit
/sbin/modprobe ipt_MASQUERADE

#
# 2.2 Non-Required modules
#

#/sbin/modprobe ipt_owner
#/sbin/modprobe ipt_REJECT
#/sbin/modprobe ip_conntrack_ftp
#/sbin/modprobe ip_conntrack_irc
#/sbin/modprobe ip_nat_ftp
#/sbin/modprobe ip_nat_irc

###########################################################################
#
# 3. /proc set up.
#

#
# 3.1 Required proc configuration
#

echo "1" > /proc/sys/net/ipv4/ip_forward

#
# 3.2 Non-Required proc configuration
#

#echo "1" > /proc/sys/net/ipv4/conf/all/rp_filter
#echo "1" > /proc/sys/net/ipv4/conf/all/proxy_arp
#echo "1" > /proc/sys/net/ipv4/ip_dynaddr

###########################################################################
#
# 4. rules set up.
#

######
# 4.1 Filter table
#

#
# 4.1.1 Set policies
#

$IPTABLES -P INPUT DROP
$IPTABLES -P OUTPUT DROP
$IPTABLES -P FORWARD DROP

#
# 4.1.2 Create userspecified chains
#

#
# Create chain for bad tcp packets
#

$IPTABLES -N bad_tcp_packets

#
# Create separate chains for ICMP, TCP and UDP to traverse
#

$IPTABLES -N allowed
$IPTABLES -N tcp_packets
$IPTABLES -N udp_packets
$IPTABLES -N icmp_packets

#
# 4.1.3 Create content in userspecified chains
#

#
# bad_tcp_packets chain
#

$IPTABLES -A bad_tcp_packets -p tcp --tcp-flags SYN,ACK SYN,ACK \
-m state --state NEW -j REJECT --reject-with tcp-reset
$IPTABLES -A bad_tcp_packets -p tcp ! --syn -m state --state NEW -j LOG \
--log-prefix "New not syn:"
$IPTABLES -A bad_tcp_packets -p tcp ! --syn -m state --state NEW -j DROP

#
# allowed chain
#

$IPTABLES -A allowed -p TCP --syn -j ACCEPT
$IPTABLES -A allowed -p TCP -m state --state ESTABLISHED,RELATED -j ACCEPT
$IPTABLES -A allowed -p TCP -j DROP

#
# TCP rules
#

$IPTABLES -A tcp_packets -p TCP -s 0/0 --dport 21 -j allowed
$IPTABLES -A tcp_packets -p TCP -s 0/0 --dport 22 -j allowed
$IPTABLES -A tcp_packets -p TCP -s 0/0 --dport 80 -j allowed
$IPTABLES -A tcp_packets -p TCP -s 0/0 --dport 113 -j allowed

#
# UDP ports
#

$IPTABLES -A udp_packets -p UDP -s 0/0 --source-port 53 -j ACCEPT
if [ $DHCP == "yes" ] ; then
 $IPTABLES -A udp_packets -p UDP -s $DHCP_SERVER --sport 67 \
 --dport 68 -j ACCEPT
fi

#$IPTABLES -A udp_packets -p UDP -s 0/0 --source-port 53 -j ACCEPT
#$IPTABLES -A udp_packets -p UDP -s 0/0 --source-port 123 -j ACCEPT
$IPTABLES -A udp_packets -p UDP -s 0/0 --source-port 2074 -j ACCEPT
$IPTABLES -A udp_packets -p UDP -s 0/0 --source-port 4000 -j ACCEPT

#
# In Microsoft Networks you will be swamped by broadcasts. These lines
# will prevent them from showing up in the logs.
#

#$IPTABLES -A udp_packets -p UDP -i $INET_IFACE \
#--destination-port 135:139 -j DROP

#
# If we get DHCP requests from the Outside of our network, our logs will
# be swamped as well. This rule will block them from getting logged.
#

#$IPTABLES -A udp_packets -p UDP -i $INET_IFACE -d 255.255.255.255 \
#--destination-port 67:68 -j DROP

#
# ICMP rules
#

$IPTABLES -A icmp_packets -p ICMP -s 0/0 --icmp-type 8 -j ACCEPT
$IPTABLES -A icmp_packets -p ICMP -s 0/0 --icmp-type 11 -j ACCEPT

#
# 4.1.4 INPUT chain
#

#
# Bad TCP packets we don't want.
#

$IPTABLES -A INPUT -p tcp -j bad_tcp_packets

#
# Rules for special networks not part of the Internet
#

$IPTABLES -A INPUT -p ALL -i $LAN_IFACE -s $LAN_IP_RANGE -j ACCEPT
$IPTABLES -A INPUT -p ALL -i $LO_IFACE -j ACCEPT

#
# Special rule for DHCP requests from LAN, which are not caught properly
# otherwise.
#

$IPTABLES -A INPUT -p UDP -i $LAN_IFACE --dport 67 --sport 68 -j ACCEPT

#
# Rules for incoming packets from the internet.
#

$IPTABLES -A INPUT -p ALL -i $INET_IFACE -m state --state ESTABLISHED,RELATED \
-j ACCEPT
$IPTABLES -A INPUT -p TCP -i $INET_IFACE -j tcp_packets
$IPTABLES -A INPUT -p UDP -i $INET_IFACE -j udp_packets
$IPTABLES -A INPUT -p ICMP -i $INET_IFACE -j icmp_packets

#
# If you have a Microsoft Network on the outside of your firewall, you may
# also get flooded by Multicasts. We drop them so we do not get flooded by
# logs
#

#$IPTABLES -A INPUT -i $INET_IFACE -d 224.0.0.0/8 -j DROP

#
# Log weird packets that don't match the above.
#

$IPTABLES -A INPUT -m limit --limit 3/minute --limit-burst 3 -j LOG \
--log-level DEBUG --log-prefix "IPT INPUT packet died: "

#
# 4.1.5 FORWARD chain
#

#
# Bad TCP packets we don't want
#

$IPTABLES -A FORWARD -p tcp -j bad_tcp_packets

#
# Accept the packets we actually want to forward
#

$IPTABLES -A FORWARD -i $LAN_IFACE -j ACCEPT
$IPTABLES -A FORWARD -m state --state ESTABLISHED,RELATED -j ACCEPT

#
# Log weird packets that don't match the above.
#

$IPTABLES -A FORWARD -m limit --limit 3/minute --limit-burst 3 -j LOG \
--log-level DEBUG --log-prefix "IPT FORWARD packet died: "

#
# 4.1.6 OUTPUT chain
#

#
# Bad TCP packets we don't want.
#

$IPTABLES -A OUTPUT -p tcp -j bad_tcp_packets

#
# Special OUTPUT rules to decide which IP's to allow.
#

$IPTABLES -A OUTPUT -p ALL -s $LO_IP -j ACCEPT
$IPTABLES -A OUTPUT -p ALL -s $LAN_IP -j ACCEPT
$IPTABLES -A OUTPUT -p ALL -o $INET_IFACE -j ACCEPT

#
# Log weird packets that don't match the above.
#

$IPTABLES -A OUTPUT -m limit --limit 3/minute --limit-burst 3 -j LOG \
--log-level DEBUG --log-prefix "IPT OUTPUT packet died: "

######
# 4.2 nat table
#

#
# 4.2.1 Set policies
#

#
# 4.2.2 Create user specified chains
#

#
# 4.2.3 Create content in user specified chains
#

#
# 4.2.4 PREROUTING chain
#

#
# 4.2.5 POSTROUTING chain
#

if [ $PPPOE_PMTU == "yes" ] ; then
 $IPTABLES -t nat -A POSTROUTING -p tcp --tcp-flags SYN,RST SYN \
 -j TCPMSS --clamp-mss-to-pmtu
fi
$IPTABLES -t nat -A POSTROUTING -o $INET_IFACE -j MASQUERADE

#
# 4.2.6 OUTPUT chain
#

######
# 4.3 mangle table
#

#
# 4.3.1 Set policies
#

#
# 4.3.2 Create user specified chains
#

#
# 4.3.3 Create content in user specified chains
#

#
# 4.3.4 PREROUTING chain
#

#
# 4.3.5 INPUT chain
#

#
# 4.3.6 FORWARD chain
#

#
# 4.3.7 OUTPUT chain
#

#
# 4.3.8 POSTROUTING chain
#
I.5. Example rc.flush-iptables script
#!/bin/sh
#
# rc.flush-iptables - Resets iptables to default values.
#
# Copyright (C) 2001  Oskar Andreasson <bluefluxATkoffeinDOTnet>
#
# This program is free software; you can redistribute it and/or modify
# it under the terms of the GNU General Public License as published by
# the Free Software Foundation; version 2 of the License.
#
# This program is distributed in the hope that it will be useful,
# but WITHOUT ANY WARRANTY; without even the implied warranty of
# MERCHANTABILITY or FITNESS FOR A PARTICULAR PURPOSE.  See the
# GNU General Public License for more details.
#
# You should have received a copy of the GNU General Public License
# along with this program or from the site that you downloaded it
# from; if not, write to the Free Software Foundation, Inc., 59 Temple
# Place, Suite 330, Boston, MA  02111-1307   USA

#
# Configurations
#
IPTABLES="/usr/sbin/iptables"

#
# reset the default policies in the filter table.
#
$IPTABLES -P INPUT ACCEPT
$IPTABLES -P FORWARD ACCEPT
$IPTABLES -P OUTPUT ACCEPT

#
# reset the default policies in the nat table.
#
$IPTABLES -t nat -P PREROUTING ACCEPT
$IPTABLES -t nat -P POSTROUTING ACCEPT
$IPTABLES -t nat -P OUTPUT ACCEPT

#
# reset the default policies in the mangle table.
#
$IPTABLES -t mangle -P PREROUTING ACCEPT
$IPTABLES -t mangle -P OUTPUT ACCEPT

#
# flush all the rules in the filter and nat tables.
#
$IPTABLES -F
$IPTABLES -t nat -F
$IPTABLES -t mangle -F
#
# erase all chains that's not default in filter and nat table.
#
$IPTABLES -X
$IPTABLES -t nat -X
$IPTABLES -t mangle -X
I.6. Example rc.test-iptables script
#!/bin/bash
#
# rc.test-iptables - test script for iptables chains and tables.
#
# Copyright (C) 2001  Oskar Andreasson <bluefluxATkoffeinDOTnet>
#
# This program is free software; you can redistribute it and/or modify
# it under the terms of the GNU General Public License as published by
# the Free Software Foundation; version 2 of the License.
#
# This program is distributed in the hope that it will be useful,
# but WITHOUT ANY WARRANTY; without even the implied warranty of
# MERCHANTABILITY or FITNESS FOR A PARTICULAR PURPOSE.  See the
# GNU General Public License for more details.
#
# You should have received a copy of the GNU General Public License
# along with this program or from the site that you downloaded it
# from; if not, write to the Free Software Foundation, Inc., 59 Temple
# Place, Suite 330, Boston, MA  02111-1307   USA
#

#
# Filter table, all chains
#
iptables -t filter -A INPUT -p icmp --icmp-type echo-request \
-j LOG --log-prefix="filter INPUT:"
iptables -t filter -A INPUT -p icmp --icmp-type echo-reply \
-j LOG --log-prefix="filter INPUT:"
iptables -t filter -A OUTPUT -p icmp --icmp-type echo-request \
-j LOG --log-prefix="filter OUTPUT:"
iptables -t filter -A OUTPUT -p icmp --icmp-type echo-reply \
-j LOG --log-prefix="filter OUTPUT:"
iptables -t filter -A FORWARD -p icmp --icmp-type echo-request \
-j LOG --log-prefix="filter FORWARD:"
iptables -t filter -A FORWARD -p icmp --icmp-type echo-reply \
-j LOG --log-prefix="filter FORWARD:"

#
# NAT table, all chains except OUTPUT which don't work.
#
iptables -t nat -A PREROUTING -p icmp --icmp-type echo-request \
-j LOG --log-prefix="nat PREROUTING:"
iptables -t nat -A PREROUTING -p icmp --icmp-type echo-reply \
-j LOG --log-prefix="nat PREROUTING:"
iptables -t nat -A POSTROUTING -p icmp --icmp-type echo-request \
-j LOG --log-prefix="nat POSTROUTING:"
iptables -t nat -A POSTROUTING -p icmp --icmp-type echo-reply \
-j LOG --log-prefix="nat POSTROUTING:"
iptables -t nat -A OUTPUT -p icmp --icmp-type echo-request \
-j LOG --log-prefix="nat OUTPUT:"
iptables -t nat -A OUTPUT -p icmp --icmp-type echo-reply \
-j LOG --log-prefix="nat OUTPUT:"

#
# Mangle table, all chains
#
iptables -t mangle -A PREROUTING -p icmp --icmp-type echo-request \
-j LOG --log-prefix="mangle PREROUTING:"
iptables -t mangle -A PREROUTING -p icmp --icmp-type echo-reply \
-j LOG --log-prefix="mangle PREROUTING:"
iptables -t mangle -I FORWARD 1 -p icmp --icmp-type echo-request \
-j LOG --log-prefix="mangle FORWARD:"
iptables -t mangle -I FORWARD 1 -p icmp --icmp-type echo-reply \
-j LOG --log-prefix="mangle FORWARD:"
iptables -t mangle -I INPUT 1 -p icmp --icmp-type echo-request \
-j LOG --log-prefix="mangle INPUT:"
iptables -t mangle -I INPUT 1 -p icmp --icmp-type echo-reply \
-j LOG --log-prefix="mangle INPUT:"
iptables -t mangle -A OUTPUT -p icmp --icmp-type echo-request \
-j LOG --log-prefix="mangle OUTPUT:"
iptables -t mangle -A OUTPUT -p icmp --icmp-type echo-reply \
-j LOG --log-prefix="mangle OUTPUT:"
iptables -t mangle -I POSTROUTING 1 -p icmp --icmp-type echo-request \
-j LOG --log-prefix="mangle POSTROUTING:"
iptables -t mangle -I POSTROUTING 1 -p icmp --icmp-type echo-reply \
-j LOG --log-prefix="mangle POSTROUTING:"